
There’s a quiet magic in the old ways of baking, isn’t there? It’s not just about mixing flour and water; it’s about tapping into nature itself to make something rise, something complex and delicious without relying on those little packets of commercial yeast. When I first found myself disconnected from my grandmother Daisy’s kitchen, baking felt impossible. But creating my very first sourdough starter from scratch—that felt like coming home.
Trust me, if you have ever wanted to bake real, rustic loaves, this guide is for you. I’ve broken down the whole seven-day process into the simplest, most manageable steps. This is truly the easiest, day-by-day guide to help any first time sourdough baker cultivate their own vibrant, bubbly culture right on the counter. We’re keeping it simple, just flour and water, starting from scratch! I hope this leads you to making amazing loaves like my Sourdough Sandwich Bread someday soon.
- Sourdough 101: Why You Need an Active Sourdough Starter
- Gathering Supplies for Your Sourdough Starter Recipe
- Day-by-Day Guide: How to Create Sourdough Starter at Home
- Expert Tips for Successful Sourdough Starter Fermentation
- Sourdough Maintenance Tips for Long-Term Health
- Transitioning: From Sourdough Starter to Artisan Bread Foundation
- Frequently Asked Questions About Your New Sourdough Starter
- Understanding Sourdough Levain and Starter Variations
- Nutritional Estimates for Flour and Water Starter
- Share Your First Bubbly Sourdough Starter Success
- Understanding Sourdough Levain and Starter Variations
- Nutritional Estimates for Flour and Water Starter
- Share Your First Bubbly Sourdough Starter Success
Sourdough 101: Why You Need an Active Sourdough Starter
If you think baking bread without yeast is some kind of black magic, let me stop you right there! This is the foundation of no yeast baking, and it’s all thanks to the humble sourdough starter. Think of this culture as the essential starting point for every incredible loaf of artisan bread foundation you’ll ever make. It gives you that tangy flavor, better texture, and folks say it’s easier on the tummy, too. If you’re looking for sourdough for dummies advice, this is where you start!
My grandmother, Daisy, relied on this completely natural leavening. She knew that once you capture those tiny organisms, you unlock a whole new world of flavor that commercial yeasts just can’t touch. You’ll want to check out some great initial concepts over at this beginner sourdough guide to get the broader picture too.
The Science of Your Homemade Sourdough Culture
So, what are you actually capturing in that jar? It’s wild yeast and protective lactic acid bacteria floating around! These guys eat the sugars in the flour and create the carbon dioxide that makes your bread puff up beautifully. When you’re growing your homemade sourdough culture, you are essentially feeding a tiny ecosystem. When it’s lively, that means the yeast is gassy and ready to lift your dough. It’s really just the oldest, most honest way to bake; forget the store-bought stuff!
Once you master this first step, you’ll find inspiration for things like my sourdough banana bread recipe are just waiting for you!
Gathering Supplies for Your Sourdough Starter Recipe
Before we get into the mixing—because this is serious business, you need the right tools and, more importantly, the right raw ingredients! You don’t need a giant stand mixer or specialized gear to begin this sourdough starter recipe journey. Precision matters here, which is why I started weighing things right from the jump. My grandmother used cups, bless her heart, but weighing ensures the wild yeast gets exactly what it needs to thrive.
You’ll need a clean glass jar (maybe a quart size), a rubber spatula for mixing, and definitely a digital kitchen scale. Accuracy is key for capturing those wild spores!
Here’s what you need to grab before Day 1:
- 100g Whole Wheat Flour or Rye Flour (This sounds strange, but trust me, this is for the initial activation!)
- 100g Unbleached All-Purpose Flour (This is what we switch to for regular feeding.)
- 100g Unchlorinated Water (Room temperature—this is critical, and I’ll tell you why in a minute!)
Getting these simple components ready establishes the groundwork for a strong future loaf. You can find more easy setup tips for your DIY starter guide online, but these basic supplies are all you need to start!
Ingredient Notes and Water Quality for Your Flour and Water Starter
Let’s talk flour first. I know it seems fussy, but Day 1 requires whole wheat or rye. Why? Those flours still have the bran and germ attached, which are packed with the natural microbes we are trying to attract! It gives our little yeast friends a better welcome party, so to speak. After Day 3, when things are bubbling nicely, we switch exclusively to unbleached all-purpose flour since the culture is established now.
Now for the water—this is where many people trip up without realizing it! See, chlorine in tap water is designed to kill bacteria and microbes. We are trying to *grow* microbes! If your water is heavily chlorinated, it can slow down or even stop your entire process. You must use filtered or distilled or even spring water for your flour and water starter. If you only have tap water, leave it in an open container on the counter for 24 hours; sometimes that lets the chlorine gas off. It sounds like a lot of fuss over water, but trust me, ensuring it’s clean is one of my top secrets for a healthy culture.
Day-by-Day Guide: How to Create Sourdough Starter at Home
Alright, this is where the fun—and the waiting!—begins. Making your sourdough starter isn’t hard, but it requires commitment for the first week. We are following a very specific schedule based on feeding equal parts starter, flour, and water, which you’ll see clearly below. Just remember, patience is the secret ingredient in every DIY starter guide!
You need to keep your jar loosely covered at room temperature. I mean loosely! These young cultures need to breathe so the wild yeasts can develop properly. Don’t panic if nothing happens on Day 2; that’s totally normal. Just stick to the routine, and you’ll see results.
Days 1-3: Initial Activation and First Feedings
For Day 1, grab that rye or whole wheat flour we talked about. Mix 50 grams of it with 50 grams of room-temp water in your clean jar until it looks like thick pancake batter. Cover it loosely and let it sit for 24 hours.
On Day 2, you might see a tiny bubble or two, or maybe nothing at all. Either way, we discard half of what’s in the jar! Then, you feed the remaining half with 50 grams of your *all-purpose* flour and 50 grams of water. Keep doing this exact discard-and-feed process for Day 3. By the end of Day 3, we are hoping to see some definite activity, like a few small bubbles or a slight sour smell.
Days 4-7: Developing an Active Sourdough Starter
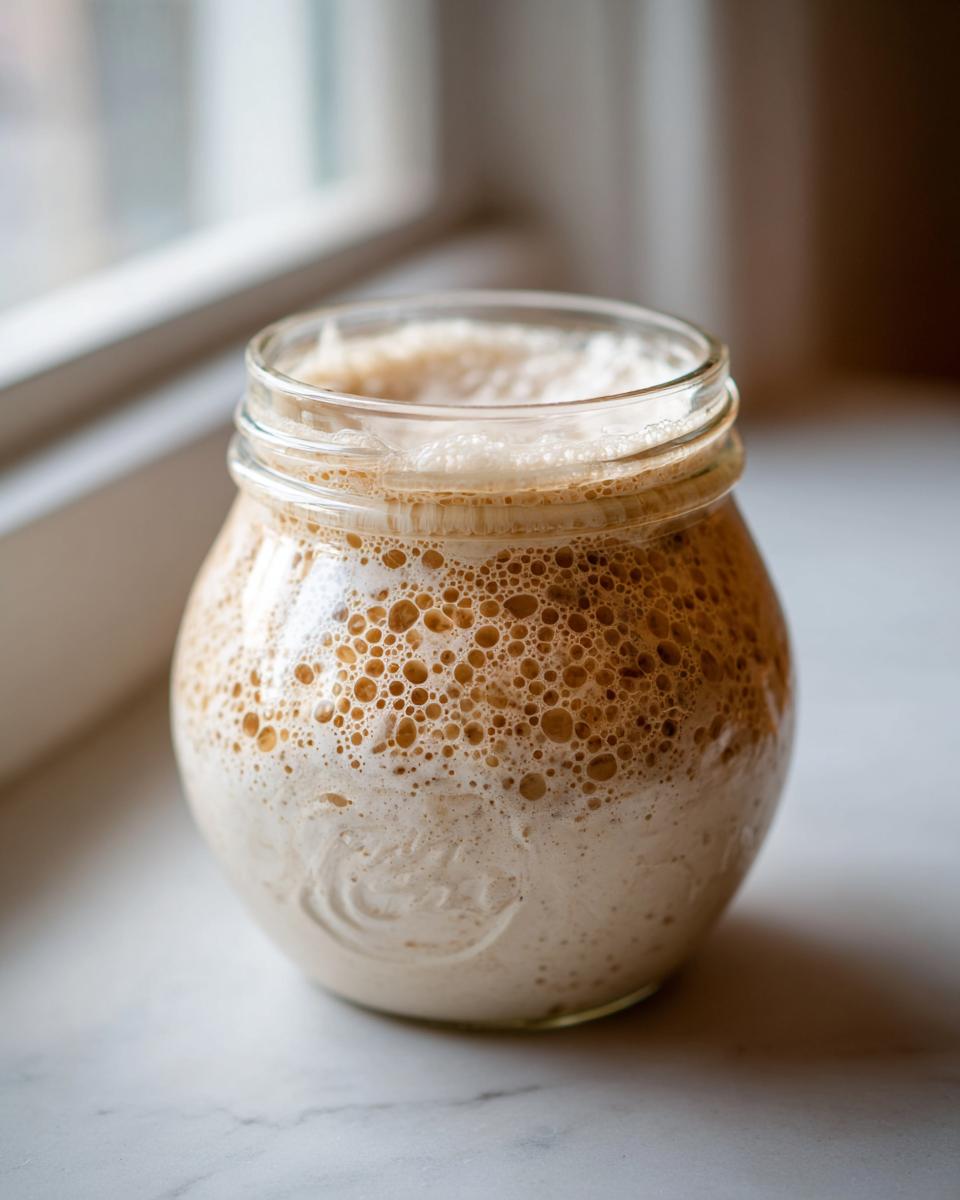
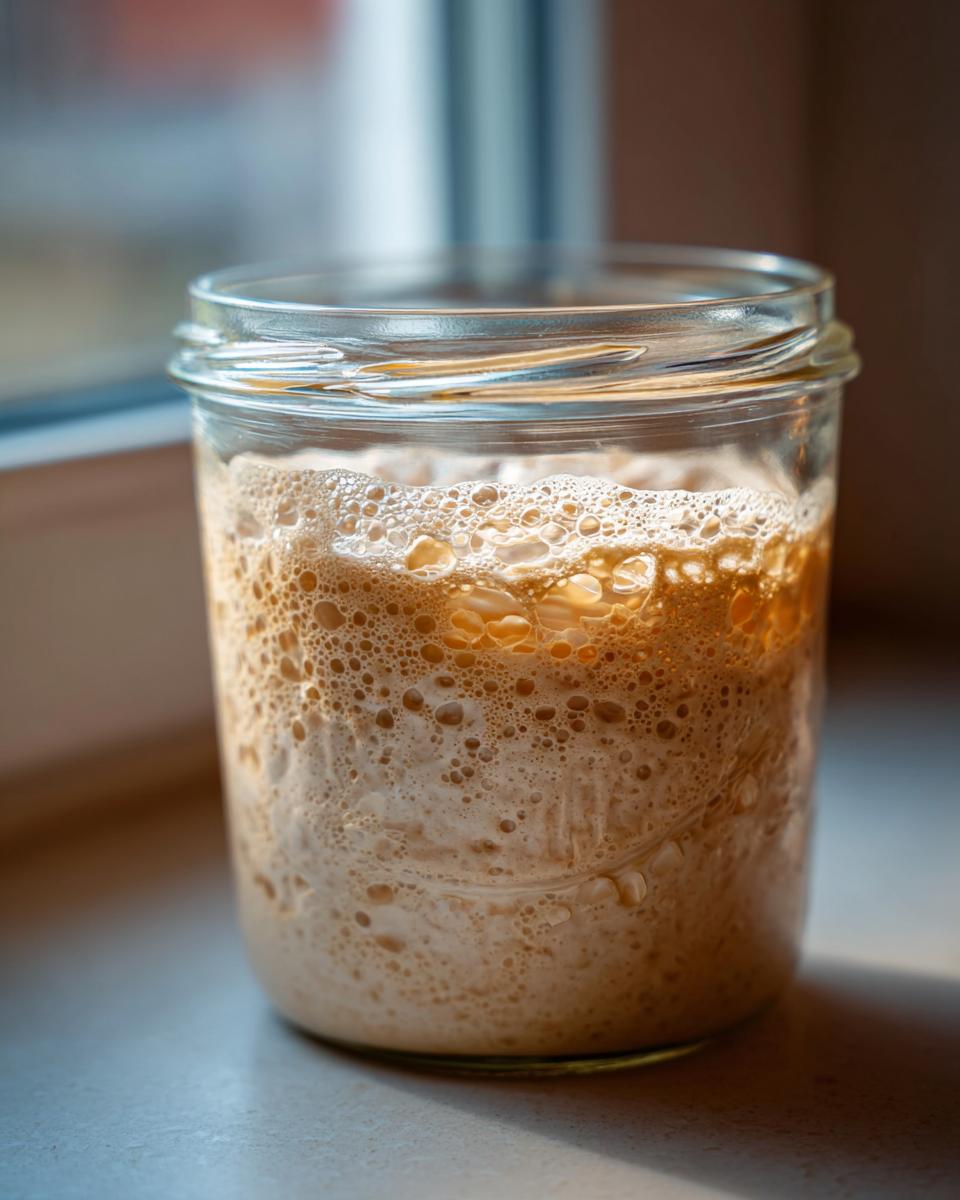
From Day 4 onward, you need to check on your culture more often. Depending on how warm your kitchen is, you might need to feed it every 12 hours instead of just once a day to keep those yeasties happy and fed. The goal here is consistency to develop that active sourdough starter we need for baking. You are looking for it to reliably double its size within about 4 to 8 hours after you feed it.
By Day 7, if it’s passing the ‘doubling test’—meaning it gets big and bubbly after feeding—congratulations! You’ve done the hardest part. You now have a healthy, homemade culture. If you need a refresher on timing, you can see a great flow chart over at this easy homemade guide. Keep mixing and feeding that glorious goo, and don’t forget you can use the discard to make yummy discard banana muffins!
Expert Tips for Successful Sourdough Starter Fermentation
Now that you’ve got your sourdough starter going, you might start noticing it doing weird things. That’s okay! This is the fermentation stage, and it’s where you really step up from just following directions to actually understanding your culture. Remember how I said temperature matters? If you’re baking in the dead of winter, your kitchen might feel downright arctic to a tiny bit of yeast. Daisy always said, “Don’t let the cold trick you into thinking they’ve gone dormant.”
The key to success right now is consistency, just like in my chocolate chip cookie recipe. If you feed it every 24 hours, stick to that schedule. If you notice it struggling to double, you might need to move it to a warmer spot or switch to feeding every 12 hours until it gets really strong. We want predictable behavior, not surprise dormancy!
Troubleshooting Common Issues in Your Sourdough Starter
Don’t panic if you see any of these things—it usually means you just need to adjust its environment or its diet. Dealing with sourdough starter troubleshooting is part of the journey, honestly.
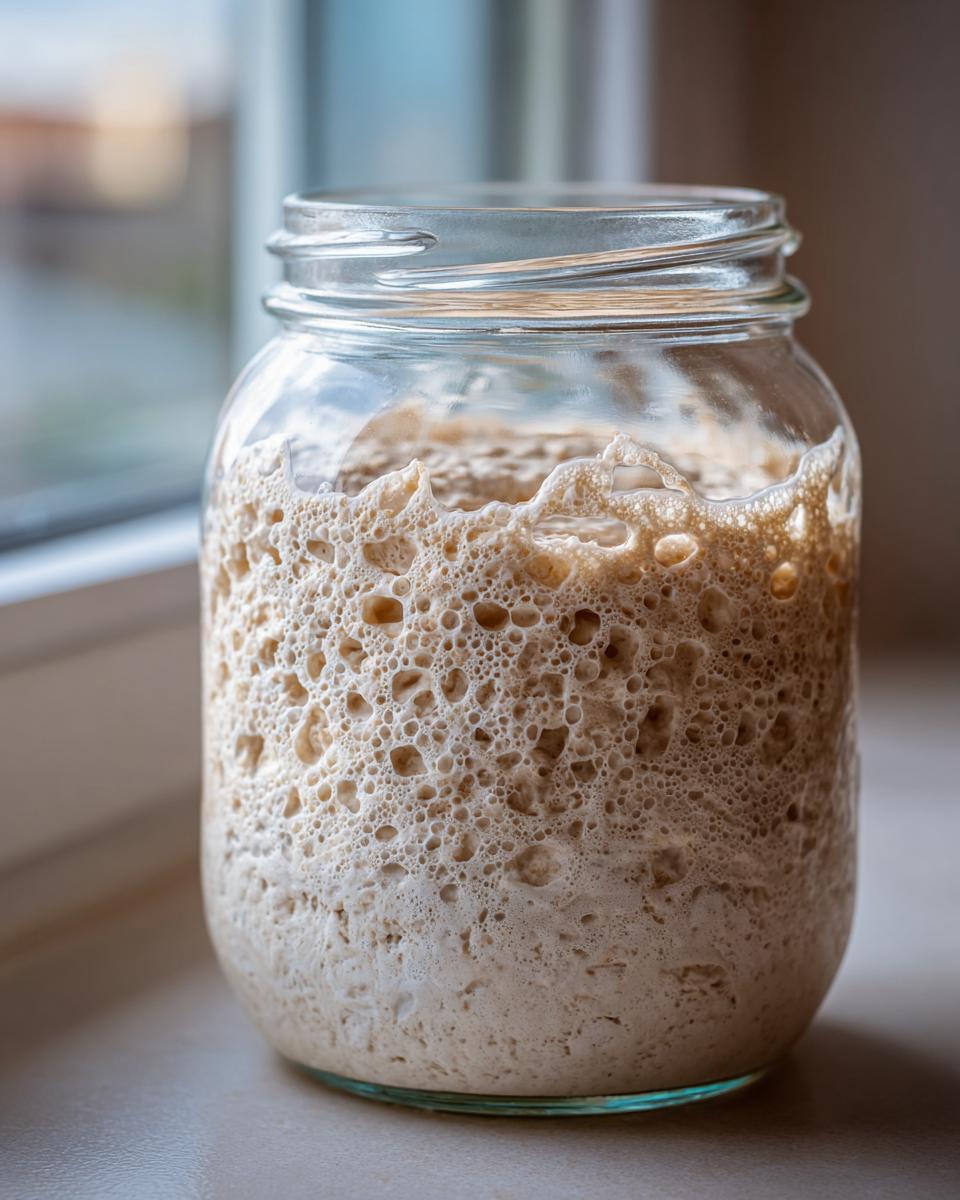
The most common thing you’ll see is liquid pooling on top. That’s called ‘hooch,’ and it’s just a sign your starter is hungry! It’s alcohol produced by the yeast when they run out of food. If you see hooch, just stir it back in for extra tang, or pour it off, discard half your starter, and feed it right away. It’s not bad at all; it’s a cry for more food!
What about mold? If you see anything fuzzy, pink, blue, or black, that’s the scary one. Chances are, you didn’t use clean equipment or your water was contaminated. If you see mold, you have to toss the whole thing and start over—safety first! This is why clean jars are so important.
If things seem sluggish, especially in a cool kitchen, try moving your jar to a warmer spot for a few days until you see reliable doubling. You can find some great tips on using cool environments to your advantage, especially in winter, over at this easy fluffy starter guide to keep the fermentation steady!
Sourdough Maintenance Tips for Long-Term Health
Okay, now that you have successfully taught wild yeast how to behave—amazing job!—you need to keep your sourdough starter healthy for the long haul. This culture is meant to be kept alive for years, becoming a true kitchen heirloom. You have two main paths now: keeping it on the counter for daily baking, or storing it in the fridge for occasional use. Both methods require implementing solid sourdough maintenance tips.
If you plan to bake every day or every other day, keeping it happy on the counter is easy. But be warned, this means you are committing to regular feeding sourdough starter duties, kinda like caring for a pet! If life gets busy, stashing it in the back of the fridge is your best friend. It essentially puts the little guys into hibernation until you need them.
When and How to Feed Your Sourdough Starter
Whether it’s on the counter or in the fridge, the feeding ratio is the most important thing to nail down. For a strong, active culture, we stick to a weight-based 1:1:1 ratio. Say that out loud: one part starter, one part flour, one part water. For example, if you keep 50 grams of starter in your jar after your last feeding, you’ll feed it 50 grams of flour and 50 grams of water.
If your starter is on the counter, it should be hungry and starting to fall after doubling, usually every 12 to 24 hours. You really want to feed it when it’s at its peak height or just starting to recede. When you plan to actually mix your dough for that amazing artisan loaf, you need to give it a fresh feed about 4 to 12 hours beforehand. You want that starter to be booming—doubled in size and full of visible bubbles—right when you need it for mixing dough.
If you’re storing it in the fridge, you only need to pull it out once a week, discard most of it, and give it that 1:1:1 feed. Let it sit on the counter for an hour or two after feeding so it perks up before going back into the cold. Remember, using up the discard makes for delicious things like my sourdough discard muffins! Never feel guilty about discarding!
Transitioning: From Sourdough Starter to Artisan Bread Foundation
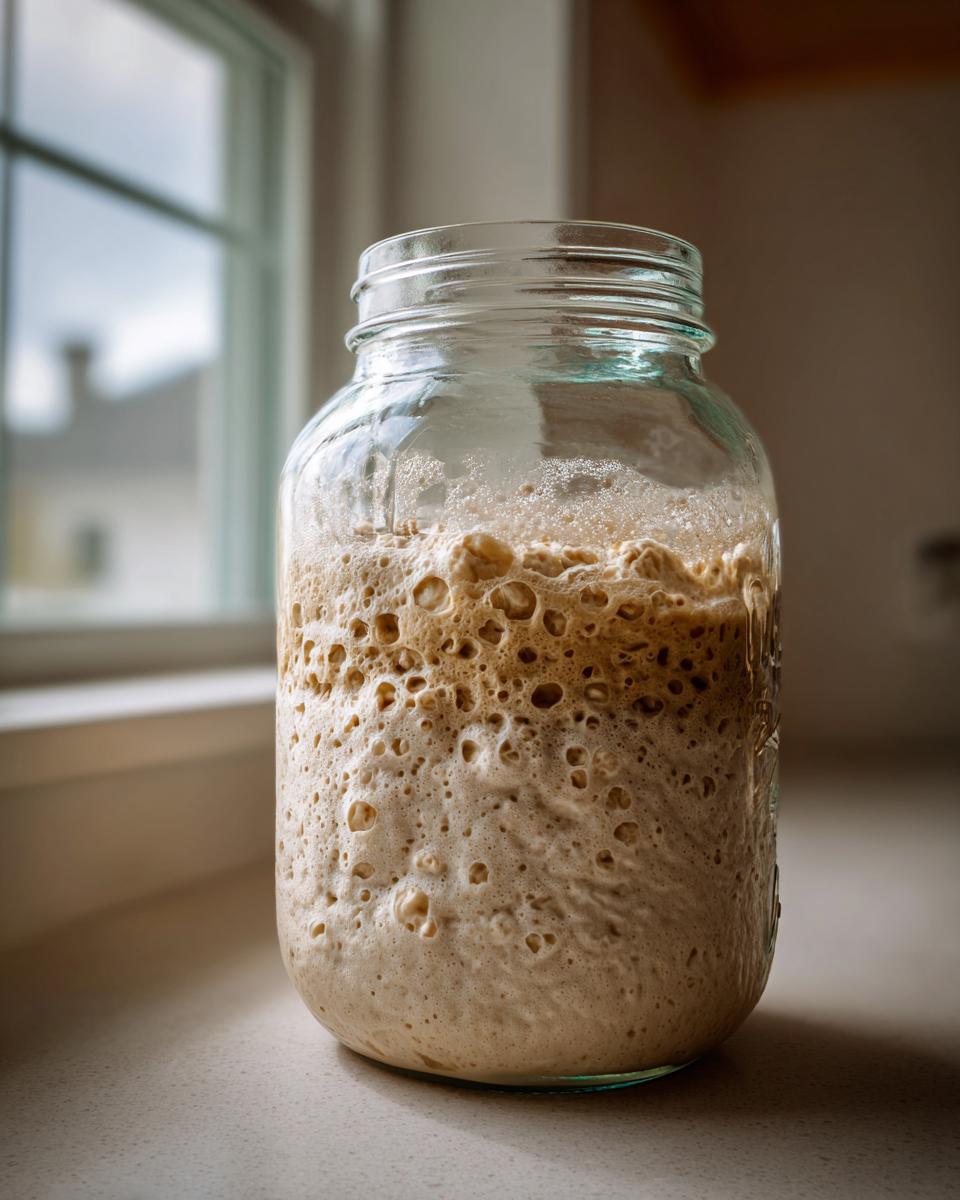
So, you made it! You’ve babysat your jar of flour and water, you’ve got a nice, smelly, bubbly culture sitting right there, and you’re ready for the next step. This active sourdough starter isn’t just a fun science experiment; it’s the actual living core of your future loaves! This is the moment you transition from creating the culture to using it as your artisan bread foundation.
Before you even think about mixing your dough, you need to know your starter is ready to work hard for you. Don’t just eyeball it! You need to watch for specific signs that show the wild yeast is at its absolute strongest point. If you use it too early, your bread will be dense—and we worked all week to avoid dense bread!
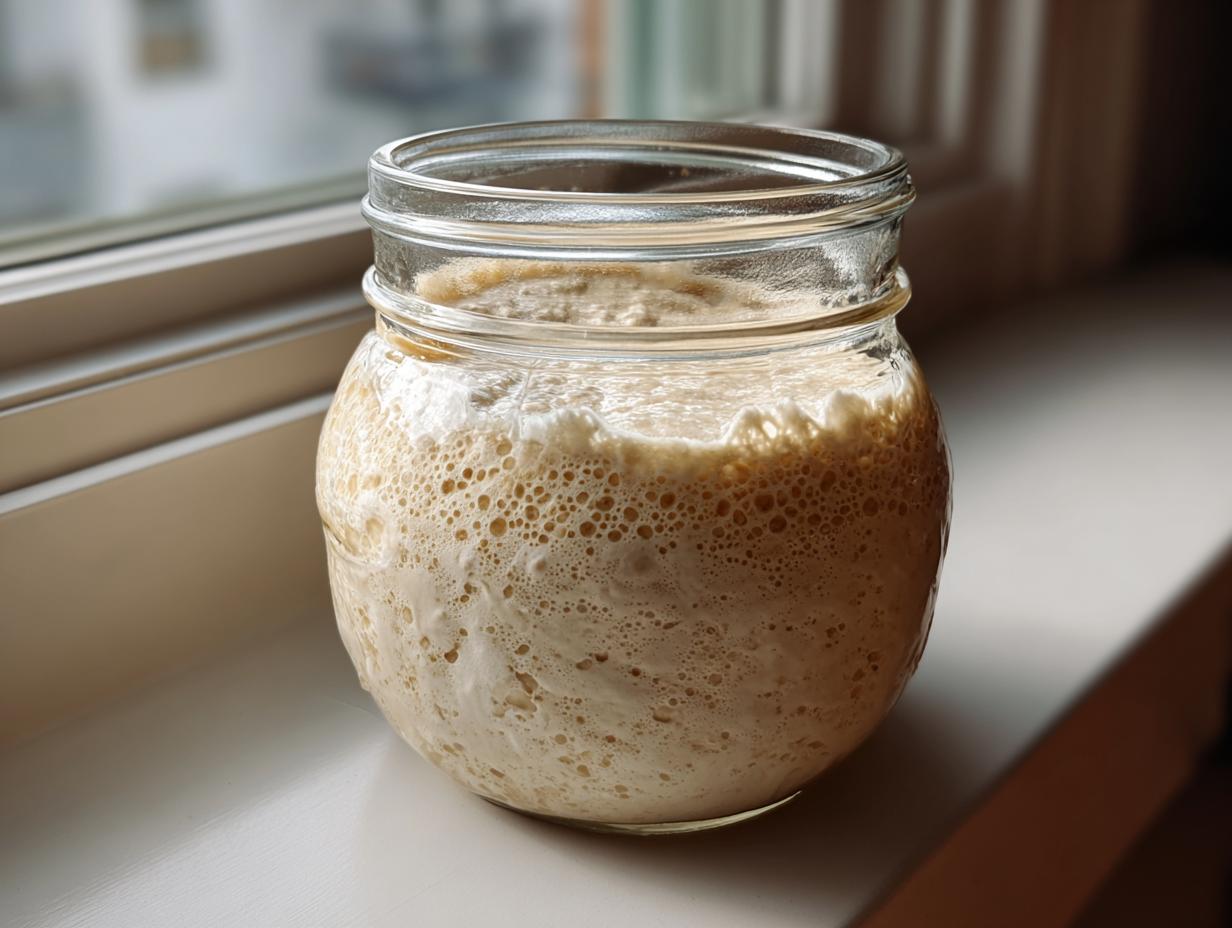
This is where we get into baking with starter basics. The main thing to look for is that doubling action. When you feed it, wait until it has reliably doubled in volume, maybe even a little more. You should see tons of activity inside—big air pockets stretching the entire mass!
Also, pay attention to that smell. When it’s truly ready for baking, the aroma shouldn’t be overwhelmingly sour or vinegary; it should smell tangy, yeasty, and complex—almost like strong yogurt or fresh beer. If it smells like nail polish remover, feed it again and wait a few more hours before mixing your dough.
Once you see that peak growth, use it right away! That’s the sweet spot where the natural leavening power is maximum. You can use that perfect starter today, or you can feed it again and use it tomorrow. When you’re ready to try it out, think about something easy like my Sourdough French Toast before tackling a full loaf. You’ve earned that satisfying first bake!
Frequently Asked Questions About Your New Sourdough Starter
I know you probably have a million questions swirling around in your head, especially after watching that jar for a whole week! That’s perfectly normal for a first time sourdough baker. When I was learning this process using just flour and water, I thought every little bubble meant success or failure. Don’t worry, most of the mystery dissolves once you gain a little confidence!
Here are a few things I get asked constantly when teaching people my beginner sourdough guide:
How long until my sourdough starter is reliably active?
This is the million-dollar question! Truthfully, it varies a lot based on your kitchen temperature. Most people see their sourdough starter really start hitting its stride—meaning it reliably doubles in size within 4 to 8 hours after a feeding—somewhere between Day 6 and Day 10. If your kitchen is a bit chilly, it might take closer to two weeks. You are looking for consistency, not just a one-time spectacular rise on Day 3 that immediately collapses. Remember, this is natural leavening; it takes time to build that robust culture!
Can I use whole wheat flour for every feeding?
You absolutely *can*, and many seasoned bakers prefer doing it for long-term health! As I mentioned in the instructions, we start with whole grain flour because it wakes up the yeast faster. If you want to stick with whole wheat or rye for all your feeding sourdough starter sessions after Day 3, go for it! Those flours do contain more nutrients for the microbes. The trade-off is that your starter might smell funkier or require a slightly more frequent feeding schedule than one fed only with all-purpose flour. If you want to try out a different variety later on, you can explore some starter variations to see what you like best for your style of bread!
What should I do with the leftover starter that I discard?
Oh, the discard! My grandmother never threw any of it away; she’d always say, “Waste not, want not, Amelia!” The discard is perfectly good—it just isn’t bubbly enough yet to actually lift bread dough. You should never throw it away, because that’s where the flavor compounds are developing! Instead, save it in a separate jar in the fridge. Once you have about a cup saved up, you can use it in so many things that don’t require high leavening power. I love whipping up a batch of my moist sourdough banana bread using the leftovers. It gives baked goods that wonderful, subtle tang!
What is that gross-smelling liquid that sometimes forms on top?
That’s what we affectionately call ‘hooch’! Don’t let the name scare you; it’s completely harmless, though it does look a little strange—like a layer of gray or dark water. Hooch is simply alcohol produced by the yeast when they run out of food and start stressing a bit. It’s your starter’s way of telling you, “Hey, I’m hungry!” If you see it, just stir it back into the mixture for extra depth, discard half, and give it a good, fresh feeding. It’s a sure sign your sourdough starter needs more frequent attention.
Understanding Sourdough Levain and Starter Variations
Once you have your happy, bubbly jar on the counter, you might start hearing bakers throw around terms like sourdough levain, and it can sound a little confusing at first. Think of your main jar—the one you feed daily to keep it alive—as your Mother Culture. It’s your dependable long-term investment!
A levain, however, is typically just a *portion* of that mother culture that you deliberately feed again, usually at a higher ratio of flour and water, specifically preparing it for baking bread in the next 4 to 12 hours. It’s like pulling a portion away from the main family unit to send it on a specific mission to bake a loaf. When I prepare my artisan bread, I always build a levain the night before I mix the dough so it’s at its absolute peak strength, ready for that big rise.
There are tons of ways to keep your sourdough starter alive—some people use stiff, thick starters (less water) or switch between rye, corn, and different wheat flours. But for your very first culture, stick to the simple, liquid one we made here. It’s the most straightforward way to learn the rhythms of natural leavening before you start experimenting with thicker, stiffer cultures! It’s amazing how just flour and water can turn into something so complex! I love using my mature starter in other simple bakes, too, like this easy 3-ingredient beer bread recipe.
Nutritional Estimates for Flour and Water Starter
Since we are making a pure live culture here—not a baked good—the nutritional breakdown is pretty basic, reflecting only the uncooked flour and water we started with. This data is estimated based on the ingredients used in a single feeding cycle before the bulk of the starter is discarded. Please remember this isn’t meant for a baked product, and these numbers change rapidly depending on how much you discard.
- Serving Size: N/A (Culture)
- Calories: 10
- Sugar: 0.1g
- Sodium: 0mg
- Fat: 0.1g
- Carbohydrates: 2g
- Protein: 0.5g
- Cholesterol: 0mg
Share Your First Bubbly Sourdough Starter Success
I’m so incredibly proud of you for taking this step! Creating your own sourdough starter is a huge achievement, and it connects you to centuries of bakers who relied on nothing more than nature to make their daily bread. I truly hope this DIY starter guide made the process feel accessible and maybe even fun, despite the daily commitment!
Now, I want to hear all about it! Did you see bubbles on Day 2? Did you choose rye or whole wheat to start? Drop a comment below and tell me how your journey with your new culture is going. Seeing those first few successful bakes is the best payoff, and I absolutely love seeing photos of your beautiful, risen loaves! If you need inspiration for what to make once you’re ready, I have plenty of recipes waiting for you. If you had a great experience, maybe check out what other folks are saying over at this favorite guide too!
Understanding Sourdough Levain and Starter Variations
Once you have your happy, bubbly jar on the counter, you might start hearing bakers throw around terms like sourdough levain, and it can sound a little confusing at first. Think of your main jar—the one you feed daily to keep it alive—as your Mother Culture. It’s your dependable long-term investment!
A levain, however, is typically just a *portion* of that mother culture that you deliberately feed again, usually at a higher ratio of flour and water, specifically preparing it for baking bread in the next 4 to 12 hours. It’s like pulling a portion away from the main family unit to send it on a specific mission to bake a loaf. When I prepare my artisan bread, I always build a levain the night before I mix the dough so it’s at its absolute peak strength, ready for that big rise.
There are tons of ways to keep your sourdough starter alive—some people use stiff, thick starters (less water) or switch between rye, corn, and different wheat flours. But for your very first culture, stick to the simple, liquid one we made here. It’s the most straightforward way to learn the rhythms of natural leavening before you start experimenting with thicker, stiffer cultures! It’s amazing how just flour and water can turn into something so complex! I love using my mature starter in other simple bakes, too, like this easy 3-ingredient beer bread recipe.
Nutritional Estimates for Flour and Water Starter
I know this seems a little silly since we aren’t actually eating a full jar of this *before* we feed it, but people always ask, right? Since we are just mixing flour and water—the core of every flour and water starter—we can estimate what’s in the culture based on the ingredients we use in that feeding.
I want to be really clear: this isn’t the nutrition breakdown for a beautiful loaf of artisan bread. This is just an estimate for the culture itself, which you’ll largely be discarding before baking. But for anyone curious about what’s going on in that jar before you get that bubbly result, here are the rough numbers based on the feeding amounts:
- Serving Size: N/A (Culture)
- Calories: 10
- Sugar: 0.1g
- Sodium: 0mg
- Fat: 0.1g
- Carbohydrates: 2g
- Protein: 0.5g
- Cholesterol: 0mg
See? Not very exciting yet! That’s because all the real flavor, the texture, and the nutrition that makes sourdough so fantastic comes later, once the wild yeast and bacteria get to work breaking down those components. For now, just know that you’re feeding those little guys and building up your sourdough starter for bigger and better things!
Share Your First Bubbly Sourdough Starter Success
I’m so incredibly proud of you for taking this step! Creating your own sourdough starter is a huge achievement, and it connects you to centuries of bakers who relied on nothing more than nature to make their daily bread. I truly hope this DIY starter guide made the process feel accessible and maybe even fun, despite the daily commitment!
Now, I want to hear all about it! Did you see bubbles on Day 2? Did you choose rye or whole wheat to start? Drop a comment below and tell me how your journey with your new culture is going. Seeing those first few successful bakes is the best payoff, and I absolutely love seeing photos of your beautiful, risen loaves! If you need inspiration for what to make once you’re ready, I have plenty of recipes waiting for you. If you had a great experience, especially as a first time sourdough baker, check out what other folks are saying over at this favorite guide too!
Don’t forget, that newly bubbly starter can go right into my recipe for easy moist jello poke cake if you want to use some of your discard right away! Keep that connection to the kitchen alive!
PrintThe Ultimate Beginner’s Guide: How to Make a Bubbly Sourdough Starter From Scratch (Step-by-Step)
Learn how to create your own active sourdough starter using only flour and water. This easy, day-by-day guide is perfect for the first time sourdough baker wanting to master natural leavening.
- Prep Time: 5 min daily
- Cook Time: 0 min
- Total Time: 7 days (active creation period)
- Yield: One active culture
- Category: Baking Foundation
- Method: Natural Fermentation
- Cuisine: American
- Diet: Vegetarian
Ingredients
- 100g Whole Wheat Flour or Rye Flour (for initial activation)
- 100g Unbleached All-Purpose Flour (for subsequent feedings)
- 100g Unchlorinated Water (room temperature)
Instructions
- Day 1: Mix 50g of whole wheat or rye flour with 50g of room temperature water in a clean jar. Stir until fully combined. Cover loosely and leave at room temperature (ideally 70-75°F) for 24 hours.
- Day 2: You may see small bubbles or no activity. Discard half of the mixture. Add 50g of all-purpose flour and 50g of water to the remaining starter. Mix well, cover loosely, and wait 24 hours.
- Day 3: You should see some activity now. Discard half. Feed with 50g of all-purpose flour and 50g of water. Mix and wait 24 hours.
- Day 4: Discard half. Feed with 50g of all-purpose flour and 50g of water. If your kitchen is cool, you may need to wait 24-36 hours between feedings.
- Day 5: Continue discarding half and feeding with 50g of all-purpose flour and 50g of water every 12 to 24 hours. The starter should begin to double in size predictably after feeding.
- Day 6 & 7: Your sourdough starter should now be reliably doubling in size within 4 to 8 hours after feeding, showing many bubbles, and smelling pleasantly sour. This is an active sourdough starter ready for baking.
- Maintenance: Once active, switch to feeding once daily if kept at room temperature, or once a week if stored in the refrigerator. Always use equal parts starter, flour, and water for feeding (a 1:1:1 ratio by weight).
Notes
- Use filtered or bottled water if your tap water contains chlorine, as chlorine can slow down the wild yeast growth.
- A consistent temperature helps fermentation. If your kitchen is cold (below 68°F), place the jar in a slightly warmer spot, like near a pilot light or inside an oven with just the light on.
- When you are ready to bake artisan bread, feed your starter 4-12 hours before you plan to mix your dough. You want it to be at its peak activity (doubled and very bubbly).
Nutrition
- Serving Size: N/A (Culture)
- Calories: 10
- Sugar: 0.1
- Sodium: 0
- Fat: 0.1
- Saturated Fat: 0
- Unsaturated Fat: 0
- Trans Fat: 0
- Carbohydrates: 2
- Fiber: 0.2
- Protein: 0.5
- Cholesterol: 0