
Oh, when the summer sun just begs for something bright and truly refreshing, you need a dessert that screams pure joy! Forget those heavy, complicated cakes; I found a way to capture that perfect juicy, sweet flavor of fresh watermelon in something fun and easy. These watermelon cupcakes are my absolute favorite discovery because they look exactly like a tiny slice of summer sitting right on your counter. It reminds me so much of why I started **Daisy’s Recipes**—bringing simple, heartfelt baking back into busy lives. We use straightforward techniques passed down from Grandma Daisy to ensure the flavor is authentic, not fake or overpowering. Trust me, baking these layered beauties is pure magic.
- Why You Will Love These Watermelon Cupcakes
- Essential Equipment for Perfect Watermelon Cupcakes
- Gathering Ingredients for Your Watermelon Cupcakes
- Step-by-Step Instructions for Making Watermelon Cupcakes
- Tips for Success with These Fruit Flavored Cupcakes
- Variations for Unique Cupcake Flavors
- Storage and Make-Ahead Tips for Watermelon Cupcakes
- Frequently Asked Questions About These Watermelon Cupcakes
- Nutritional Estimates for This Summer Dessert Recipe
Why You Will Love These Watermelon Cupcakes
Honestly, these aren’t just another cupcake recipe. They are little works of art that taste exactly like a slice of juicy fruit! I whipped these up for a neighborhood picnic last year, and they vanished first. Here’s why I think you’ll be obsessed with making these **easy summer baking ideas**:
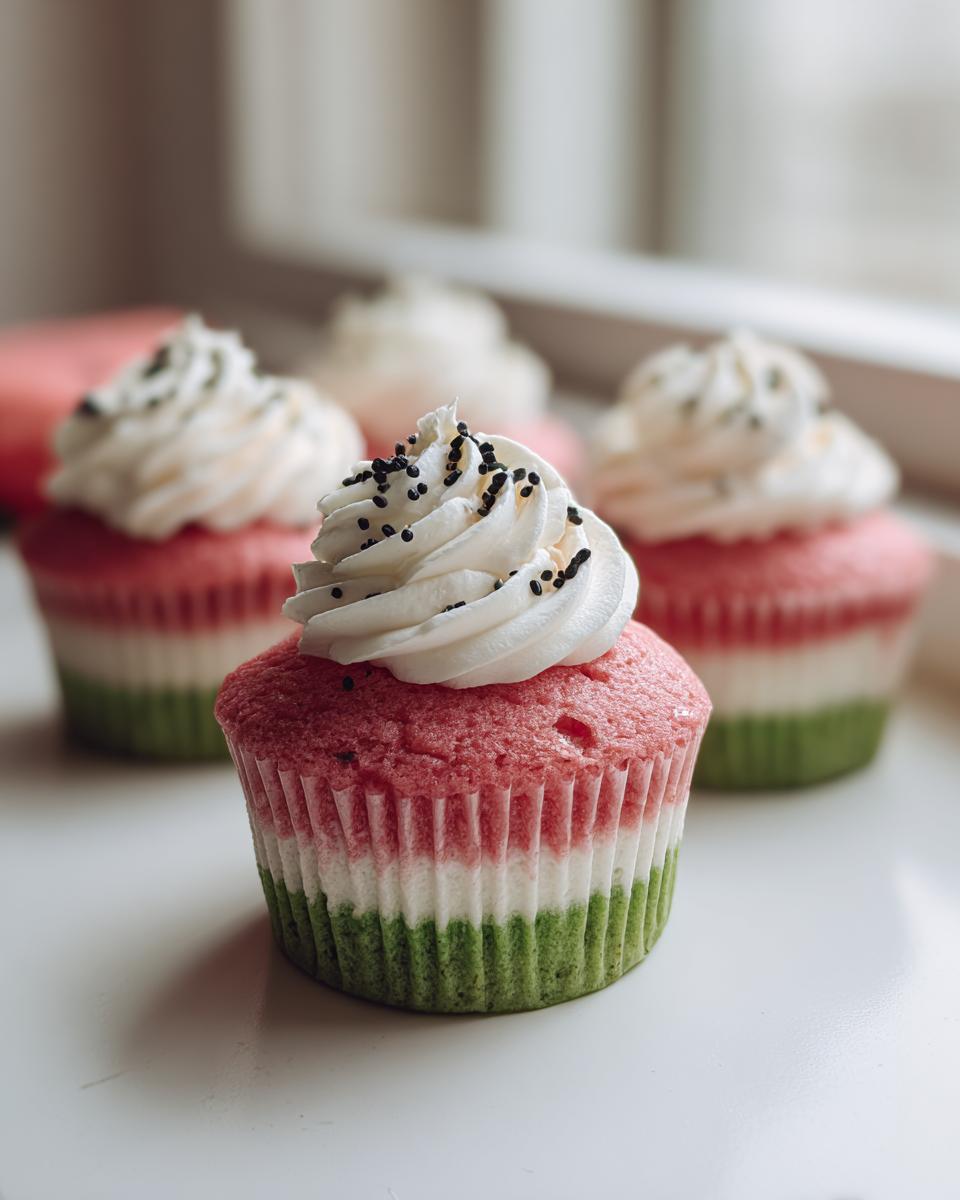
- They tackle the sheer visual appeal! The pink, white, and green layers make them instantly recognizable, perfect for **themed birthday party treats** or any **pink and green food recipes** celebration.
- The flavor is spot-on fresh, thanks to that special extract we use. They are wonderfully **light and refreshing cupcakes**—not heavy like a pound cake.
- Making those layers is easier than you think! They fit right in with my philosophy of offering straightforward techniques for **creative cupcake designs**.
- They are a fantastic alternative if you are looking for a **homemade watermelon cake substitute** but want something individual-sized and easier to serve.
- They hit that sweet spot for **kids party food ideas** because they are colorful, fun, and smell amazing while baking.
- You get that lovely tang of cream cheese frosting that keeps them from being overly sweet, making them delightful **summer dessert recipes**.
Essential Equipment for Perfect Watermelon Cupcakes
You don’t need fancy gadgets for these cupcakes, thank goodness! Grandma Daisy always relied on sturdy basics, and that’s what we’re sticking with. Good tools just make the process smoother, especially when we are aiming for these distinct layers. Since we are using vibrant colors, having the right type of coloring matters a lot, too.
Here is the short list of what I always pull out for a batch of these:
- A standard 12-cup muffin tin lined with pretty paper liners. Make sure those liners fit snugly!
- Your trusty electric mixer, either a stand mixer or a hand mixer. It makes creaming that butter so much easier than a wooden spoon—though Grandma could certainly whip it by hand!
- Three small, identical bowls for dividing and coloring the batter. Keeping the sizes the same helps ensure even distribution of the coloring agents.
- Gel food coloring—and I cannot stress this enough! Liquid food coloring is watery and will thin out your batter, which ruins our beautiful layers. We want thick, vibrant gel colors (red, pink, and green).
- A sturdy whisk for your dry ingredients and a rubber spatula for folding everything together gently once the colors are ready.
That’s really it! We’re keeping things simple so you can focus on layering those colors perfectly.
Gathering Ingredients for Your Watermelon Cupcakes
Before we even think about dividing and conquering those colors, we have to make sure our pantry is stocked correctly! When you’re aiming for a specific fruit flavor in a bake like this, the quality of the flavorings matters more than anything. Everything else is standard cake fare, but that extract—that’s where the summer magic comes from.
You’ll notice I’ve broken the list down because we mix the cake first, then tackle the frosting. Don’t substitute the butter for anything else; remember Grandma Daisy’s rule: real butter equals real flavor! When you buy your watermelon extract, try to find a highly-rated one; the cheap stuff can taste a bit artificial, and we want that juicy freshness!
For the Light and Refreshing Cupcakes Batter
The batter needs room-temperature ingredients for that essential creaming step. This is how we get those tiny air pockets that make light cakes, even though we are using colors! Let your butter and eggs sit out for at least an hour before you start mixing. Trust me on the temperature—it keeps everything emulsified beautifully.
- 1 1/2 cups all-purpose flour
- 1 1/2 teaspoons baking powder
- 1/2 teaspoon salt
- 1/2 cup unsalted butter, softened (must be room temp!)
- 1 cup granulated sugar
- 2 large eggs (also room temperature, please!)
- 1 teaspoon vanilla extract
- 1/2 cup milk
- 1 teaspoon watermelon extract (The star of the show!)
- Red, pink, and green food coloring (I strongly suggest gel coloring here.)
These ingredients, mixed right, give us the perfect base before we split it up.
For the Cream Cheese Frosting and Decoration
We want a frosting that is tangy enough to cut through the sweetness of the cake but smooth enough to pipe high. Again, your cream cheese needs to be soft when you start beating it, or you’ll end up with chunks! Don’t start frosting until everything is completely cool, or you’ll have a melted, colorful mess.
- 1/4 cup cream cheese, softened
- 2 tablespoons unsalted butter, softened
- 1 1/2 cups powdered sugar (sift this if you have time!)
- 1/2 teaspoon vanilla extract
- 1 tablespoon milk (have a tiny bit extra ready just in case!)
- Black nonpareils or mini chocolate chips for seeds
Grab everything, and let’s get ready to paint our batter! If you’re looking for tips on making a classic buttercream or understanding how different frostings handle, you can always check out my favorite guide on vanilla buttercream basics.
Step-by-Step Instructions for Making Watermelon Cupcakes
Okay, now for the really fun part! This is where we turn perfectly good vanilla batter into something that looks like it came straight from a summer fruit stand. The secret to success here isn’t speed; it’s being thoughtful when we divide and layer the colors. We want distinct stripes, not a muddy mess, so take your time with the assembly!
Preparing the Cake Batter and Coloring the Layers
First things first, get that oven humming at 350°F (175°C) and get your liners in that muffin tin—we want everything ready to go. We start by combining our dry things in one bowl (flour, baking powder, salt) and creaming the sugar and room-temperature butter until it’s super fluffy. Remember that step? That’s what builds the structure!
Then we alternate adding the dry mix and the milk/watermelon mix. Mix gently, just until it comes together. Now, here’s the critical move: Divide that gorgeous, colorless batter evenly into three separate bowls. Into one bowl, add your green gel coloring until you get a soft, grassy hue. In the second, add just a tiny bit of red to turn it white-ish or very pale pink. The last bowl gets the heavy red dose to achieve that deep watermelon pink! I try to get the bowls as equal as possible.
Here’s a trick from my notes: If your batter seems a little runny after coloring—which can happen if you use too much color—pop all three bowls into the fridge for about ten minutes. Chilling the batter makes it less likely the colors will bleed together when we stack them. It makes layering so much cleaner!
Assembling and Baking Your Watermelon Cupcakes
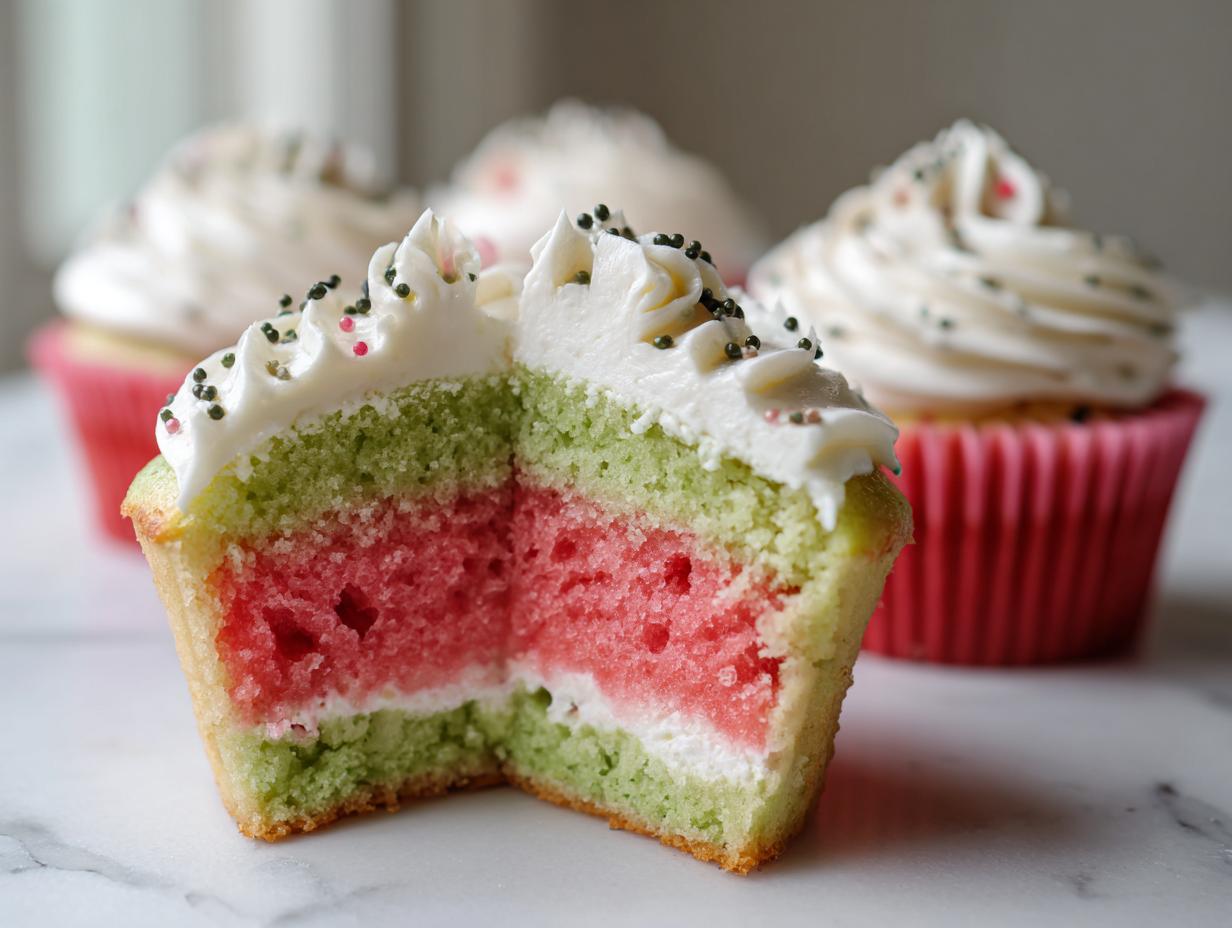
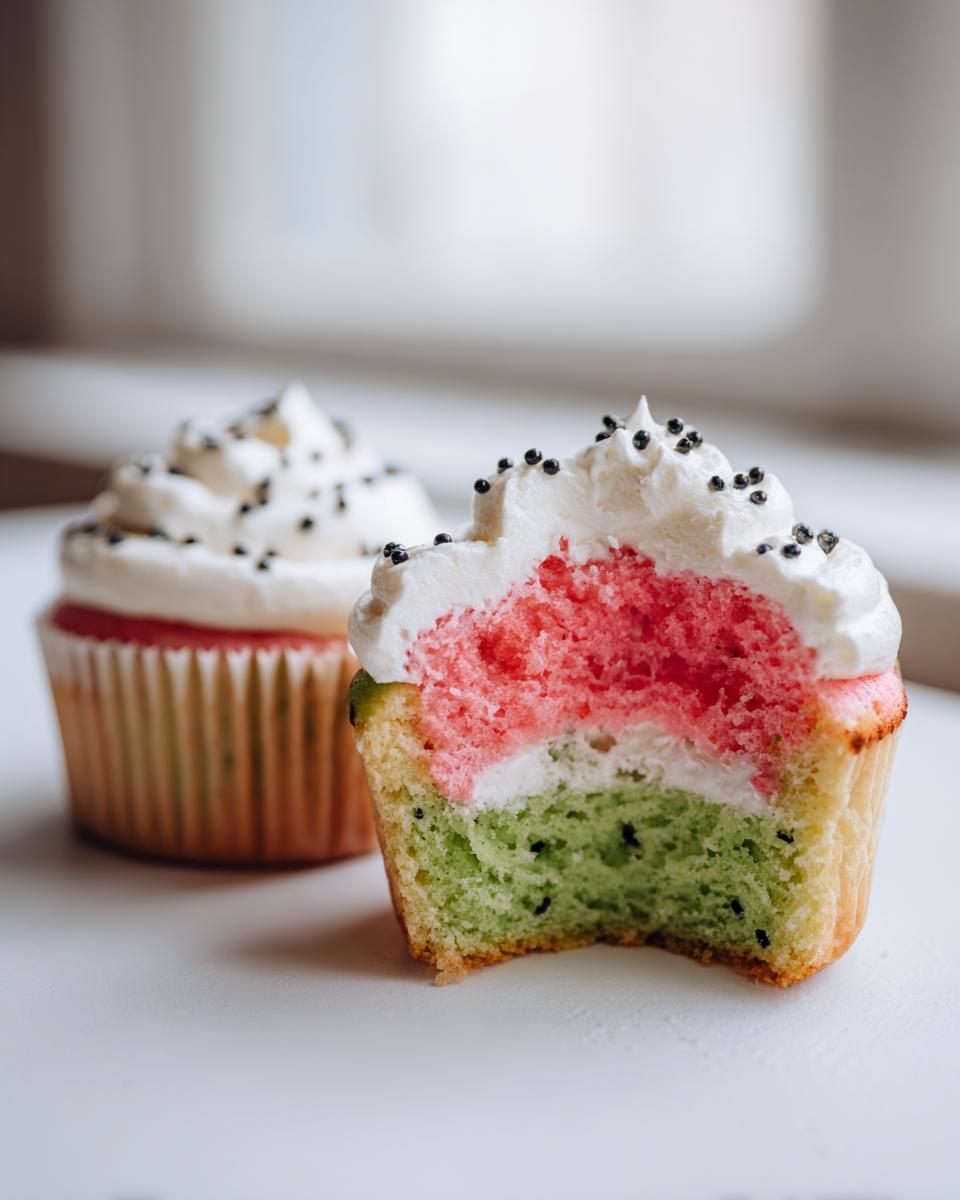
This layering technique is what makes these **watermelon cupcakes** famous! You need to spoon the colors in a specific order to mimic the rind, the white transition layer, and the pink flesh. Don’t overfill the liner; about two-thirds full is perfect.
Start with the green batter on the very bottom of the liner. Use about a tablespoon—just enough for a thin base layer. Next, gently dollop or spoon the white batter right over the green layer. Finally, cap it all off with the bold pink/red batter on top. Try not to disturb the layers below! It’s okay if they bump a bit, we’re aiming for rustic charm here, not architectural perfection.
Pop them into the 350°F oven for 18 to 20 minutes. Keep an eye on them! You want that toothpick inserted right near the center to come out clean, maybe with just a few moist crumbs clinging to it. Don’t let them bake too long, or all that wonderful moisture we worked to create will disappear!
Creating the Perfect Cream Cheese Frosting
While those beautiful, colorful bases cool down—and they must be *completely* cool, I mean cold to the touch—we whip up that tangy cream cheese topping. Beat your softened cream cheese and softened butter together until they look fluffy and welcoming. Don’t rush this part; lumps here mean lumpy frosting later.
Start adding your powdered sugar slowly, beating on low speed so you don’t coat your entire kitchen in white dust! Once it’s incorporated, add the vanilla. If the frosting feels like it’s fighting you—too stiff to spread—drizzle in that tablespoon of milk, just a little bit at a time, until you get that perfect, cloud-like consistency. It should hold its shape on a spatula but still sink slightly when you press it.
Finishing Your Creative Cupcake Designs
Now for the grand finale! Once those cakes are totally chilled, grab your frosting bag or a knife. You can pipe a tall swirl, or I just use an offset spatula to create a gentle mound on top—simple is often best for these **creative cupcake designs**. Make sure you frost right up to the edge to give that nice white base frame.
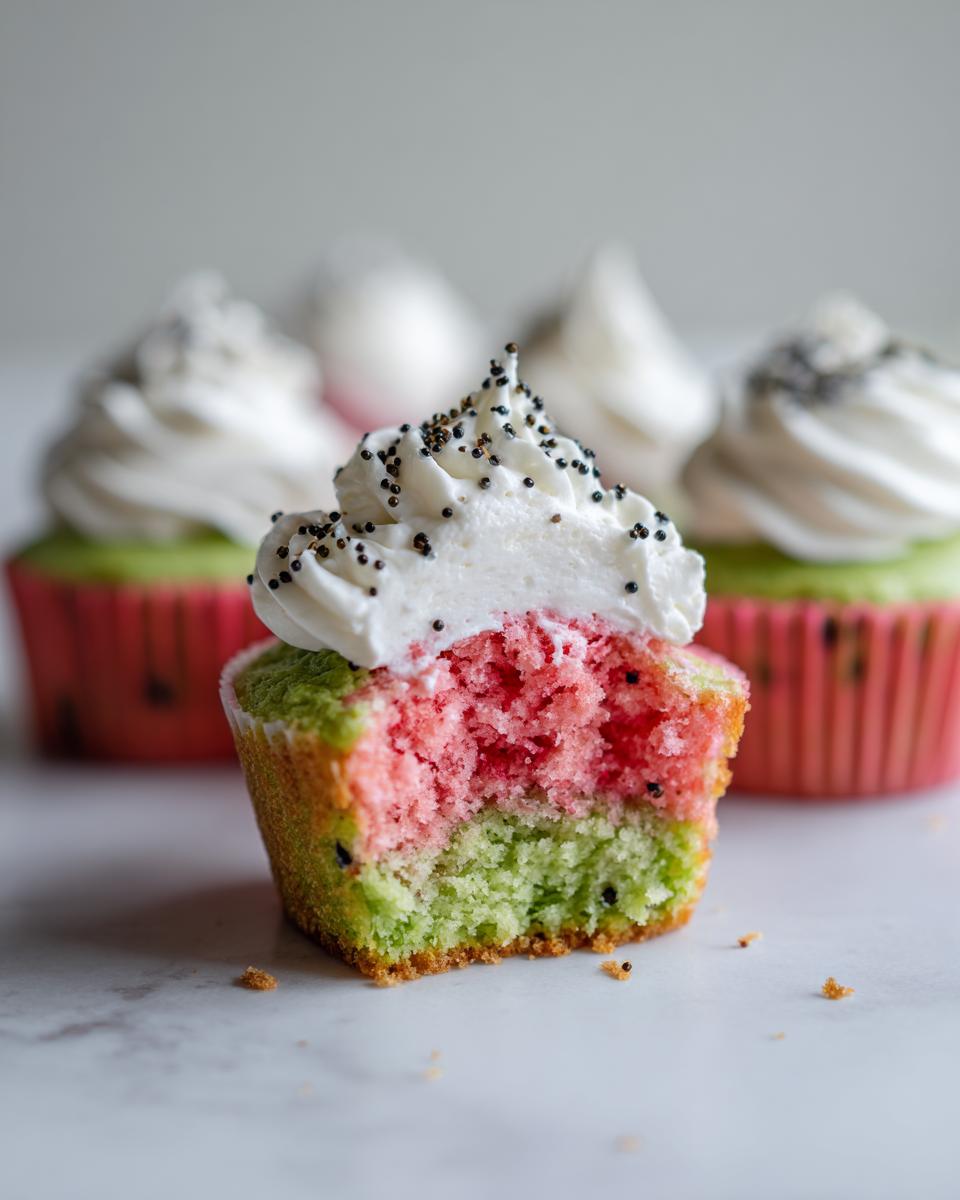
To finish them off and nail that authentic look, press those black nonpareils or mini chocolate chips right into the frosting randomly. These stand in perfectly for the seeds. Suddenly, you don’t just have a cupcake; you have a miniature summer feast ready to go! Seeing these makes me so happy; they are true **fresh fruit dessert inspiration**.

Tips for Success with These Fruit Flavored Cupcakes
Look, baking is science, but making these **fruit flavored cupcakes** look stunning is pure kitchen intuition—and a few tricks I learned the hard way when I first tried to replicate Grandma Daisy’s colorful baking ideas! Since the layering is the trickiest part, I want to share the absolute must-knows to ensure you get beautiful definition between the green, white, and pink sections.
First, let’s talk about that dreaded overmixing. When you combine the wet and dry ingredients, mix until you *just* see the last streak of flour disappear. Seriously, stop stirring right there. Overmixing develops gluten, which makes a tough cupcake, and that’s the opposite of what we want in these light, summery treats. We are aiming for tenderness!
Controlling the Color Bleed
The biggest complaint I hear is that the colors run together, especially if you’re using them for **kids party food ideas** and they sit out for a while. While the chilling trick I mentioned earlier helps a ton before baking, you can also manage the color intensity pre-bake. Use gel coloring sparingly! Gel is concentrated, so a tiny toothpick dip is often enough. If you use too much liquid, that extra water content can cause the colored batter to become too thin, making it seep right through the layers.
Ensuring Flavor Hits Right
Watermelon flavor isn’t always easy to capture without tasting artificial. To boost that genuine, sweet taste, make sure your watermelon extract is fresh. If you find the flavor a little weak once the cupcakes are cooled, don’t panic! You can very carefully poke a couple of tiny holes in the cooled cake top (before frosting) and drip a half-teaspoon of strong, chilled watermelon juice or a tiny drop more extract right into the center of the crumb. It soaks right in and gives the flavor a little lift. If you ever need inspiration for bumping up flavors in other bakes, my guide on lemon crinkle cookies talks a lot about maximizing citrus zing, and the principles apply here!
Frosting Temperature Management
When you finally get to the frosting stage, remember that the cupcakes must be completely chilled. If you frost a warm or even slightly lukewarm cupcake, the heat transfers right into that gorgeous cream cheese frosting, making it turn soupy and slide right off. This ruins the beautiful height you want from your frosting swirl. I sometimes even stick my cooled cupcakes in the fridge for fifteen minutes right before I start decorating just to guarantee they are cold enough to handle the topping.
Variations for Unique Cupcake Flavors
Now, I know we are totally obsessed with that bright, sweet watermelon flavor, but honestly, once you master the layering technique, these cupcakes become a fantastic canvas for all sorts of **unique cupcake flavors**! This is where you can really start experimenting now that you’ve nailed the visual structure. We’re still keeping the fun pink/green look, but we can play with the actual taste within the batter layers.
When I look at my notes for **pecan pie cupcakes**, I see how a little bit of zest or a change in extract can completely transform the profile. Here are a few simple swaps I recommend for endless fun:
- Tropical Twist: Substitute the watermelon extract with half pineapple extract and half coconut extract in the pink layer. Keep the green layer flavored with a tiny bit of lime extract. It suddenly becomes a tropical dream!
- Berry Brightness: If you can’t find good watermelon extract, you can use strawberry or raspberry extract in the pink layer, but you MUST use a touch less sugar in that specific bowl, or it gets too sweet.
- Citrus Splash Green: For the green layer, ditch the extract and instead whisk in about two teaspoons of fresh lime zest and a tablespoon of lime juice (cut back on the milk slightly in that portion of the batter to compensate for the extra liquid). The lime rind offers a bright, almost tart contrast to the sweet pink layer.
- Spiced Surprise: For an adult version, keep the pink batter watermelon flavored, but mix a pinch of ground cardamom and a drop of almond extract into the white layer. It warms up the whole flavor profile nicely.
The key is to only change the flavor component in one or two of the sections so that the overall look remains intact. Trying to do four different extracts might turn into a confusing flavor profile, but sticking to two complementary tastes really works well!
Storage and Make-Ahead Tips for Watermelon Cupcakes
As someone who loves to host but hates the last-minute rush, I know planning ahead is everything when it comes to **themed birthday party treats**. The good news is that these colorful beauties are wonderfully adaptable to prep work! Whether you’re making them for **picnic dessert ideas** or a big party, knowing how to store them right ensures they look and taste perfect when it’s time to serve.
The main consideration is the cream cheese frosting. Cream cheese is fantastic for flavor, but it doesn’t love sitting out on the counter for days like a plain buttercream does.
Storing Frosted Watermelon Cupcakes
If you’ve already frosted your **watermelon cupcakes**, they need to go straight into the refrigerator. Pop them into an airtight container, but be careful! You don’t want them squished, especially those pretty layers. I usually place them on a flat tray, cover it loosely with plastic wrap, and then put the lid on the container if there’s room. If the container is too small, use toothpicks gently placed around the frosting swirls to keep the plastic wrap from pressing down on the icing.
They’ll keep well in the fridge for about three days. When you pull them out to serve, give them about 30 minutes on the counter to take the chill off the cake part; cold cake can taste a bit dry, even when it isn’t! The frosting will soften slightly, which is lovely.
Storing Unfrosted Cupcake Bases
This is my favorite make-ahead method for these **light and refreshing cupcakes**! You bake the naked cake bases according to the instructions, let them cool completely (this is important!), and then wrap them tightly in plastic wrap—maybe two layers deep—before tucking them into a freezer-safe bag. They freeze beautifully for up to three months.
When you are ready to decorate, just pull out the quantity you need and let them thaw overnight in the refrigerator. By morning, they’ll be perfect for frosting. This saves your entire morning on the day of the party!
If you’re interested in keeping other treats fresh for longer, I shared some great long-term storage tips in my guide for no bake Oreo balls that can apply to freezing cakes, too.
Tips for Freezing the Frosting Separately
You can also freeze the cream cheese frosting separately, though it needs a little more care. Make the frosting, place it in an airtight container, and freeze it for about an hour until it’s very firm but not rock solid. You can then take it out to fully thaw in the fridge overnight. Just give it a quick, minute-long whisk before piping it onto those already-thawed cupcakes to fluff it back up. It saves fridge space if you’re making a huge batch!
Frequently Asked Questions About These Watermelon Cupcakes
I totally get it—when you put this much effort into making something look so special, you want to make absolutely sure you get it right! Baking **watermelon cupcakes** for the first time can bring up a few worries about flavor accuracy and keeping those pretty layers separated. Here are the common things I hear from bakers before they dive in. Don’t worry, we’ve handled these things in the recipe already!
Can I use fresh watermelon juice instead of extract in these watermelon cupcakes?
Oh, I wish we could! Fresh juice sounds so perfect, right? But here’s the reality check: fresh juice brings way too much water into the batter. Remember, we need thick batter to keep our green, white, and pink layers separate when they bake. If you add juice, the batter gets thin, and boom—you end up with a muddy, grayish swirl instead of distinct layers. It also messes with the leavening. For that intense, true flavor without compromising the texture, you really need to trust that teaspoon of good quality watermelon extract.
How do I keep the pink, white, and green layers from mixing?
This is all about being gentle and cold! We talked about this, but it bears repeating because it’s the make-or-break moment for the look. First, use the gel coloring—it’s thicker. Second, mix super gently once the color is added; you don’t want to deflate the air you just beat into the batter! Best of all? If you have time, pop those three bowls of colored batter into the fridge for about ten minutes. Chilling the batter slightly makes it thick enough to hold its position when you spoon the layers into the cups. Work quickly once they are out of the fridge!
What is the best way to decorate these as picnic dessert ideas?
For a backyard BBQ or a **picnic dessert idea**, sometimes I skip the seeds entirely because I worry about little chocolate chips rolling off on the drive over. My favorite simple decoration if I’m serving them outside is to top the cream cheese frosting with just one perfect candied cherry half right in the center. It gives it a beautiful pop of extra red, and it feels much more secure traveling than loose chips. Alternatively, if you really want that seed look but need more stability, use green sprinkles pressed gently around the very outside edge of the frosting swirl instead of trying to place individual ‘seeds’ all over the top.
If you want more inspiration on creative ways to present simple home bakes, check out my guide to making a great homemade watermelon cake substitute for ideas on presentation!
Nutritional Estimates for This Summer Dessert Recipe
I always include this section because, while we are baking for joy and flavor here at **Daisy’s Recipes**, it’s good to have a general idea of what we are serving! Remember, these figures are just estimates based on the standard ingredients called for in this recipe, like the butter, sugar, and flour measurements. If you use different brands, heavy creams, or substitute ingredients, your final counts will change, of course. Consider this your friendly guideline for enjoying these **summer dessert recipes** guilt-free!
We made 12 lovely **watermelon cupcakes** total, so these numbers reflect a single serving. Sometimes I feel like I eat two because they are so light, but we’ll stick to one portion size here!
- Serving Size: 1 cupcake
- Calories: 320
- Sugar: 35g
- Fat: 16g
- Saturated Fat: 10g
- Carbohydrates: 43g
- Protein: 3g
- Sodium: 180mg
- Cholesterol: 55mg
As you can see, with the sugar and fat content, these are definitely a treat, but they’re worth every single colorful bite! If you’re ever looking for something a little lighter on the sugar front, I’ve put together some great ideas for healthy breakfast ideas that focus more on fresh whole foods.
PrintWatermelon Cupcakes with Cream Cheese Frosting

Make these visually appealing watermelon cupcakes that taste like summer. The cake layers mimic a watermelon slice, and watermelon extract provides the fresh flavor.
- Prep Time: 25 min
- Cook Time: 20 min
- Total Time: 45 min
- Yield: 12 servings 1x
- Category: Dessert
- Method: Baking
- Cuisine: American
- Diet: Vegetarian
Ingredients
- 1 1/2 cups all-purpose flour
- 1 1/2 teaspoons baking powder
- 1/2 teaspoon salt
- 1/2 cup unsalted butter, softened
- 1 cup granulated sugar
- 2 large eggs
- 1 teaspoon vanilla extract
- 1/2 cup milk
- 1 teaspoon watermelon extract
- Red, pink, and green food coloring (gel preferred)
- 1/4 cup cream cheese, softened
- 2 tablespoons unsalted butter, softened
- 1 1/2 cups powdered sugar
- 1/2 teaspoon vanilla extract
- 1 tablespoon milk (or more, as needed)
- Black nonpareils or mini chocolate chips for seeds
Instructions
- Preheat your oven to 350°F (175°C). Line a standard 12-cup muffin tin with paper liners.
- In a medium bowl, whisk together the flour, baking powder, and salt. Set aside.
- In a large bowl, cream together the softened butter and granulated sugar until light and fluffy. Beat in the eggs one at a time, mixing well after each addition. Stir in the vanilla extract.
- In a small bowl, mix the milk and watermelon extract.
- Gradually add the dry ingredients to the wet ingredients, alternating with the milk mixture, beginning and ending with the dry ingredients. Mix until just combined. Do not overmix.
- Divide the batter evenly into three separate bowls. Leave one bowl white (or very pale pink). Add a few drops of red food coloring to the second bowl and mix until you achieve a bright pink color. Add green food coloring to the third bowl until you reach a light green color.
- Spoon the colored batters into the prepared liners to create the watermelon look: Place a spoonful of green batter at the bottom of each liner. Top the green layer with a spoonful of white batter. Finally, top with the pink/red batter, filling the liner about two-thirds full.
- Bake for 18 to 20 minutes, or until a toothpick inserted into the center comes out clean. Let the cupcakes cool in the pan for 5 minutes before transferring them to a wire rack to cool completely.
- While the cupcakes cool, prepare the frosting. In a bowl, beat the cream cheese and 2 tablespoons of butter until smooth. Gradually add the powdered sugar until combined. Beat in the vanilla extract and milk until the frosting is smooth and spreadable. Add more milk if the frosting is too stiff.
- Once the cupcakes are completely cool, frost the tops. Press a few black nonpareils or mini chocolate chips onto the frosting to resemble watermelon seeds.
Notes
- For the best visual effect, use gel food coloring as liquid coloring can thin the batter too much.
- Chill the colored batters for 10 minutes before filling the liners; this helps keep the layers distinct during baking.
- If you want a stronger watermelon flavor, increase the watermelon extract to 1 1/2 teaspoons, but taste the batter first.
Nutrition
- Serving Size: 1 cupcake
- Calories: 320
- Sugar: 35
- Sodium: 180
- Fat: 16
- Saturated Fat: 10
- Unsaturated Fat: 6
- Trans Fat: 0
- Carbohydrates: 43
- Fiber: 1
- Protein: 3
- Cholesterol: 55