
You know those desserts you see in bakeries that look almost too perfect to eat? We’re making that today, but ten times better because it’s made right here in your kitchen. I’m talking about the ultimate showstopper: the red velvet cheesecake, complete with a crunchy Oreo crust and a gorgeous cream cheese swirl! Honestly, when I first looked at Grandma Daisy’s old recipe cards, I knew I had to take her lessons in patience and honest baking and apply them to something truly decadent like this.
This isn’t just a dessert; it’s a centerpiece, meant for dazzling guests at Christmas or any big celebration. We are layering that deep, slightly tangy red velvet flavor right against impossibly smooth, rich cheesecake. Trust me, my city life got busy, but recreating this sense of warmth through baking this stunning layered treat brings me right back to Daisy’s sunny kitchen. Follow along, because this easy cheesecake baking method guarantees bakery-style results every time.
If you’re looking for more incredible sweets that carry that same feeling of home, check out my collection of delicious dessert recipes.
- Why This Showstopper red velvet cheesecake Recipe Works
- Gathering Ingredients for Your red velvet cheesecake
- Step-by-Step Instructions for the Showstopper red velvet cheesecake
- Expert Tips for Perfect red velvet cheesecake Results
- Variations on Your red velvet cheesecake
- Serving Suggestions for this Holiday Cheesecake Ideas Centerpiece
- Storing and Reheating Your Decadent Red Velvet Dessert
- Frequently Asked Questions About Homemade Cheesecake
- Next Steps After Baking Your red velvet cheesecake
Why This Showstopper red velvet cheesecake Recipe Works
So, why do folks go absolutely wild over this recipe? Because it hits every single mark. It’s not just pretty; it’s engineered for success. I learned from Grandma that the best food always has a structural reason for tasting good. This isn’t accidental perfection; it’s method-driven decadence!
- The final product manages to be both deeply rich and unbelievably smooth.
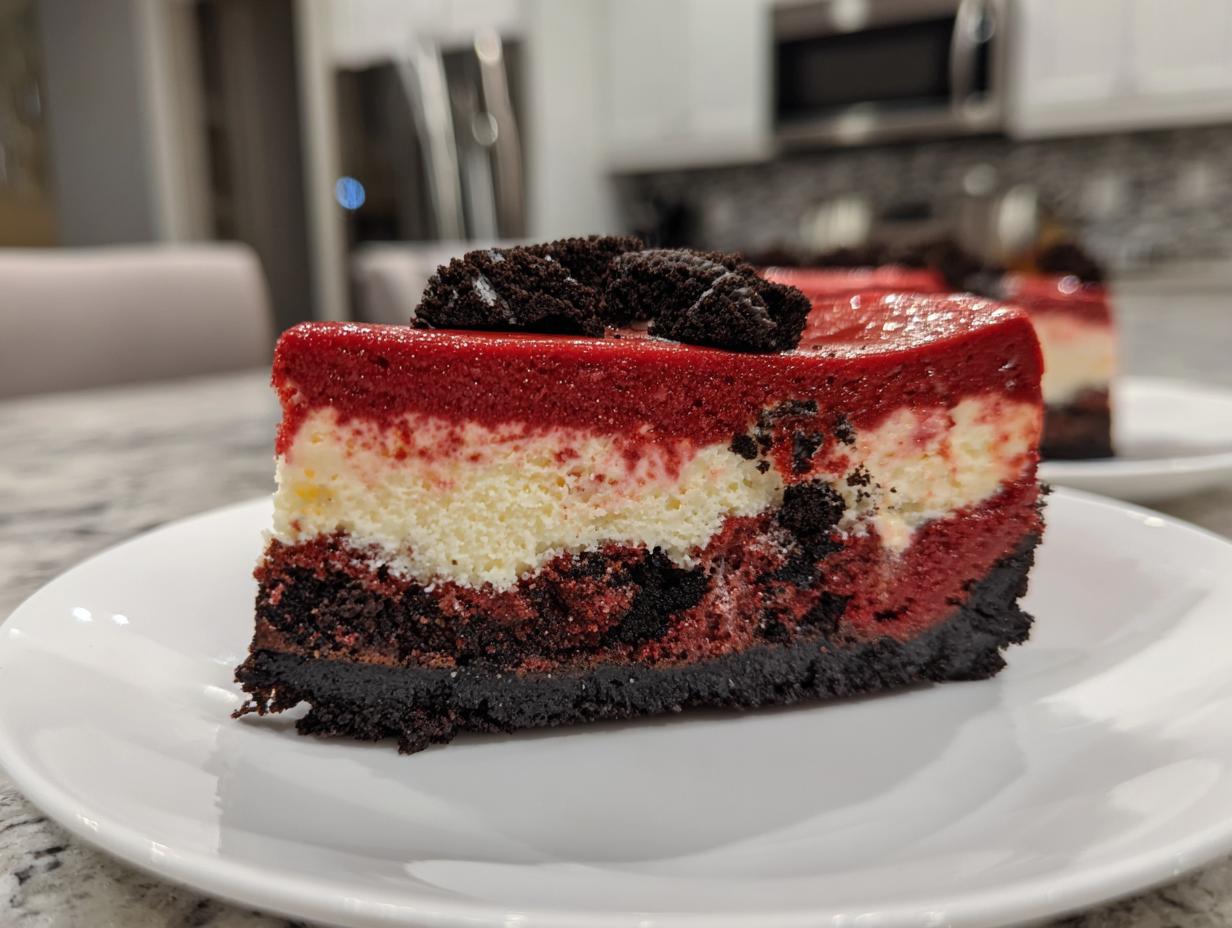
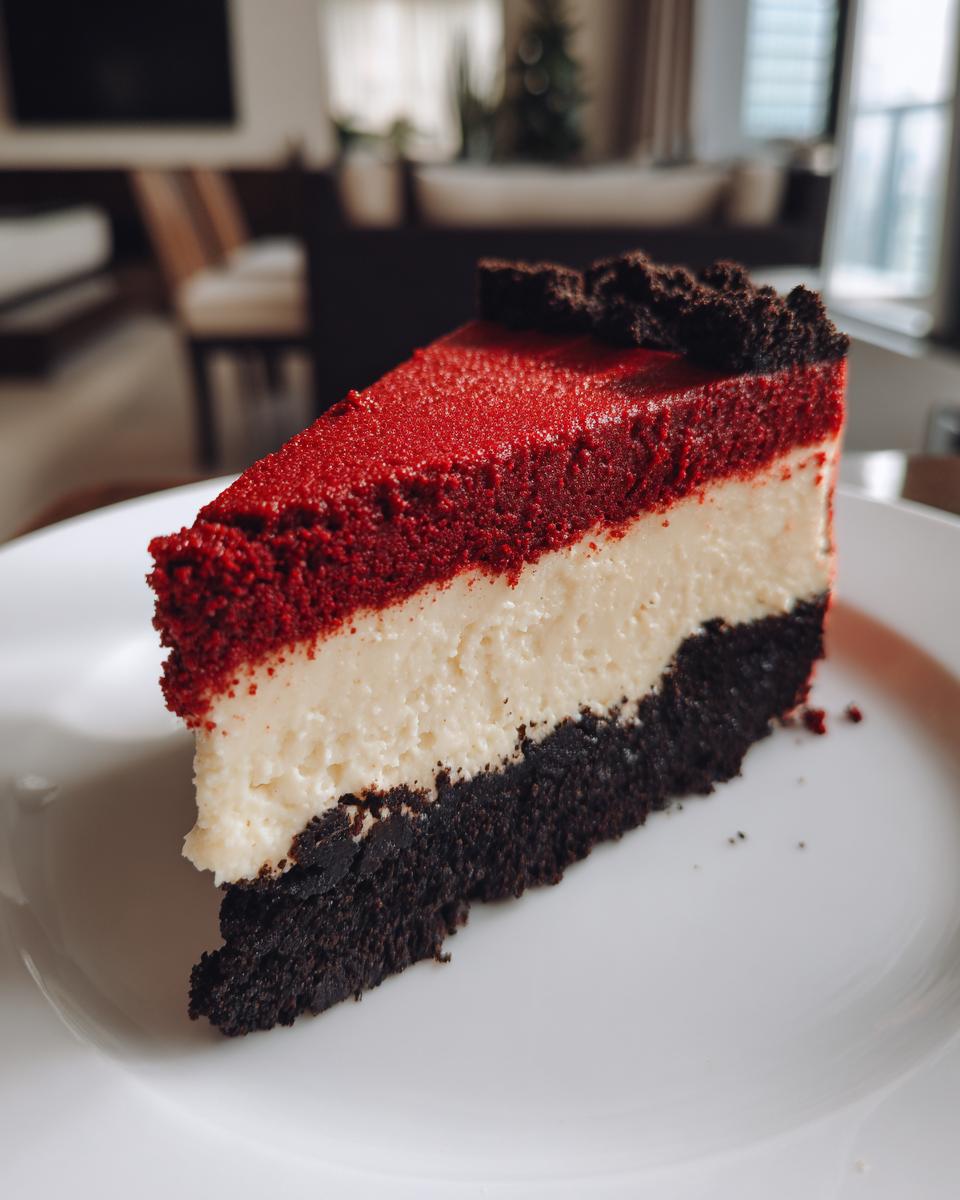
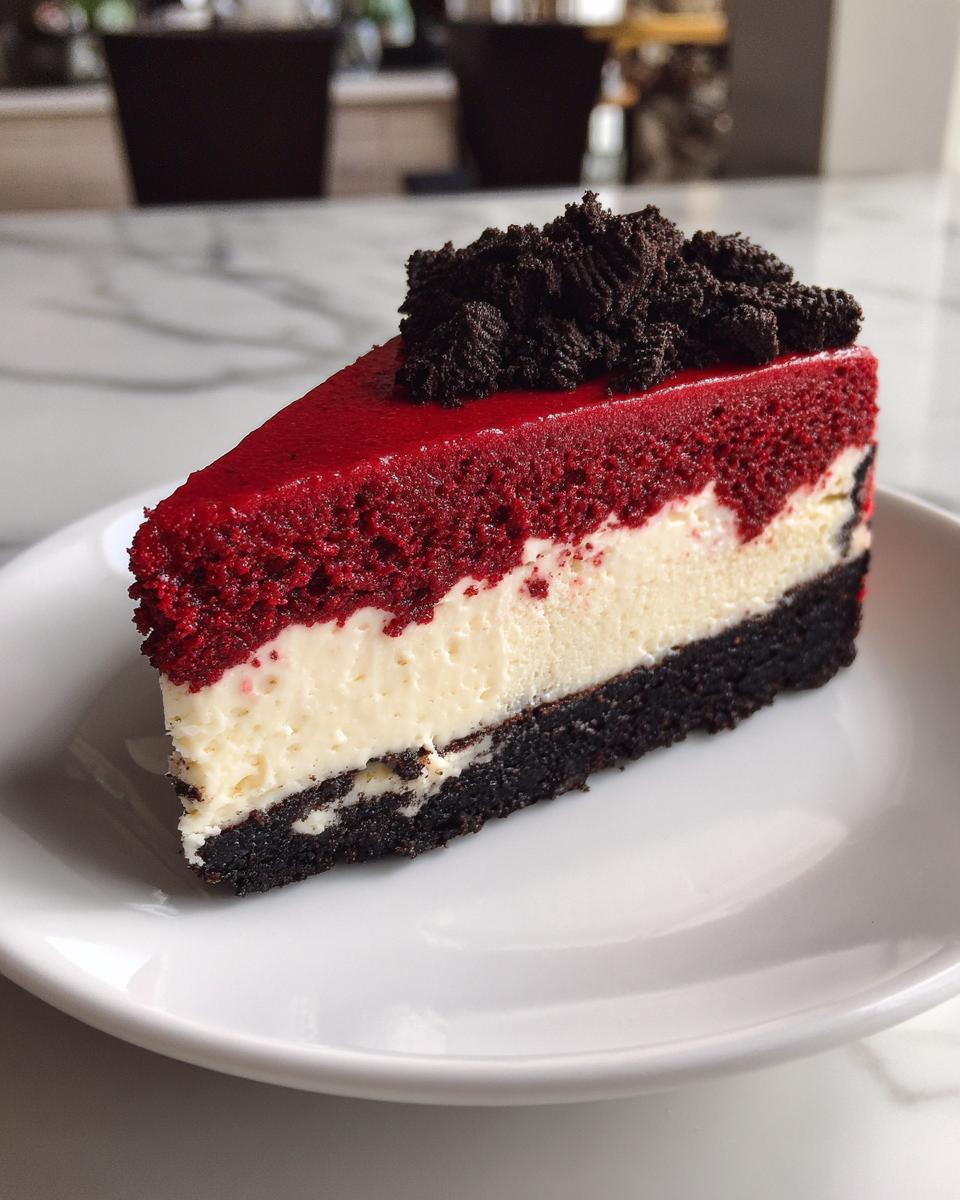
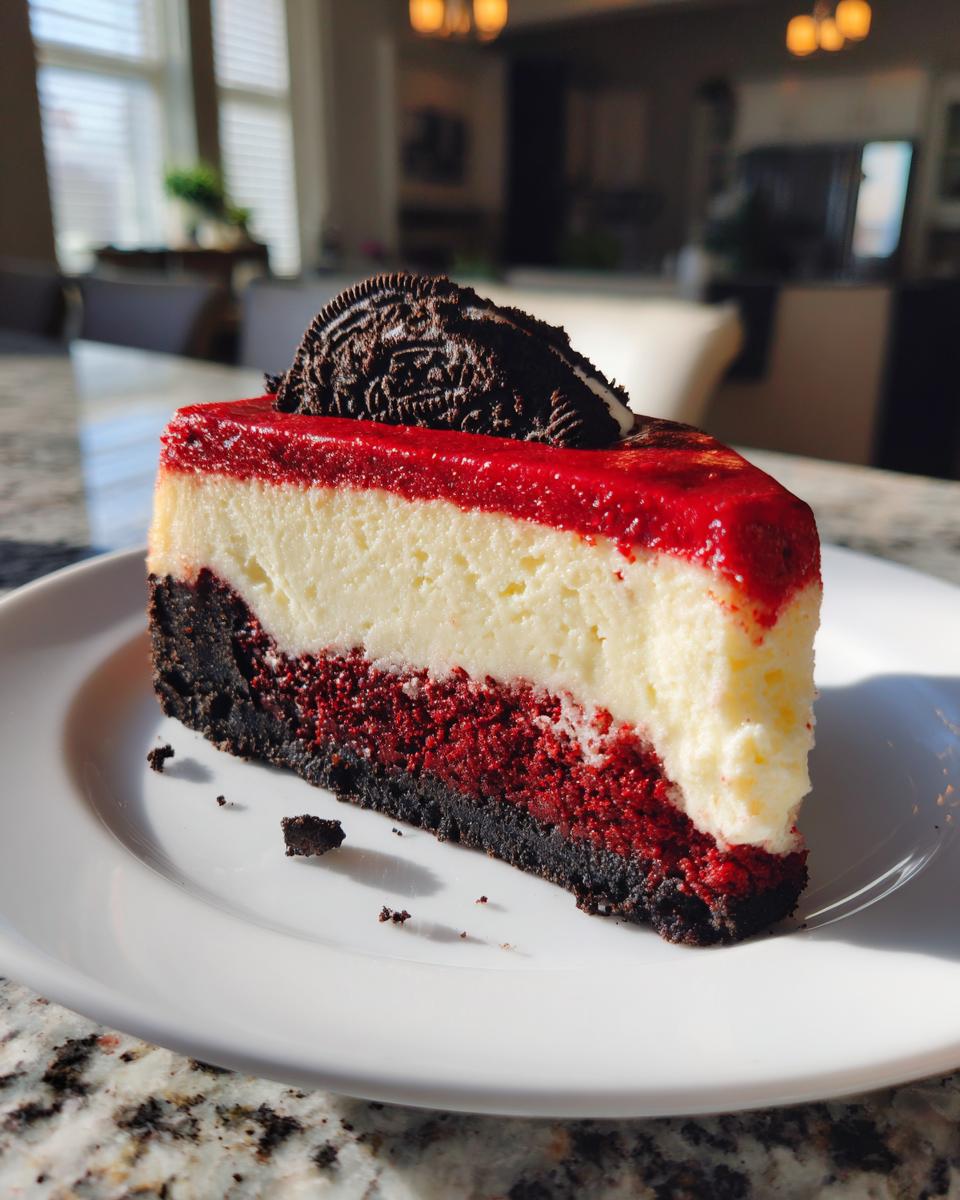
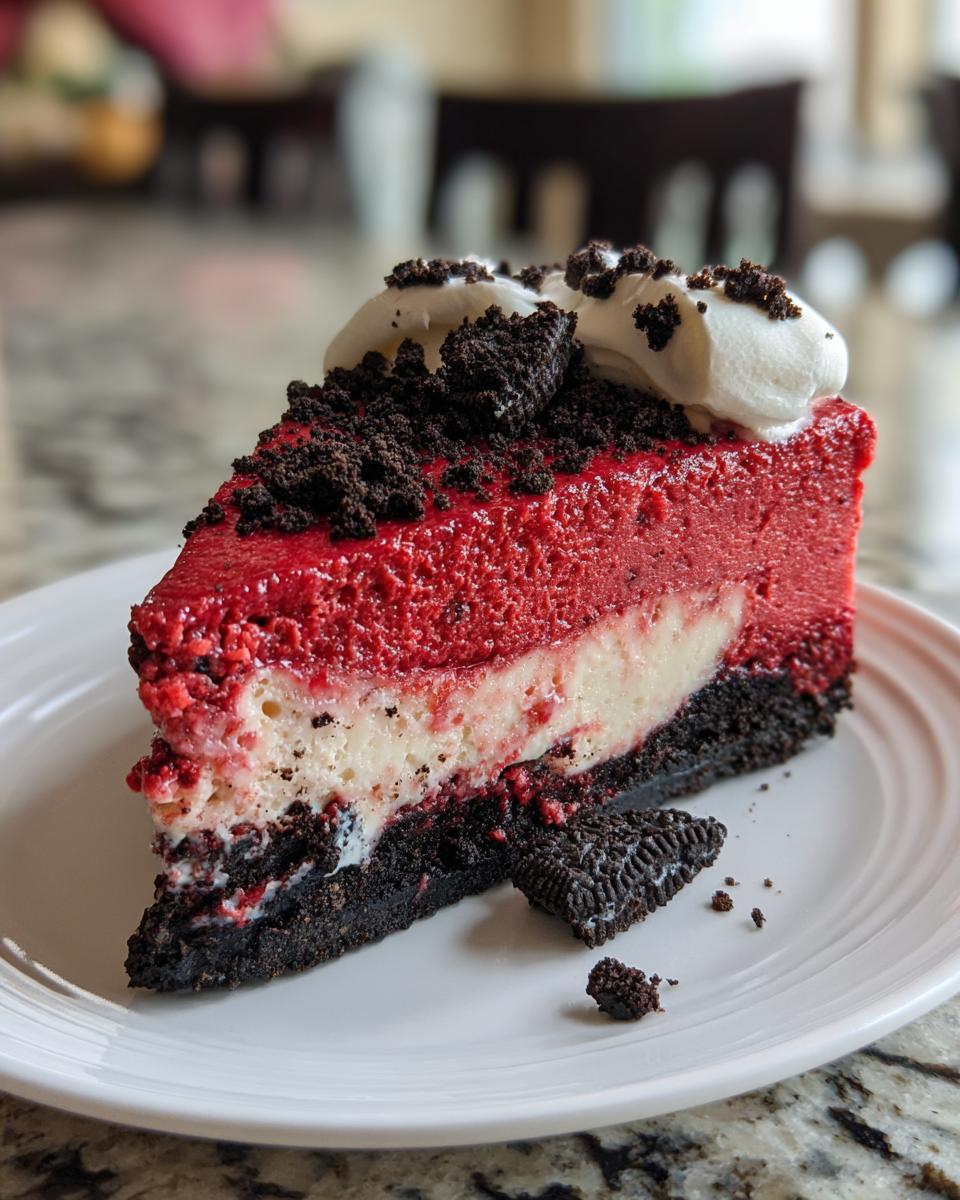
- The contrasting layers—dark crust, bright red velvet, pale cheesecake—make it a visual stunner.
- It delivers that classic, slightly tangy depth that makes a great cheesecake memorable.
Achieving Ultra Creamy Cheesecake Texture
This is non-negotiable if you want that glorious, creamy cheesecake texture. You absolutely must bring your cream cheese, sour cream, and eggs out of the fridge hours beforehand. They need to be completely room temperature, almost sleepy, so they mix without any lumps showing up later. Also, we use a water bath—that gentle steam is what stops the edges from cooking too fast and cracking. It keeps the bake slow and moist!
The Best red velvet cheesecake Flavor Balance
This is where the magic really happens, moving beyond just a simple cake. We have the mellow cocoa notes from the red velvet layer, which might sound heavy, but we cut through that richness perfectly. The buttermilk and sour cream bring a necessary tang that keeps the whole red velvet cheesecake from tasting flat or too sweet. It creates that wonderful tension between rich dairy and bright acidity—that’s what keeps you going back for just one more bite!
Gathering Ingredients for Your red velvet cheesecake
Okay, now that we know this is going to be the best homemade cheesecake you’ve ever made, we need to get organized. My Grandma Daisy always said a messy station leads to a messy bake, so laying everything out before you turn on the mixer is crucial. This recipe is layered, so we’ll break the ingredients down by section. Don’t skip anything—every measurement here contributes to that ultra-creamy result we’re aiming for!
For the Crunchy Oreo Crust Cheesecake Base
This is our anchor, and it needs to be sturdy so it can support all that decadent filling! We’re keeping it simple here:
- 2 cups crushed Oreo cookies (yes, the whole cookie, filling and all!)
- 6 tablespoons unsalted butter melted
Ingredients for the Red Velvet Layer
This is where we get that signature color and hint of tang:
- 1 (8 ounce) package cream cheese, softened
- 1 cup granulated sugar
- 2 large eggs
- 1 teaspoon vanilla extract
- 1 teaspoon white vinegar
- 1 teaspoon cocoa powder
- 1 teaspoon red food coloring (use the gel kind, trust me, it’s brighter!)
- 1/4 cup buttermilk
- 1 cup all-purpose flour
- 1/2 teaspoon baking soda
Components for the Rich Cheesecake Layer
This is the luxurious, tangy heart of the dessert. Make sure you have the full two blocks ready to go:
- 2 (8 ounce) packages cream cheese, softened
- 1 cup granulated sugar
- 1/2 cup sour cream
- 1 teaspoon vanilla extract
- 3 large eggs
Optional Cream Cheese Swirl Topping
If you want to take this beauty over the top, you’ll mix up this light blanket right at the end:
- 4 ounces cream cheese, softened
- 1/2 cup powdered sugar
- 1/4 cup heavy whipping cream
Step-by-Step Instructions for the Showstopper red velvet cheesecake
This is the part where we translate all those beautiful ingredients into a spectacular final product! Since this is a layered dessert, we need to take it slow. Don’t rush anything, especially the cooling part—that’s the secret to getting that perfectly smooth, crack-free top. When you’re looking for the ultimate cheesecake baking guide, remember that technique over speed is always the name of the game here.
Preparing and Baking the Oreo Crust
First things first, get your oven warmed up to 350°F (175°C). While it’s heating, combine your crushed Oreos and that melted butter until it looks like wet sand. Press this mixture firmly and evenly into the bottom of your 9-inch springform pan—really pack it down so it holds up later! Pop that crust into the oven for exactly 10 minutes. Once that’s done, pull it out and let it hang out on the counter to cool down a touch before we pile the layers on.
Mixing the Red Velvet Batter: A Key Step
For the red velvet section, remember what I said about room temperature ingredients? Start by beating your softened cream cheese and the first cup of sugar until it’s truly smooth. Then, add your eggs, one at a time, mixing just until each one disappears before adding the next. Gently stir in the vanilla, vinegar, cocoa powder, and that gorgeous red food coloring. In a separate little bowl, whisk the buttermilk, flour, and baking soda together, and then—this is important—gently fold that into the wet mixture. Don’t overdo it; we want just combined!
Assembling and Swirling the Layered Cheesecake
Time to build this masterpiece! Pour about half of your red velvet batter right over that cooled Oreo crust. Put it back in the 350°F oven and bake it for 10 minutes just to set that base layer up. While that’s setting, mix your main cheesecake batter until creamy (but don’t beat the air into it!). Pour all of the cheesecake batter over the partially baked red velvet layer. Now, drop spoonfuls of your remaining red velvet batter randomly on top of the cheesecake layer. Take a knife or a skewer and gently drag it through the layers a few times to create that stunning visual swirl. That’s what makes it a true layered cheesecake!
Baking and Cooling for a No Fail Cheesecake Recipe
You must reduce the oven temperature now down to 325°F (160°C). Bake this beauty for about 60 to 75 minutes. You know it’s done when the edges look set, but the very center wiggles just a little when you nudge the pan—this is key for a no fail cheesecake recipe! When the time is up, turn the oven OFF completely. Crack the door open just a tiny bit and let it sit in that residual heat for a full hour. After that hour, take it out, let it cool on the rack, and then you absolutely must chill it in the fridge for a minimum of six hours, but honestly, overnight is what secures that perfect texture. If you want more incredible baking guides, be sure to check out my ultimate cheesecake baking guide!
Expert Tips for Perfect red velvet cheesecake Results
Listen, I’ve cracked a few cheesecakes in my day, and I’ve learned that these little details separate a good dessert from a truly show-stopping one. These tricks are what saved my batches from looking like cracked deserts! We’re focusing on two things here: keeping the heat gentle and keeping the ingredients happy. If you want to revisit the success factors for this bake later, check out my guide on a no fail cheesecake recipe.
Water Bath Technique for Rich and Tangy Cheesecake
If you want that stunning, smooth finish that looks like it came straight from a professional bakery, you have to use a water bath, or bain-marie. Before you even think about putting your pan in the oven, wrap the entire bottom and sides of your springform pan tightly, like you’re wrapping a precious gift, using heavy-duty aluminum foil. This stops water from seeping in! Then, place that foil-wrapped pan into a larger roasting pan, and only then do you pour in about an inch of simmering hot water. The steam keeps the environment inside the oven moist, which is the secret weapon to a perfectly rich and tangy cheesecake that never cracks.
Ingredient Temperature Management
I can’t stress this enough: throw out your preconceived notions about skipping this step! If your cream cheese, eggs, or sour cream are even slightly cool, they won’t blend properly with the sugar. I always pull everything related to the filling out about three hours before I plan to mix. When the dairy is at room temperature, it whips up into this velvety structure that holds air beautifully. That’s exactly what we need for our no-fail cheesecake recipe, ensuring every bite is heavenly and creamy.
Variations on Your red velvet cheesecake
You’ve mastered the classic red velvet cheesecake, but who says you have to stick to the script? I love seeing how you all adapt this recipe! Sometimes I just don’t have the energy for the tricky swirl part, and that’s totally okay. The beauty of Daisy’s approach was always adaptation, making sure the recipe worked for the cook, not the other way around. There are a couple of fun ways you can switch things up!
If you’re feeling particularly adventurous and want to push the texture boundaries, you can skip the final red velvet dollops on top and just leave a pure, smooth cheesecake surface. Or, if you’re looking for more crunch throughout the filling, we can get those Oreos involved deeper than just the bottom crust. For more creative desserts, take a peek at my guide on apple pie cheesecake recipes for more inspiration!
Creating an Oreo Crust Cheesecake Swirl
This is how you get that extra layer of texture and that true “Oreo Cheesecake Perfection” that people rave about. Once you have poured your main cheesecake layer onto the partially baked red velvet base, you can take some of those extra crushed Oreos—the ones you might have planned to just sprinkle on top—and sprinkle about half a cup right over that cheesecake layer. Then, pour the remaining red velvet batter over that chocolate layer and swirl as usual. If you want pieces instead of a fully integrated layer, you can crush about 10-12 cookies roughly and fold them right into the main cheesecake batter before pouring. It makes for such a fun surprise when you cut into it!
Serving Suggestions for this Holiday Cheesecake Ideas Centerpiece
Now that you’ve pulled this magnificent creation from the fridge, you want to serve it right, don’t you? This dessert is already rich and decadent all on its own, honestly. It doesn’t *need* much help, which is why I usually skip heavy frostings when I’m making a classic swirl—the optional cream cheese topping is plenty!
Because it has that deep, earthy red velvet vibe mixed with the tang of the cheesecake, the best accompaniments are things that offer a nice, bright contrast. For Christmas gatherings, you can’t beat a beautiful tartness. If you want to make yourself a lovely cocktail to enjoy alongside your slice, I highly recommend trying the recipe for my cranberry pomegranate margarita—it’s the perfect festive pairing!
Here are a few ways to present this Christmas dessert centerpiece:
- Tart Fruit Compote: A quick simmered sauce of raspberries or tart cherries, slightly sweetened, cuts through the richness beautifully. Let it pool just a little next to the slice on the plate.
- Simple Whipped Cream: If you skipped the optional topping, whip up some heavy cream with just a touch of vanilla and powdered sugar. It adds lightness and fluffiness without competing with the layers underneath.
- Dusting: A fine, delicate dusting of powdered sugar around the serving plate or across the top looks incredibly elegant. It echoes the simplicity Daisy always loved but still makes it look special.
The key takeaway for presentation is contrast. Let those deep reds and rich creams do all the talking!
Storing and Reheating Your Decadent Red Velvet Dessert
You’ve done the hard work, and goodness knows you’ll want leftovers of this amazing red velvet cheesecake. The most critical step after baking is the chilling process. Remember how I stressed that minimum six-hour chill? That’s the bare minimum because that’s how long it takes for the structure to truly set up and for the flavors to meld together. Seriously, waiting overnight is my favorite way to eat it!
To store leftovers, you’ve got to protect that gorgeous top surface. Be gentle! I wrap the remaining cheesecake right in the springform pan with plastic wrap, making sure to seal the edges as best I can to keep moisture in and fridge smells out. If you’ve already sliced it, cover the cut edges with a dab of plain cream cheese or use a slice of parchment paper as a barrier before wrapping tightly.
Now, about reheating—we don’t do that here! Cheesecake is designed to be served cold or slightly cool. Trying to microwave or heat up this decadent dessert will just melt those beautiful layers into a sloppy mess. Don’t risk it!
Instead of reheating, if you are craving a slightly softer texture than straight-from-the-fridge cold, just pull the sealed piece out onto the counter about 30 to 45 minutes before you plan to eat it. This lets it warm up just enough to soften the filling, giving you that perfect creamy texture without sacrificing its structural integrity. It’s the professional way to enjoy your leftover slices!
Frequently Asked Questions About Homemade Cheesecake
I know when you’re facing down a big bake like this, your brain starts spinning with ‘what ifs’! That’s totally normal, even for seasoned cooks. I’ve pulled together some of the questions I got most often after testing this recipe dozens of times to make sure you feel totally confident before you even fire up the oven. We want guaranteed success for your easy cheesecake baking adventure!
Can I make this red velvet cheesecake without a water bath?
Oh, honey, you can try, but I wouldn’t recommend it if you want that signature smooth, decadent texture! If you skip the water bath, you’re asking for uneven cooking, and that almost guarantees cracking and a slightly grainy top layer. The slow, moist heat from the water bath is precisely what turns this into a true bakery style cheesecake. It’s worth the extra little setup step, trust me!
How do I get the bright red color in the red velvet layer?
This is where the red velvet magic comes from! You need to invest in high-quality red food coloring—the gel kind works miracles compared to the watery liquid stuff. Use just the amount called for, usually about a teaspoon, depending on the brand’s intensity. Also, be precise with your cocoa powder measurement. Too much cocoa powder will muddy that bright red backdrop we’re looking for, turning it a dull brownish-red instead of that vibrant velvet hue we want.
Can I use a different crust instead of Oreos for this red velvet cheesecake recipe?
Absolutely, you can switch things up! If you’re out of Oreos or just prefer a different flavor profile, graham crackers or even shortbread cookies work beautifully as a base. However, you have to know that using anything other than the Oreos fundamentally changes the result. Graham crackers give you a lighter, sweeter foundation, while Oreos give us that deep chocolate punch that really complements the tang of the rich and tangy cheesecake filling. Just remember to treat the new crumb mixture the same way—mix it with melted butter and press it firmly!
Next Steps After Baking Your red velvet cheesecake
Whew! You’ve done it! You pulled this stunning, multi-layered construction out of the fridge, and it’s perfect. But the story isn’t over yet, is it? Now comes the fun part—sharing this glorious red velvet cheesecake with the world, or at least with your dinner guests!
I really, truly hope you loved making this as much as I love sharing it. This is the kind of recipe I revisit every single year, like an old friend. If you succeeded—if that swirl came out just right, or if the Oreo crust held its shape perfectly—please, please let me know how it went!
Leave a comment down below and tell me what you thought. Did the tang perfectly balance the richness? Are you already planning when you can make your next one? I’m always curious to hear about the little triumphs! If you ended up posting a picture of your finished cake on social media, don’t forget to tag me so I can see your beautiful work. You can send pictures directly through my contact page—I check it constantly!
If you’re looking for more recipes that inspire that same wow factor, don’t forget to check out the original source for inspiration, like this incredible red velvet cheesecake post. Keep that connection to simple, honest baking alive, and I’ll see you in the next recipe!
PrintShowstopper Red Velvet Cheesecake with Oreo Crust

Make this ultra creamy and rich red velvet cheesecake featuring a crunchy Oreo crust and a beautiful cream cheese swirl. This bakery-style dessert is perfect for holidays and special occasions.
- Prep Time: 30 min
- Cook Time: 75 min
- Total Time: 105 min
- Yield: 12 servings
- Category: Dessert
- Method: Baking
- Cuisine: American
- Diet: Vegetarian
Ingredients
- For the Oreo Crust: 2 cups crushed Oreo cookies, 6 tablespoons unsalted butter melted
- For the Red Velvet Layer: 1 (8 ounce) package cream cheese softened, 1 cup granulated sugar, 2 large eggs, 1 teaspoon vanilla extract, 1 teaspoon white vinegar, 1 teaspoon cocoa powder, 1 teaspoon red food coloring, 1/4 cup buttermilk, 1 cup all-purpose flour, 1/2 teaspoon baking soda
- For the Cheesecake Layer: 2 (8 ounce) packages cream cheese softened, 1 cup granulated sugar, 1/2 cup sour cream, 1 teaspoon vanilla extract, 3 large eggs
- For the Cream Cheese Swirl/Topping (Optional): 4 ounces cream cheese softened, 1/2 cup powdered sugar, 1/4 cup heavy whipping cream
Instructions
- Prepare the crust: Preheat your oven to 350°F (175°C). Mix the crushed Oreos and melted butter. Press the mixture firmly into the bottom of a 9-inch springform pan. Bake for 10 minutes. Let cool slightly.
- Prepare the red velvet layer: In a medium bowl, beat the softened cream cheese and 1 cup sugar until smooth. Beat in the eggs one at a time. Stir in vanilla, vinegar, cocoa powder, and red food coloring until combined. Mix buttermilk, flour, and baking soda separately, then gently fold into the red velvet batter.
- Pour half of the red velvet batter over the cooled crust. Bake for 10 minutes. Remove from oven.
- Prepare the cheesecake layer: In a large bowl, beat the 2 packages of cream cheese and 1 cup sugar until smooth. Beat in the sour cream and vanilla. Add the eggs one at a time, mixing just until combined after each addition.
- Pour the cheesecake batter over the partially baked red velvet layer.
- Top with the remaining red velvet batter, dropping spoonfuls randomly over the cheesecake layer. Use a knife or skewer to gently swirl the layers together for a stunning visual effect.
- Bake: Reduce the oven temperature to 325°F (160°C). Bake for 60 to 75 minutes, or until the edges are set but the center still has a slight jiggle.
- Cool: Turn off the oven, crack the door open, and let the cheesecake cool inside for 1 hour. Remove from the oven and cool completely on a wire rack. Chill in the refrigerator for at least 6 hours, preferably overnight.
- Make the optional topping: Beat the 4 ounces of cream cheese with powdered sugar until smooth. Gradually beat in the heavy cream until fluffy. Spread over the chilled cheesecake before serving.
Notes
- For an ultra creamy texture, bring all dairy ingredients for the cheesecake layer to room temperature before mixing.
- Wrap the outside of the springform pan tightly with heavy-duty aluminum foil before placing it in a water bath (bain-marie) to prevent cracking and ensure even baking.
- If you skip the swirl, you can bake the red velvet batter as a thin base layer and pour all the cheesecake batter on top for a classic two-layer cheesecake.
Nutrition
- Serving Size: 1 slice
- Calories: 450
- Sugar: 40g
- Sodium: 350mg
- Fat: 30g
- Saturated Fat: 18g
- Unsaturated Fat: 12g
- Trans Fat: 0.5g
- Carbohydrates: 42g
- Fiber: 1g
- Protein: 8g
- Cholesterol: 110mg