
When that craving hits—you know the one, for something tart, rich, and undeniably festive—you need instant satisfaction, not an afternoon commitment. That’s exactly why I fell head-over-heels for these red velvet cake balls! This recipe is pure joy masquerading as simplicity. It’s one of those secrets I learned from my Grandma Daisy: take the flavors you love and find the most honest, straightforward path to them. Since I’m juggling a career now, I use a little smart hack to make these no-bake little bites in hardly any time. They deliver that deep, velvety red flavor inside a chocolate shell, all without ever turning on the oven. If you loved my recipe for classic no-bake Oreo truffles, you’ll adore these even more! Trust me, these are the ultimate **bite sized red velvet treats** for a busy life!
- Why These Are the Best Red Velvet Cake Balls Recipe for Quick Treats
- Gathering Ingredients for Your Red Velvet Cake Balls
- Simple Cake Ball Instructions: Creating Perfect Red Velvet Cake Balls
- Tips for Success with Your Indulgent Red Velvet Recipe
- Serving Suggestions for Party Small Cakes
- Storage & Reheating Instructions for Homemade Cake Truffles
- Variations on Classic Red Velvet Cake Balls
- Frequently Asked Questions About Red Velvet Cake Balls Recipe
- Share Your Red Velvet Cake Balls Creations
Why These Are the Best Red Velvet Cake Balls Recipe for Quick Treats
When you need a show-stopping dessert for a party but have zero time for cooling racks and fussy baking times, this recipe wins every single time. They aren’t just pretty; they offer that signature, decadent red velvet flavor we all crave in a perfect, tiny package. We use a quick cake mix hack, which drastically speeds things up without sacrificing that rich flavor profile, making these fantastic **easy cake balls dessert** options. You get all the indulgence, way less fuss! If you loved my recipe for easy 3-ingredient chocolate fudge, you’ll understand why simple hacks are my jam.
Quick Assembly: The No Bake Advantage of Red Velvet Cake Balls
The best part? There’s no actual baking involved once the cake is done—we roll and chill! This means cleanup is minimal, and you aren’t waiting hours for things to cool down enough to handle. If you’re in need of last-minute **quick sweet treats**, this feature alone makes this recipe indispensable for holiday baking or sudden dessert crises.
Moist Center Guaranteed with Cream Cheese Red Velvet Balls
A dry cake ball is a tragedy, plain and simple. That’s why the cream cheese frosting is non-negotiable! It acts as the perfect binder while adding that subtle, necessary tang alongside the chocolatey goodness. The combination of the cake crumbs and the frosting is what creates that enviable **moist cake ball center**—tender, never crumbly, and incredibly rich.
Gathering Ingredients for Your Red Velvet Cake Balls
Okay, time to look at what we need! Since we’re aiming for ease, we’re leaning on a boxed mix here—it’s a fantastic shortcut that still yields fantastic results for these **cream cheese red velvet balls**. But listen closely: don’t skimp on the frosting! That creamy element is the glue holding our beautiful little treats together. If you ever need a scratch version, my recipe for vanilla buttercream shows you how much magic you can make with high-quality foundational ingredients, but for these bites, the box is our secret weapon!
Essential Components for Cream Cheese Red Velvet Balls
Here is what you’ll pull out to make this happen:
- 1 box (15.25 oz) red velvet cake mix (plus whatever the box tells you to add to bake it!)
- 1 container (16 oz) cream cheese frosting—and yes, store-bought is absolutely fine here for speed!
- 12 ounces white chocolate melting wafers or chips (you can swap this later for other chocolate if you like!)
- 1 teaspoon coconut oil or shortening (sometimes I toss this into the white chocolate, it helps it flow better).
- Red or white sprinkles, reserved for decorating your beautiful final product.
Simple Cake Ball Instructions: Creating Perfect Red Velvet Cake Balls
This is where the magic happens, and honestly, it’s so quick you might miss it! Since we aren’t dealing with oven heat past the initial bake, the assembly moves really fast. Just follow these steps exactly, especially the chilling part. If you rush that, the chocolate coating will become your enemy! We’re taking these simple components and turning them into elegant **party small cakes** before you know it. For more quick assembly inspiration, check out my recipe for easy ice cream pie—timing is everything!
Baking and Crumb Preparation for Your Red Velvet Cake Balls
First things first: bake that cake according to the box directions, using the listed water, eggs, and oil. Don’t make any swaps here! Once it’s baked, you have to let it cool completely—and I mean *completely*—on a rack. If it’s even slightly warm, the frosting will melt right off. When it’s cool, use your hands to crumble the entire thing into a big bowl. I always try to remove any dark, crispy edges because we want the smoothest texture possible for our center!
Mixing and Shaping the Red Velvet Dessert Bites For Parties
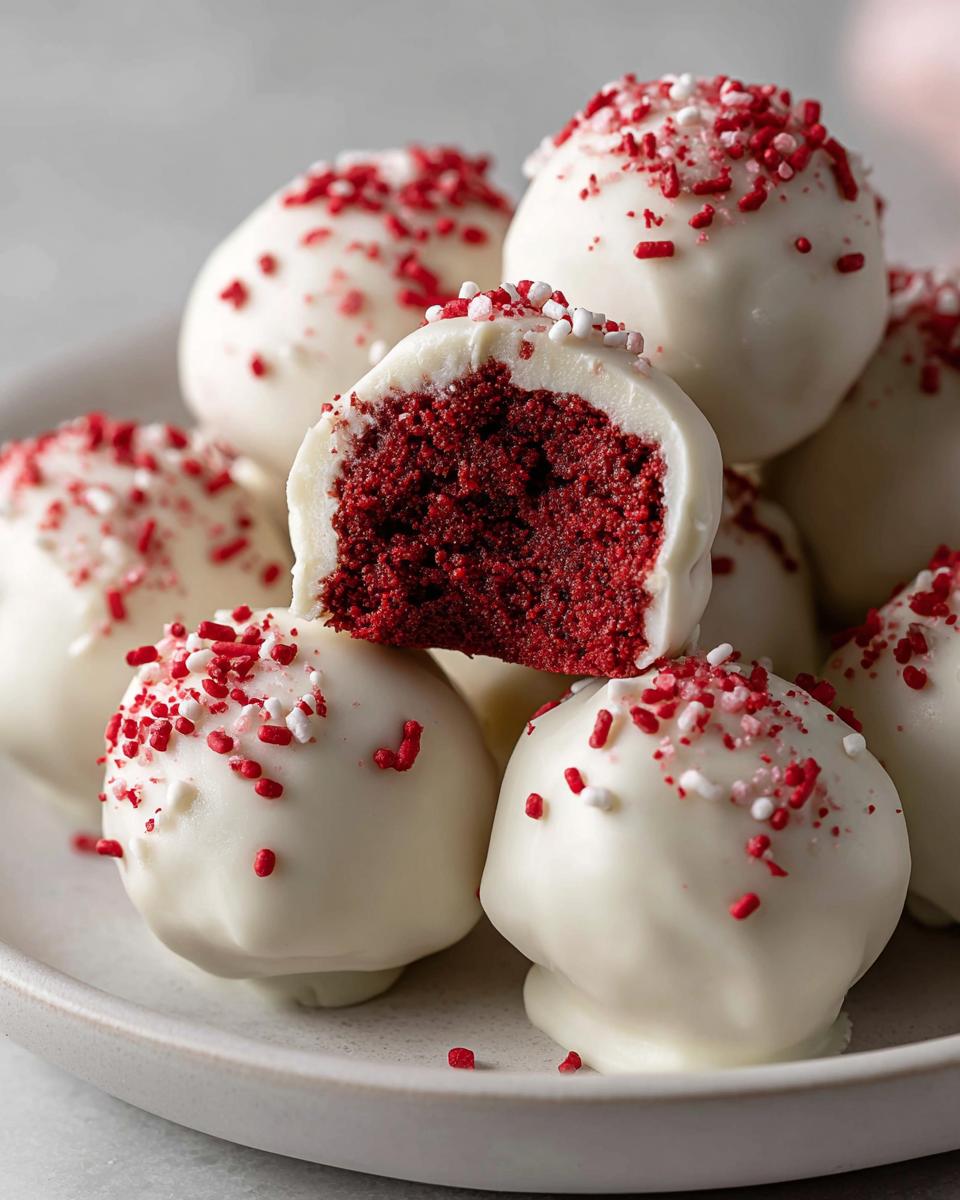
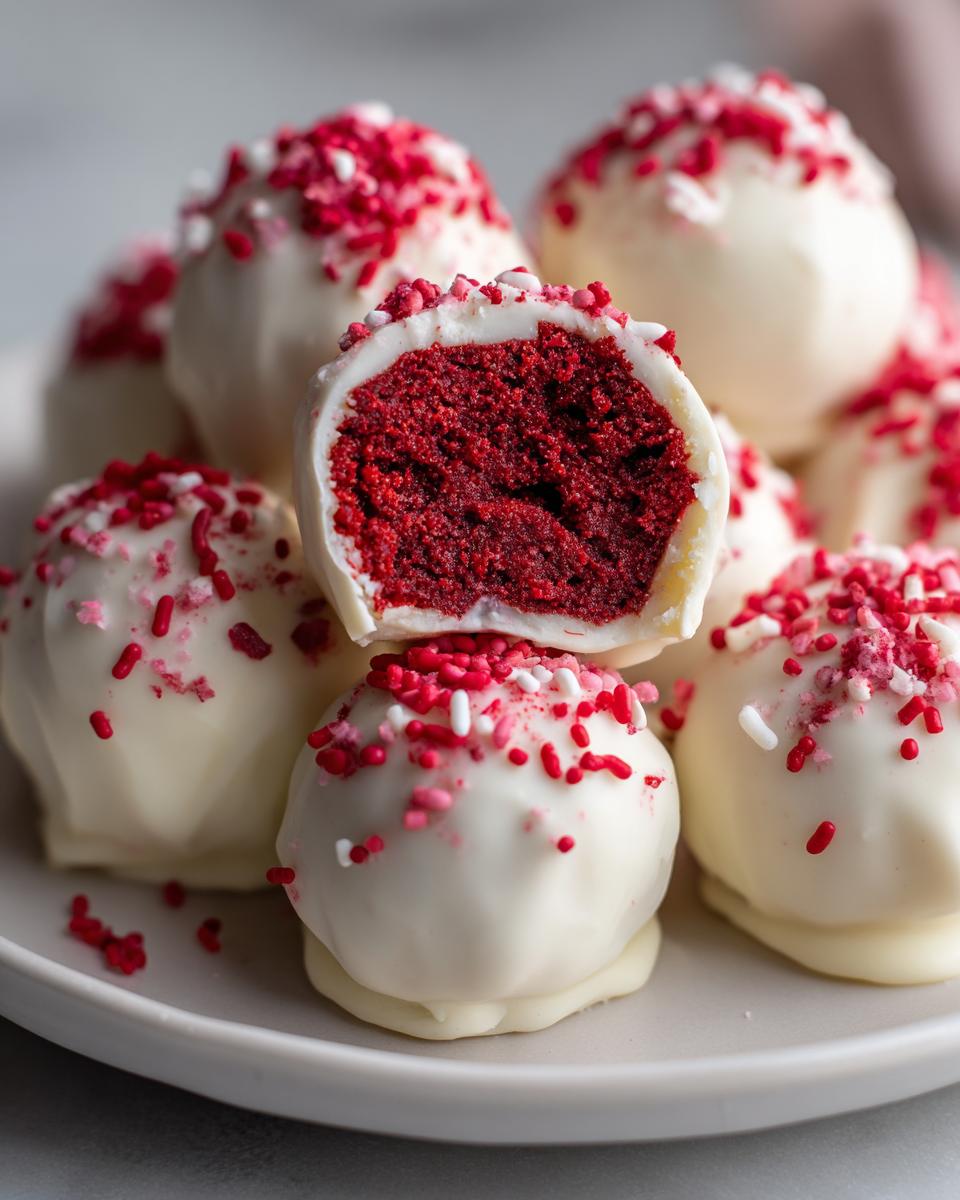
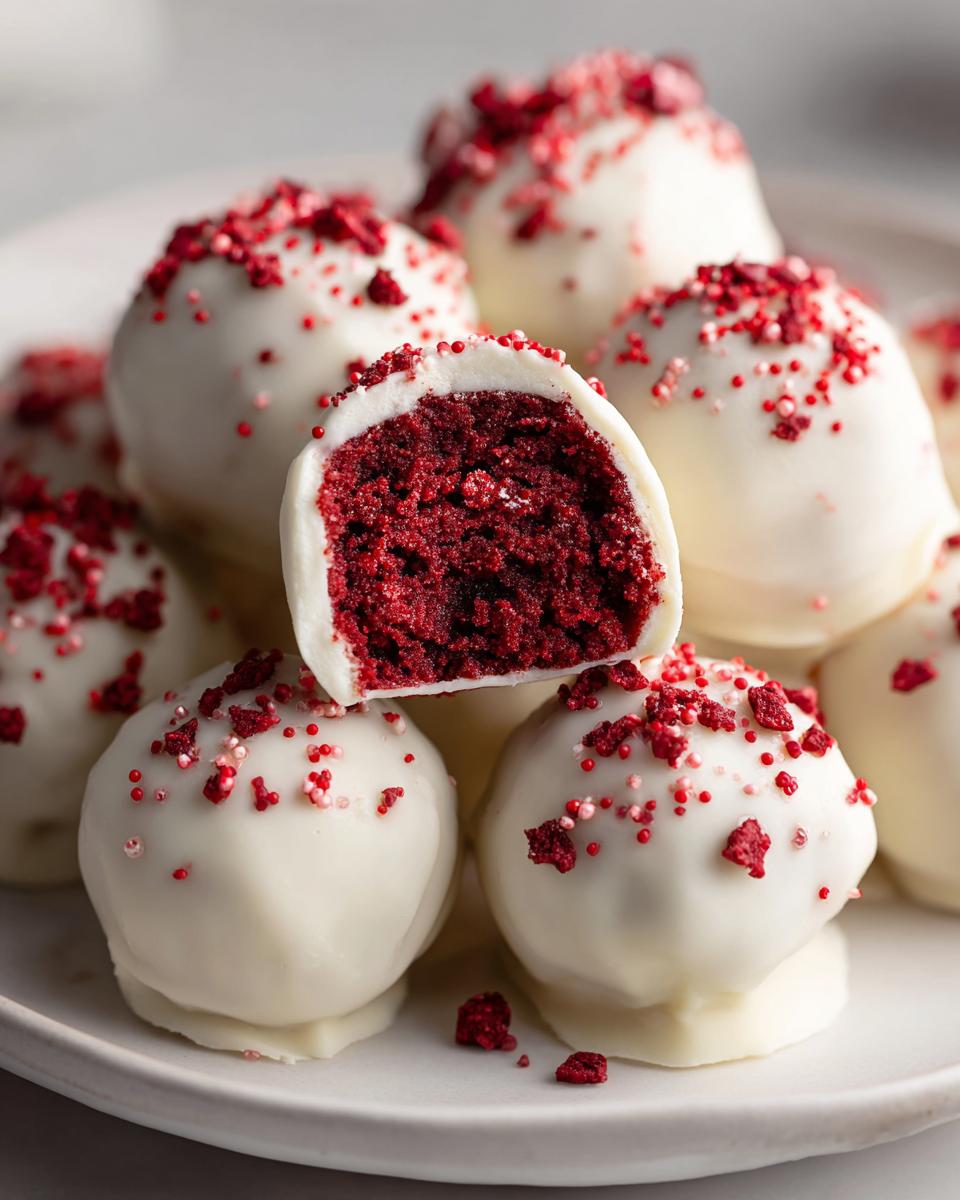
Now, dump that entire tub of cream cheese frosting right in with those beautiful red crumbs. Mix it up! I usually just use my hands here because you need to feel when it transforms into a thick, pliable dough. Roll this dough into uniform little balls, about an inch wide. Uniformity is key so they all dip evenly later on. Once they are all rolled, place them on that parchment-lined sheet and straight into the fridge for at least half an hour. Seriously, don’t skip this chill time for your **red velvet cake balls**—it’s crucial!
Mastering the White Chocolate Covered Cake Balls Coating
While those are chilling, get your chocolate ready. Melt your white chocolate wafers slowly in the microwave in short 30-second bursts, stirring well each time until it’s totally smooth. If it seems too thick to drizzle, stir in that optional teaspoon of coconut oil; it makes it pour like silk, which prevents thick, clumpy coatings. Use a fork or dipping tool to drop a cold ball into the chocolate, rotate it quickly to coat, and lift it out, letting all the extra drip off back into the bowl. Pop it back on the parchment, apply your sprinkles *immediately*—they won’t stick once the chocolate sets—and let them firm up!
Tips for Success with Your Indulgent Red Velvet Recipe
Even though this is a no-bake recipe, there are definitely little insider tricks that take these from ‘pretty good’ to ‘Oh my goodness, I need the recipe!’ My Grandma Daisy always said that even a simple treat deserves your full attention. We want these red velvet cake balls to be delightfully soft inside while holding their shape perfectly. I’ve tweaked the basics over the years, and here are the things I always stick to ensure they turn out perfectly every time we serve them up. If you are curious about taking a baked element up a notch, you should definitely check out my favorite ultra-moist carrot cake recipe for inspiration!
Achieving the Best Moist Cake Ball Center
While using that boxed cake mix is a lifesaver for speed, if you happen to have an extra hour and want to lean into that scratch, homemade flavor, you absolutely can bake the cake from scratch instead! Just make sure whatever cake you end up with is baked until just done—you never want dry cake crumbs to start with. Also, for an even richer experience, I sometimes swap out four ounces of that canned cream cheese frosting for four ounces of softened, real cream cheese. The texture becomes unbelievably decadent!
Troubleshooting Common Issues with Red Velvet Cake Balls
Nine times out of ten, if something goes wrong, it’s related to temperature or mixing. If your balls are falling apart when you try to roll them, it usually means you need more binder—throw in another tablespoon or two of that frosting, or just put the bowl back in the fridge for another twenty minutes to firm up. The cold is your friend here!
Now, chocolate is tricky. If your white chocolate melts beautifully and then suddenly gets stiff, grainy, or separates when you dip the first ball in, you’ve probably introduced a tiny bit of water or steam. That’s called seizing, and it’s heartbreaking! Don’t try to fix a seized batch; just start melting a fresh small batch. And please, make sure those cake balls are truly cold from the fridge before they meet the warm chocolate. If they aren’t chilled, the coating melts right off before it can set!
Serving Suggestions for Party Small Cakes
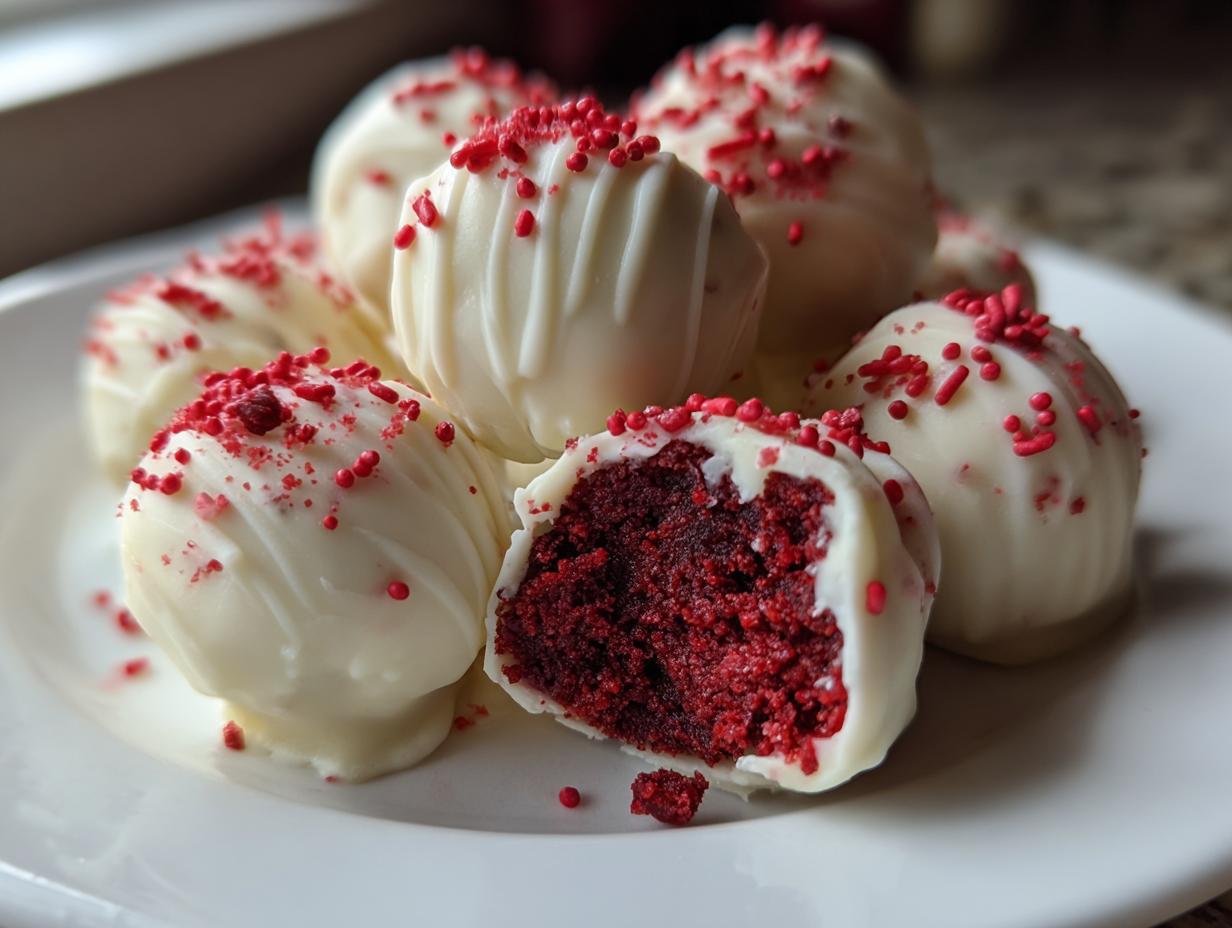
Now that you have this beautiful bounty of bite-sized perfection, deciding how to present them is almost as fun as eating them! These vibrant **red velvet cake balls** just scream celebration. They look fabulous laid out on a tiered stand for a big party—imagine them stacked up like little red jewels!
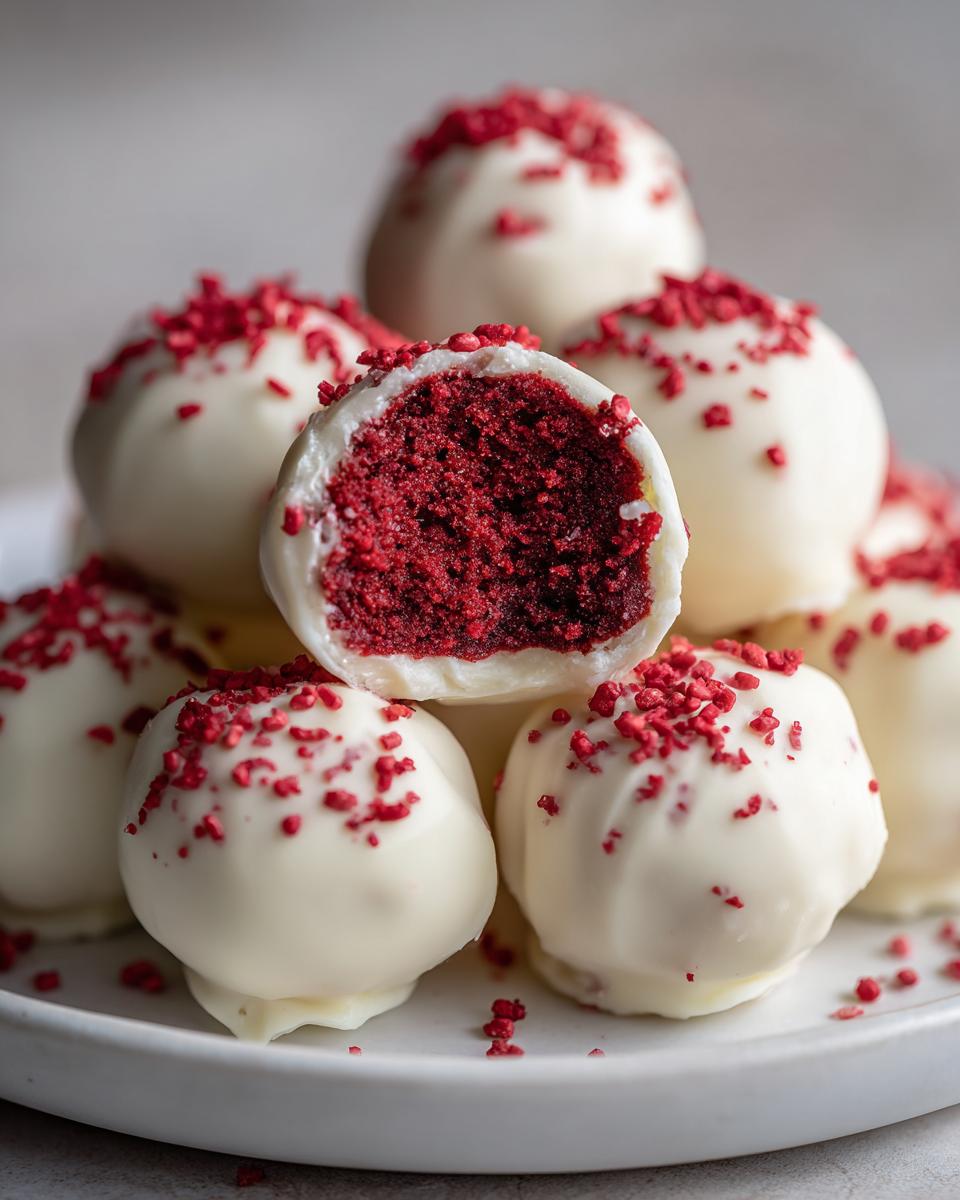
They are absolutely essential for Valentine’s Day, of course, stacked next to some fresh berries. But honestly, I make them for so many other reasons too! They look stunning on a dessert board for Christmas, adding that necessary pop of festive color. For a relaxed gathering, just put them in cute little paper truffle cups on a simple white platter.
If you’re serving these as an afternoon treat, they pair perfectly with a strong cup of coffee or maybe even a latte. For a special holiday event, since they are already so rich, sometimes I skip the heavy dessert spread entirely and just offer these alongside a large batch of my make-ahead holiday sangria. They are the perfect little indulgence that everyone can grab and go!
Storage & Reheating Instructions for Homemade Cake Truffles
Once you manage to stop yourself from eating every single one immediately—which is a genuine struggle, trust me—you need to know how long these treats last. The good news is that these red velvet cake balls are wonderfully stable, thanks to that rich cream cheese binder and the protective chocolate coat. They are built to last, whether you’re prepping for a party days ahead or just making a batch because you can!
If you have any remains, the refrigerator is your best friend. Place them gently in an airtight container—layering with parchment paper between the layers is a good idea so the chocolate doesn’t stick. They stay perfectly fresh and firm in the fridge for up to a week. They might harden up just a touch, but that’s okay!
Now, if you’re making them super far ahead or you want them ready for the holidays, freezing is the way to go. I treat them just like I store my no-bake Oreo ice cream cake—tightly wrapped. Put the cake balls in a single layer inside a sturdy, freezer-safe, airtight container. They keep beautifully for up to three months frozen!
To serve frozen ones, just pull them out about an hour before you want to eat them. They thaw perfectly on the counter while still maintaining that delightful, fudgy density. Honestly, they taste just as good from the freezer as they do fresh!
Variations on Classic Red Velvet Cake Balls
While I stand by our creamy, white chocolate classic, these little spheres are just begging to be played with! If you love a bit of variety on your dessert table, changing up the coating or adding a simple flavor extract can give you completely new red velvet cake balls that still use the super easy base recipe. It’s all about keeping things exciting without adding extra chores, right?
If white chocolate isn’t your absolute favorite, don’t worry! We can still create incredible chocolate coated cake bites. You can easily swap out the white melting wafers for milk chocolate or even a bittersweet dark chocolate. The dark chocolate, especially, cuts through that sweetness from the cream cheese frosting beautifully, giving you a much richer flavor profile overall.
For something a little different inside, try adding a tiny boost of flavor while you’re mixing the crumbs and frosting together. A quarter teaspoon of pure almond extract or even a tiny splash (maybe half a teaspoon!) of vanilla bean paste really elevates the flavor depth. If you want a real showstopper that looks like a homemade masterpiece, you should check out my recipe for ultimate chocolate meringue pie for inspiration on achieving those dramatic finishes!
And just for fun, if you really want to lean into party vibes, try dipping half the batch in one coating and the other half in another. You get the visual appeal of variety, and everyone gets exactly what they want!
Frequently Asked Questions About Red Velvet Cake Balls Recipe
I know you’ve probably got a few questions buzzing around your head now that you see how simple these are! I get asked all the time about shortcuts and keeping these beauties perfect until serving time. These **red velvet cake balls** are pretty forgiving, but a few tips here and there make all the difference. Think of this as my little troubleshooting session so your results are flawless every time!
Can I make these Red Velvet Cake Balls completely from scratch?
Absolutely, you can! I love the cake mix hack because it saves me about an hour of active baking time, which really helps when I need **quick sweet treats** for a last-minute party, but you can certainly use your favorite homemade red velvet cake, too. Just make sure the cake you bake—whether from a box or scratch—is completely cooled, as warm cake crumbles melt the frosting binder instantly. The final texture will be divine!
What is the best way to store these Bite Sized Red Velvet Treats?
Because we are using that delicious cream cheese frosting in the center, they really need to stay cool. Store them in an airtight container, making sure to place little squares of parchment paper between layers so the chocolate coating doesn’t get messy or stick together. This keeps them perfect until they are ready to be served as beautiful **bite sized red velvet treats**.
Do these Easy Cake Balls Dessert recipes need to be refrigerated?
Yes, they really do. If you plan on eating them within two or three days, the fridge is the best spot, especially if your kitchen runs warm. The cream cheese we use to bind these **easy cake balls dessert** favorites likes the cold to keep its structure, and keeping them chilled ensures that chocolate shell stays crisp and doesn’t get soft or melty on you.
If you’re curious about other recipes that include cream cheese, I highly recommend checking out my recipe for cream cheese banana bread—it has that same rich, tangy flavor profile!
Share Your Red Velvet Cake Balls Creations
Now that you have these rich, wonderful **red velvet cake balls** ready, I truly hope you saved a few to show off! I put my whole heart into making sure these simple recipes work beautifully for you, whether you’re hosting a huge holiday bash or just making a tiny batch for a quiet afternoon treat. This community is all about sharing the joy of honest, delicious home cooking, just like Grandma Daisy taught me.
When you make these, I would absolutely love to see how yours turned out! Did you stick with the classic white chocolate coating, or did you try a dark chocolate version? Maybe you used amazing metallic sprinkles for a touch of glamour? Snap a picture and tag me on social media! It means the world to me to see Daisy’s legacy making its way into your kitchen.
And hey, if you found this recipe helpful—maybe the no-bake factor saved your whole evening—please leave a rating right here on the page. Those stars really help other busy cooks find this foolproof treat! If you enjoyed this style of cooking, you might also find my recipe for easy chicken marsala useful for your next weeknight dinner adventure!
PrintEasy No-Bake Red Velvet Cake Balls with Cream Cheese Center
Make these rich, bite-sized red velvet cake balls using a simple cake mix hack and cream cheese frosting. They are no-bake, easy to prepare for parties, and coated in smooth white chocolate.
- Prep Time: 25 min
- Cook Time: 30 min
- Total Time: 1 hour 5 min
- Yield: 24 servings 1x
- Category: Dessert
- Method: No Bake
- Cuisine: American
- Diet: Vegetarian
Ingredients
- 1 box (15.25 oz) red velvet cake mix
- 1 cup water (or as directed on cake mix box)
- 3 large eggs (or as directed on cake mix box)
- 1/2 cup vegetable oil (or as directed on cake mix box)
- 1 container (16 oz) cream cheese frosting (store-bought is fine)
- 12 ounces white chocolate melting wafers or chips
- 1 teaspoon coconut oil or shortening (optional, for smoother dipping)
- Red or white sprinkles for decoration (optional)
Instructions
- Prepare the red velvet cake according to the package directions, using the water, eggs, and oil specified on the box. Bake the cake in a 9×13 inch pan.
- Let the cake cool completely on a wire rack.
- Once cool, crumble the entire cake into fine crumbs into a large bowl. Remove any overly browned edges if you prefer a very smooth center.
- Add the entire container of cream cheese frosting to the cake crumbs. Mix by hand or with a stand mixer until the mixture is fully combined and resembles a thick dough.
- Roll the mixture into small, uniform balls, about 1 inch in diameter. Place the balls on a parchment-lined baking sheet.
- Chill the cake balls in the refrigerator for at least 30 minutes to firm them up. This step prevents them from falling apart when dipping.
- Melt the white chocolate wafers in a microwave-safe bowl in 30-second intervals, stirring well after each interval, until smooth. If using, stir in the coconut oil for a thinner consistency.
- Dip each chilled cake ball into the melted white chocolate, ensuring it is fully coated. Use a fork or dipping tool to lift it out, allowing excess chocolate to drip off.
- Place the dipped cake ball back onto the parchment-lined sheet. Immediately sprinkle with decorative sprinkles, if using.
- Allow the chocolate coating to set completely at room temperature, or speed up the process by placing the sheet back in the refrigerator for 10-15 minutes.
Notes
- For a truly homemade flavor, bake the cake from scratch instead of using a mix.
- These cake balls freeze well. Store them in an airtight container in the freezer for up to three months.
- If you want a slightly richer center, substitute 4 ounces of the cream cheese frosting with 4 ounces of softened cream cheese.
Nutrition
- Serving Size: 1 ball
- Calories: 220
- Sugar: 22
- Sodium: 150
- Fat: 14
- Saturated Fat: 7
- Unsaturated Fat: 7
- Trans Fat: 0.5
- Carbohydrates: 24
- Fiber: 0.5
- Protein: 2
- Cholesterol: 25