

Oh, that relentless summer heat! When the sun is beating down and the last thing you want to do is turn on the oven, I always turn to the same magic trick: an incredible, creamy **ice cream pie**. This dessert isn’t just a treat; it’s a rescue mission for hot afternoons and last-minute get-togethers. When I first started cooking again, trying to recapture the simple joys my Grandma Daisy found in her kitchen, it was these no-bake recipes that brought me back. There is something wonderfully satisfying about creating an indulgent, show-stopping dessert without ever lighting a burner. This Ultimate Oreo Crust Ice Cream Pie is exactly that—simple work for a huge payoff.
- Why This Ultimate No-Bake Oreo Crust Ice Cream Pie is Your New Favorite
- Gathering Ingredients for Your Homemade Ice Cream Pie
- Step-by-Step Instructions for the Quick Frozen Pie
- Expert Tips for the Best Ice Cream Pies
- Storage and Make Ahead Dessert Instructions for Your Ice Cream Pie
- Serving Suggestions for This Indulgent Ice Cream Dessert
- Frequently Asked Questions About Making Ice Cream Pie
- Estimated Nutritional Data for One Slice of Ice Cream Pie
- Share Your Homemade Ice Cream Pie Creations
Why This Ultimate No-Bake Oreo Crust Ice Cream Pie is Your New Favorite
When I talk about Daisy’s legacy, I talk about efficiency blended with deliciousness. This **ice cream pie recipe** embodies that spirit perfectly. It’s the kind of dessert that looks like you spent all day fussing over it, but in reality, the active prep time is ridiculously short. It’s truly the ultimate **party frozen pie** you can rely on when company shows up unexpectedly!
- It’s entirely **no bake ice cream pie**—no melting sugar or worrying about oven temperatures here!
- Prep time is lightning fast, clocking in at just 20 minutes of active work.
- It’s incredibly easy to customize, making it a fantastic frozen dessert recipe for any occasion.
Simple Assembly: The Beauty of a No Bake Ice Cream Pie
Honestly, baking feels weighty sometimes, doesn’t it? You have to measure flour precisely and watch the oven like a hawk. With this **homemade ice cream pie**, you skip all that fuss. The beauty is in the layering: crust, ice cream, topping. That’s it! We get everything ready in about 20 minutes, press it into the dish, and let the freezer do the heavy lifting. It’s the best kind of magic for those busy summer evenings.
Customizable Ice Cream Pie Flavor Options
This base recipe is just a launching pad for your own creativity! That’s what I love most about serving this as a **summer ice cream treat**—everyone gets exactly what they want. If you’re feeling something rich, you can easily turn this into a decadent **peanut butter ice cream pie** just by stirring in some spreadable peanut butter right before freezing. Or, if you love that cool minty flavor, crush up some mint chocolate cookies and toss them in! It lets you play around with those popular flavor combinations without needing a whole new recipe card.
Gathering Ingredients for Your Homemade Ice Cream Pie
Now that you know this is going to be your new go-to **ice cream dessert idea**, let’s talk about what you need. Since this is a **no bake ice cream pie**, we aren’t gathering flour or eggs here! We are focusing purely on the creamy fillings and that spectacular crunchy base. The beauty of this **creamy frozen pie** is that most of what you need is already in your fridge or pantry, ready to go. Just make sure that ice cream is sitting on the counter for maybe ten minutes before you start so it’s spreadable—never rock-solid!
For the Oreo Crust Dessert Base
This crust is everything! It’s the foundation, the crunch, and the salty-sweet contrast that makes this whole **oreo crust dessert** sing. You’ll need:
- 2 cups crushed Oreo cookies (Don’t worry about being too precise; the food processor is your friend!)
- 6 tablespoons unsalted butter, melted (Go ahead and use salted if that’s all you have, but I really prefer the balance of unsalted butter here.)
For the Creamy Frozen Pie Filling
This is where you get to choose your adventure! For the main body of the pie, you’ll need:
- 1.5 quarts (that’s about 6 cups) of store-bought ice cream, softened slightly. Any flavor works, but classic vanilla or chocolate is a beautiful start.
- 1 cup heavy whipping cream (This is for the topping, make sure it’s cold!)
- 2 tablespoons powdered sugar
- 1 teaspoon vanilla extract
Optional Toppings for Your Ice Cream Pie
Don’t hold back here! These are the finishing flourishes for your magnificent **indulgent ice cream dessert**:
- Chocolate fudge sauce (The thicker the better!)
- Chopped peanuts or other nuts for that perfect sweet and salty dessert texture
- Maraschino cherries (Because presentation matters!)
Step-by-Step Instructions for the Quick Frozen Pie
Okay, here’s the best part—putting it all together! I promised you an **easy ice cream pie**, and these steps deliver. You don’t need to be a professional baker; you just need a freezer and patience for the waiting parts! We’re moving fast on the active steps so we can lock in that incredible texture. Trust me, once you see that crust firm up, you’ll be hooked on this **no bake ice cream pie** method.
Creating and Freezing the Oreo Crust Dessert
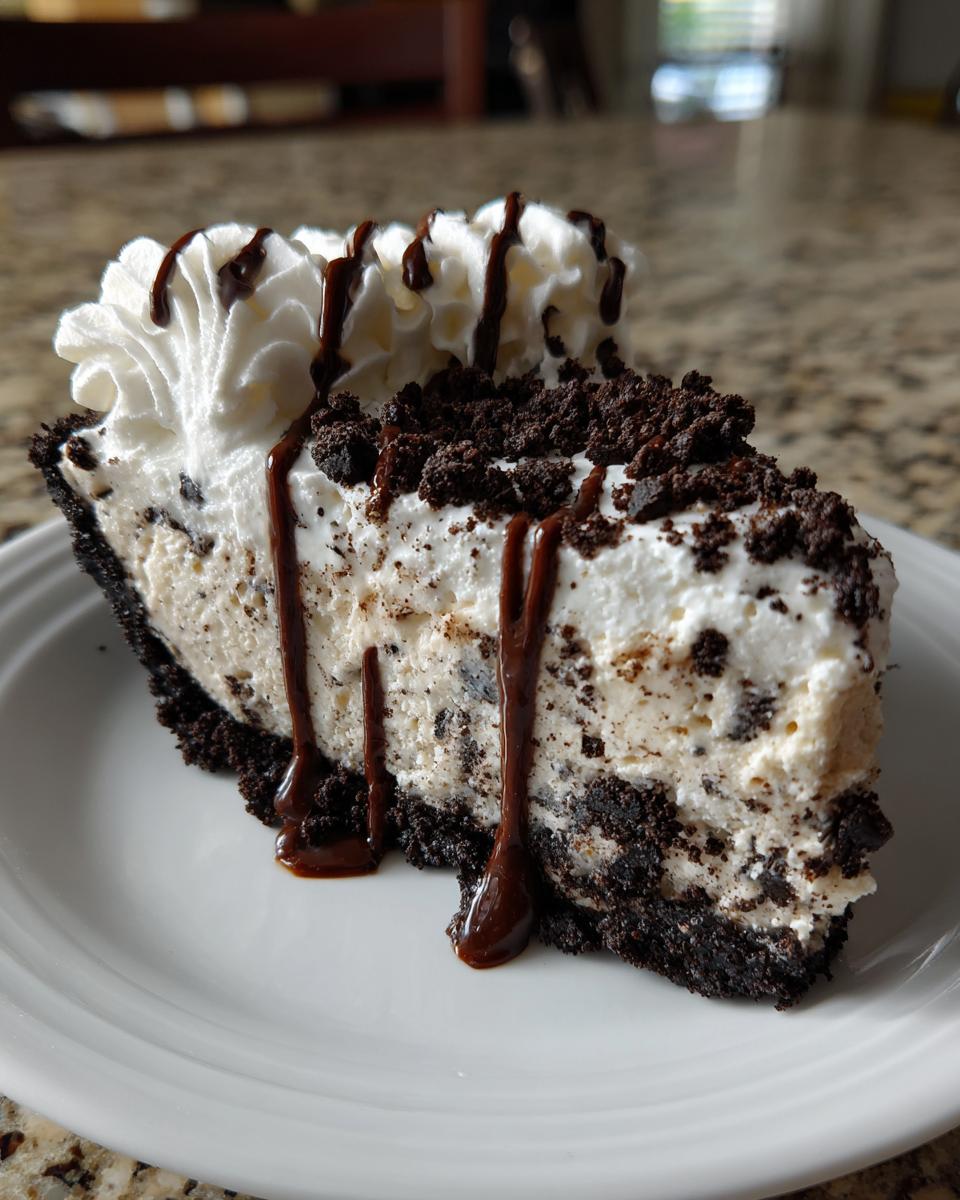
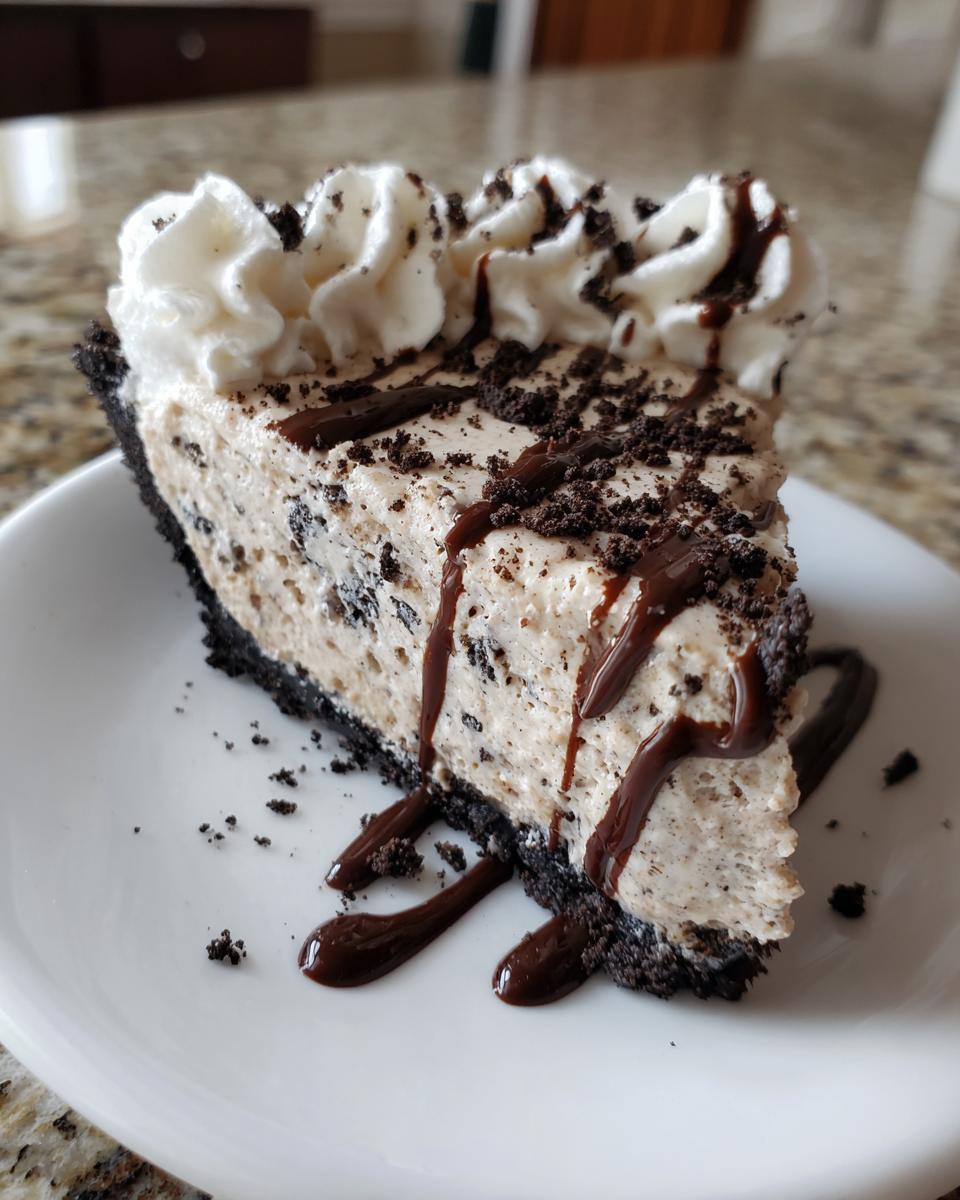
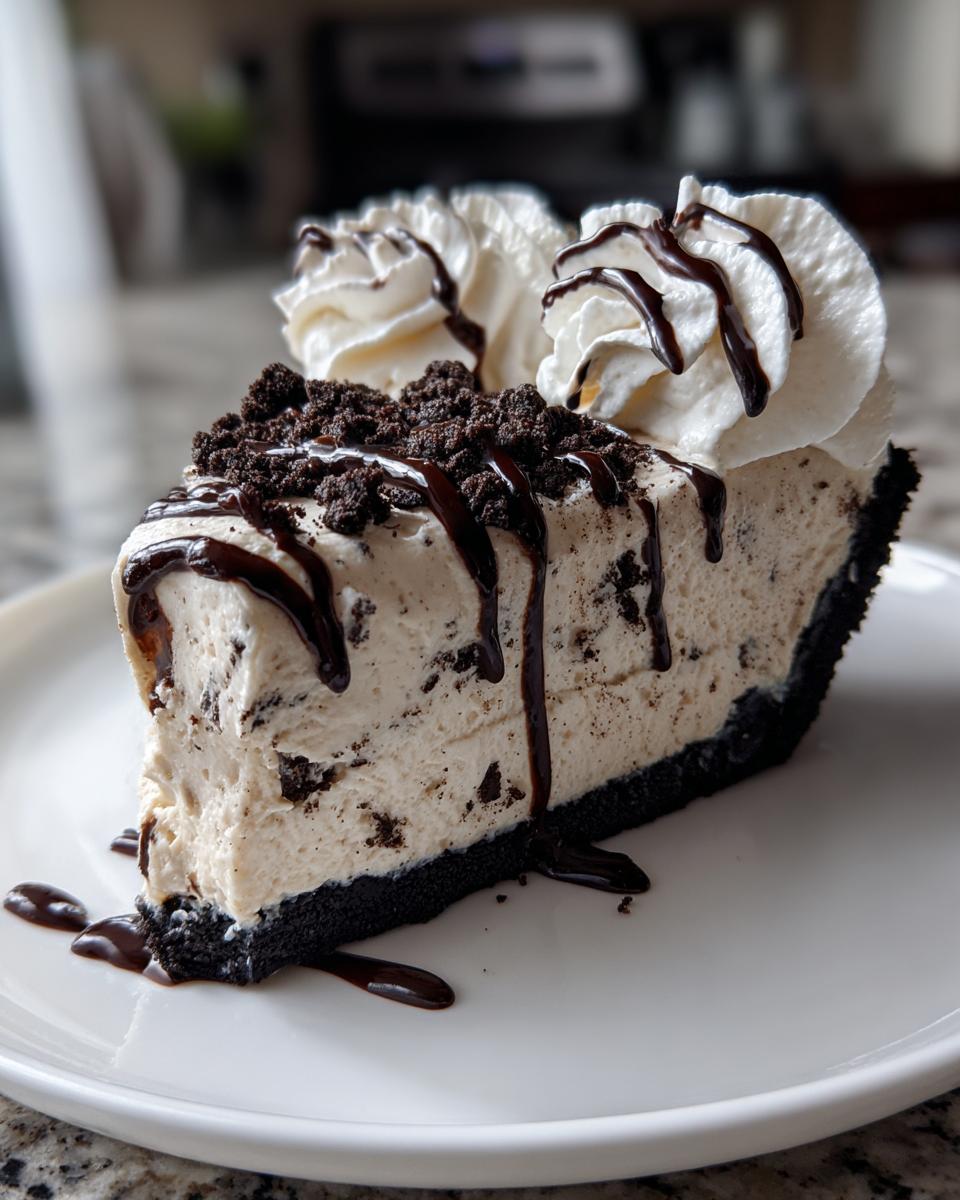
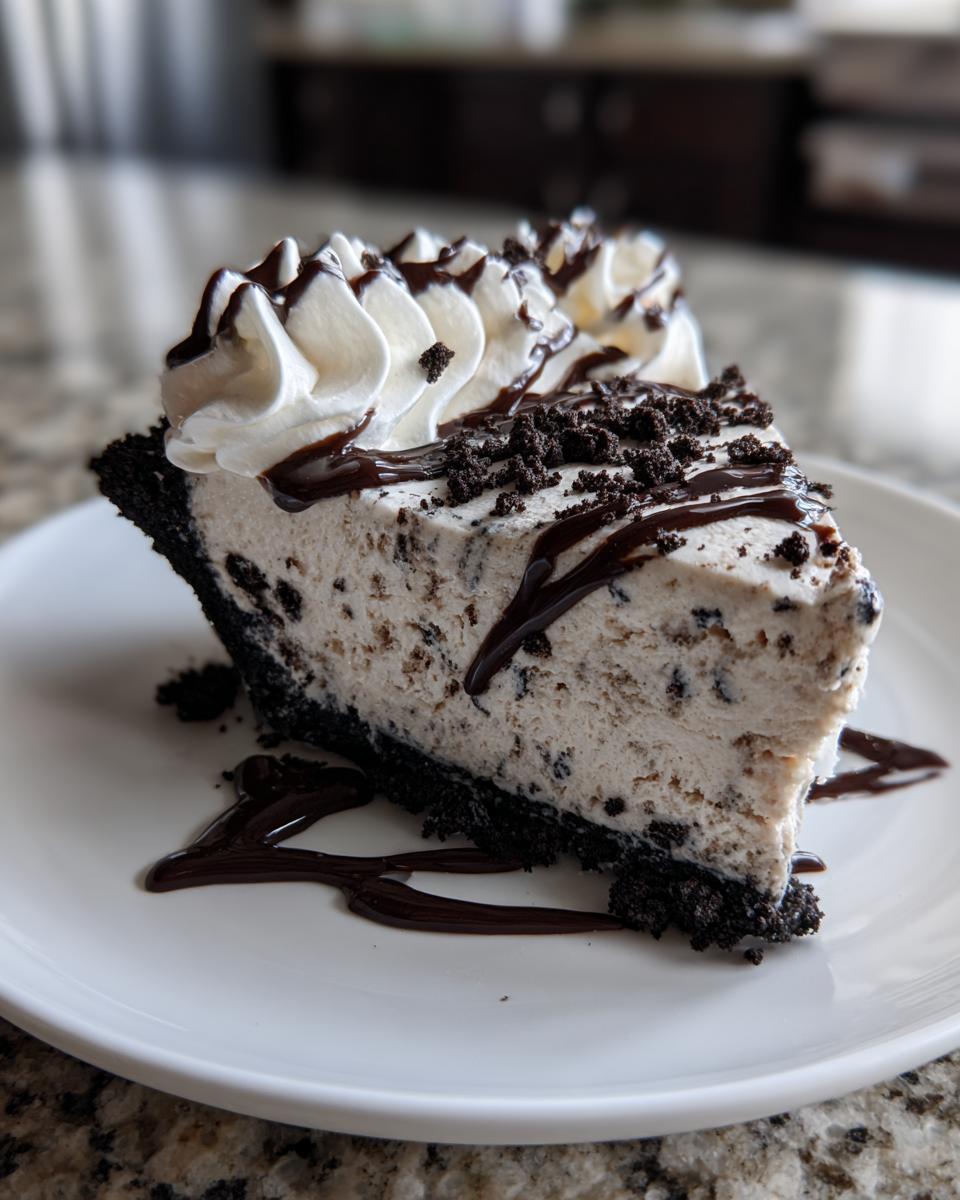
First things first, let’s make that crunchy base. In a bowl, mix your 2 cups of crushed Oreos with the 6 tablespoons of melted butter until everything looks like wet sand. Then, take that mixture and press it firmly! I mean *firmly*—use the bottom of a measuring cup to really pack it against the bottom and all the way up the sides of your 9-inch pie plate. Once it’s beautifully formed, slide that plate straight into the freezer for at least 15 minutes. This quick freeze ensures the crust stays put when we add the heavy filling later.
Assembling the Ice Cream Pie Filling
While the crust is chilling, get your ice cream slightly softened—we aren’t whipping it, just letting it sit on the counter so you can spread it without fighting it. Scoop that softened ice cream right into your chilled crust. Use a spatula to smooth the top, trying to keep it even. This is where you can sneak in those extra mix-ins if you decided on a **customizable ice cream pie**! Pop the assembled pie back into the freezer. This is the longest wait, but it’s crucial: freeze it for a minimum of 4 hours until that layer is rock solid and ready for toppings.
Finishing Touches: Whipped Cream and Serving the Ice Cream Pie
Once the ice cream is frozen solid, it’s time for the cloud topping! Whip your cold heavy cream, powdered sugar, and vanilla until stiff peaks form. Spread that gorgeous whipped cream right over the icy layer. If you’re using fudge or nuts, drizzle or sprinkle them on now. Pop it back in the freezer for one last hour so the topping sets up firm. Serving this **creamy frozen pie** requires a trick: run your sharpest knife under hot water, wipe it dry quickly, and then slice. That warm blade cuts right through the frozen layers for beautiful, clean servings. You can find some great general tips on making no bake desserts here!
Expert Tips for the Best Ice Cream Pies
When I was learning to make these frozen wonders, even though Grandma Daisy hadn’t made an ice cream pie—she was more of a standard cake woman—she always preached controlling the variables. Whether it was oven heat or freezer time, control meant quality. These little extra steps are what elevate this from just ‘scooped ice cream in a crust’ to a genuine, show-stopping **homemade ice cream pie**.
Achieving Layered Effects in Your Ice Cream Pie
The recipe notes mentioned using two different flavors, and honestly, I think that’s genius for mixing things up, especially for birthdays. If you want those beautiful stripes, you have to work quickly but patiently. Just take your first flavor—say, vanilla—and spread half of it into the crust. Freeze that layer until it’s solid, like a brick, maybe an hour. Then, lightly soften your second flavor, maybe a chocolate chip, and spread that on top. Making sure each layer is firm before adding the next keeps them from swirling together into one muddy color when you freeze it all overnight. It’s fiddly, but worth it for that visual pop!
Flavor Variations: Making a Peanut Butter Ice Cream Pie
If you’re anything like me, sometimes you just crave that salty-sweet combination. To turn this into the rich **peanut butter ice cream pie**, you don’t need a whole new recipe, thank goodness! Just wait until you’ve taken your 1.5 quarts of ice cream out to soften slightly for spreading. Before you even touch the crust, gently stir in about half a cup of creamy peanut butter right into the soft ice cream. You have to mix until it’s just combined—don’t over-mix or you’ll warm it up too much. Trust me, that salty, nutty flavor blending with the subtle chocolate cookie crust is just unbelievably good. Don’t forget to check out some other great recipes using caramel, too, since that pairs so nicely!Caramel sauce is a perfect drizzle on top!
Easy Release for Your Ice Cream Pie
This is a tip I learned the hard way after one too many beautiful pies shattered when I tried to serve them! If you plan on taking this pie out of the dish entirely—which sometimes you want to do for photos or a super formal platter—you need plastic wrap. Before you butter and flour (or use your crumb mixture), line the bottom and sides of your 9-inch pie plate with a large sheet of plastic wrap, leaving plenty of overhang on the edges. Press that Oreo crust right into the plastic lining. When the whole **ice cream pie** is completely frozen solid and topped, you just grab those plastic tabs and lift the entire thing right out! It saves so much headache, especially when dealing with something this cold. For more inspiration on amazing frozen desserts, take a peek at what others are making!These other recipes show great inspiration.
Storage and Make Ahead Dessert Instructions for Your Ice Cream Pie
This is honestly one of the greatest features of making a big **ice cream pie**: it’s the ultimate **make ahead dessert**! In my city life, knowing I can whip this up on Sunday and pull it out Wednesday night for a dinner party without thinking twice is a lifesaver. It guarantees you’re relaxed when guests arrive, which is the best secret ingredient anyway.
Once your pie is fully assembled—that means the ice cream layer is frozen hard and the whipped cream topping is set nicely—you need to protect it from freezer burn. You don’t want your beautiful creation tasting like cardboard by Friday! The key is airtight covering. I take two large pieces of plastic wrap and loosely wrap the entire pie first. Just loosely, so you aren’t sticking plastic right into that lovely whipped topping unless you want the imprint.
Next, I always wrap it again, this time snugly, in aluminum foil. That double barrier is fantastic protection for your **party frozen pie**. You can easily keep this pie in the freezer for up to two weeks! If you’re planning way ahead, you can even make just the crust ahead of time and keep that frozen, wrapped tightly. Then, when you’re ready, you just pull the frozen crust out and move straight to softening and layering the ice cream. If you’re looking for more wonderful dishes you can prep early, I have a section on the best make ahead dessert options right here on the blog!
Serving Suggestions for This Indulgent Ice Cream Dessert
We’ve got the structure perfect, we’ve got the flavor locked down, but the real fun of any great dessert is the finishing touch! This **ice cream pie** is rich, it’s creamy, and it’s cold, so we need toppings that either elevate that richness or offer a bright, contrasting texture or temperature. Think of it this way: a cold, chocolatey base begs for something warm and gooey on top, right?
My first go-to suggestion, especially if you are using a vanilla based ice cream, is always a warm sauce. A drizzle of homemade hot fudge sauce is heavenly, but if you want a true showstopper, a homemade caramel sauce is unbeatable. I obsess over the perfect swirl, and you can find my secret for that thick, perfect texture right here: my favorite caramel recipe. Making it fresh means it’s pourable and delicious when it hits that frozen surface.
But sometimes you need something lighter, especially after a big meal. If you’ve gone heavy on the chocolate or if you’ve made a decadent version like the Peanut Butter Ice Cream Pie, try a quick fruit sauce. A simple, slightly tart raspberry or cherry sauce cuts through the sweetness beautifully and adds a lovely vibrant color. Just simmer some frozen berries with a teaspoon of sugar and a tiny splash of water until they break down a bit. It cools quickly and provides that perfect balance.
And for the grown-ups? Serving a slightly thawed slice of this **indulgent ice cream dessert** alongside a strong cup of coffee or a rich espresso is just divine. The bitterness of the coffee is the perfect counterpoint to the sweet, cold cream. Honestly, no matter how you top it, this is such an easy, satisfying **frozen dessert recipe** that always feels fancier than it is!
Frequently Asked Questions About Making Ice Cream Pie
I get so many sweet notes after people try this recipe, but sometimes folks have a few quick questions pop up when they are standing in front of their freezer! These questions are always about making sure this **easy ice cream pie** turns out just as perfectly creamy and structured as mine does. Don’t worry about a thing; I’ve got the answers right here based on years of fiddling with these wonderful **summer ice cream treats**.
Can I use a different crust besides Oreo for my ice cream pie recipe?
Absolutely, you can! The Oreo crust is my favorite because it’s so dark and rich against the creamy filling, but it is certainly not the only option for a great **ice cream pie recipe**. If you don’t have Oreos on hand, or if you just prefer a lighter flavor, a classic graham cracker crust works wonderfully. You would use the exact same instructions: crush the graham crackers (about 1.5 cups usually does the trick for a 9-inch dish), mix with the melted butter, and press it down firmly. Some people even make an **ice cream pie with graham cracker crust** and then drizzle a bit of homemade caramel over the top before freezing for that extra decadent touch!
How long does this easy ice cream pie need to freeze?
This is probably the most important question for structural integrity! Because we aren’t baking anything, the freezer is our oven, and it needs time to do its job properly. The total time jumps up to about five hours and twenty minutes, but remember most of that is hands-off freezing time! You need that first 15 minutes for the crust to set, then the big one—a minimum of 4 hours to freeze the main ice cream layer solid. If you skip that 4-hour mark, when you try to spread the whipped cream topping on, you’ll just end up mixing the two layers together. We want clean layers in this **creamy frozen pie**, so don’t rush that deep freeze!
What is the best way to soften the ice cream for assembly?
This is where many people go wrong when making a **homemade ice cream pie**! You want the ice cream “slightly softened,” not melted soup. Melting it completely basically introduces water back into the equation, which freezes weirdly and can ruin that smooth texture we love. Skip the microwave entirely; it heats unevenly and creates icy hot spots. Instead, just take the bulky container of ice cream out about 10 to 15 minutes before you need it. You should be able to scoop it relatively easily with a sturdy spoon, but it should still hold its shape when you mound it into the crust. That little bit of give makes all the difference when spreading it into an even layer!
Estimated Nutritional Data for One Slice of Ice Cream Pie
Now, I know we aren’t making these magnificent **ice cream pies** because we’re counting every calorie—we make them because they bring joy! But for those of you who still like to peek at the numbers, here’s a general idea of what one slice of this Ultimate No-Bake Oreo Crust Ice Cream Pie shakes out to be. Remember, since this is a completely customizable treat, your final numbers will shift depending on the brand of ice cream or the toppings you choose to pile on top!
These values are estimated based on standard ingredient usage:
- Serving Size: 1 slice
- Calories: 450
- Sugar: 35g
- Fat: 28g
- Saturated Fat: 16g
- Carbohydrates: 45g
- Protein: 5g
Think of this as the necessary fuel for enjoying a fantastic **frozen dessert recipe** on a hot summer day! Don’t let the numbers scare you away from making this incredible **easy ice cream pie**—life is too short to skip dessert!
Share Your Homemade Ice Cream Pie Creations
Well, that’s it! I truly hope you feel empowered to whip up this **ice cream pie** tonight. It’s recipes like this—simple, cool, and completely satisfying—that remind me why I started Daisy’s Recipes in the first place. It’s about making something special without sacrificing your whole evening to the kitchen. Grandma Daisy always said the best part of cooking was the sharing, and I feel the same way about these frozen desserts!
I would absolutely love to see how yours turned out! Did you go for the classic vanilla, or did you dive into a fantastic variation like a chocolate ice cream pie? Did you layer two flavors? Did you use my trick for easy release? You can send all your gorgeous photos over to me using the contact page right here on the site, and I promise I’ll take a look. Sending photos is the easiest way to connect!
If this **creamy frozen pie** made your summer heat day better, please consider leaving a quick 5-star rating below the recipe card. Those little ratings really help other cooks find these simple, delicious ideas. Happy freezing, friends, and I hope you enjoy every single slice of that incredible **no bake ice cream pie**!
PrintUltimate No-Bake Oreo Crust Ice Cream Pie

Make this easy, creamy frozen dessert using a simple Oreo crust. This no bake ice cream pie recipe is perfect for summer parties or any time you need a make ahead dessert.
- Prep Time: 20 min
- Cook Time: 0 min
- Total Time: 5 hours 20 min
- Yield: 8 servings 1x
- Category: Dessert
- Method: No-Bake
- Cuisine: American
- Diet: Vegetarian
Ingredients
- 2 cups crushed Oreo cookies
- 6 tablespoons unsalted butter, melted
- 1.5 quarts (about 6 cups) store-bought ice cream (your favorite flavor, softened slightly)
- 1 cup heavy whipping cream
- 2 tablespoons powdered sugar
- 1 teaspoon vanilla extract
- Optional toppings: Chocolate fudge sauce, chopped peanuts, cherries
Instructions
- Prepare the crust: Combine the crushed Oreo cookies and melted butter in a medium bowl. Press the mixture firmly and evenly into the bottom and up the sides of a 9-inch pie plate.
- Freeze the crust: Place the pie plate in the freezer for at least 15 minutes while you prepare the filling.
- Assemble the pie: Remove the crust from the freezer. Spread the slightly softened ice cream evenly over the frozen crust. Smooth the top with a spatula.
- Refreeze: Return the pie to the freezer and freeze for at least 4 hours, or until the ice cream is firm.
- Make the topping: In a separate bowl, beat the heavy whipping cream, powdered sugar, and vanilla extract with an electric mixer until stiff peaks form.
- Top and serve: Spread or pipe the whipped cream topping over the frozen ice cream layer. Add your desired toppings like fudge sauce or peanuts.
- Final freeze: Freeze the finished ice cream pie for at least 1 hour before slicing and serving. Slice with a sharp, warm knife for clean cuts.
Notes
- For a customizable ice cream pie, use two different flavors of softened ice cream, layering them alternately for a striped effect.
- If you want a peanut butter ice cream pie, mix 1/2 cup of creamy peanut butter into the softened ice cream before spreading it into the crust.
- To easily remove the pie from the plate for serving, line the pie plate with plastic wrap before pressing in the crust.
Nutrition
- Serving Size: 1 slice
- Calories: 450
- Sugar: 35g
- Sodium: 320mg
- Fat: 28g
- Saturated Fat: 16g
- Unsaturated Fat: 12g
- Trans Fat: 0.5g
- Carbohydrates: 45g
- Fiber: 1g
- Protein: 5g
- Cholesterol: 65mg