

If you’re anything like me after a long, crazy day, sometimes you just want that classic, cozy comfort food feeling, but you do *not* want the mess of a plate, the bun falling apart, or the whole involved setup of a proper burger night indoors. That’s when you go simple, you go fast, and you go portable! I started working on the perfect cheeseburger wrap when I was trying to bring a little bit of Grandma Daisy’s honest cooking back into my rushed city life. This recipe—the Ultimate Air Fryer Cheeseburger Wraps—is the result. It’s everything you love about a juicy cheeseburger, minus the fuss, and cooked up shiny and crisp in under 25 minutes flat. Trust me, these tried-and-true methods ground the flavor so you get that authentic taste without losing time.
- Why This Cheeseburger Wrap is Your New Weeknight Favorite
- Gathering Ingredients for Your Ultimate Cheeseburger Wrap
- Assembling the Perfect Cheeseburger Filling: Preparation Steps
- Cooking Your Cheeseburger Wrap Patties in the Air Fryer
- Warming the Tortillas for Your Cheeseburger Wrap
- Step-by-Step Assembly of the Final Cheeseburger Wrap
- Tips for Making the Best Homemade Cheeseburger Wraps
- Storage and Reheating Instructions
- Common Questions About This Cheeseburger Wrap Recipe
Why This Cheeseburger Wrap is Your New Weeknight Favorite
I’m going to be honest with you; when I first moved downtown, my cooking routine was basically takeout menus taped to the fridge. I needed quick ground beef dinner options, but I just didn’t have the energy for full-on burger assembly. That’s where this simple adaptation came from. It’s the answer for those nights when you crave something hearty but need it on the table in under 30 minutes.
The sheer portability of this dish is a game-changer. It takes all the best parts of your favorite easy dinner recipes—the savory beef, the melty cheddar, the tangy pickle—and wraps it up tight. It’s truly the best kind of portable comfort food because there’s zero chance of missing toppings falling onto your countertop. Seriously, it’s almost mess-free burgers!
The magic relies on the air fryer, which gets the patties perfectly cooked and the cheese beautifully melted in record time. We aren’t sacrificing flavor here; we’re just streamlining the delivery system. It’s my go-to when I want that satisfying burger fix without dedicating an hour to cleanup. You’ll never look at a boring weeknight meal the same way again!
Gathering Ingredients for Your Ultimate Cheeseburger Wrap
When I was learning to cook with Grandma, her first rule was always: know your players before you start the game. For this best burger fillings recipe, we keep the list straightforward so you can focus on execution. We’re using that trusty 80/20 ground beef because you need that little bit of fat for flavor and juiciness, especially when cooking in an air fryer. Don’t make things harder on yourself; grab the good stuff!
You’ll need just four slices of sharp cheddar cheese—nothing fancy, just dependable, melty cheddar. The four large flour tortillas need to be the trusty burrito size; you need that wrapping real estate to contain all that goodness later. We keep the seasoning simple because the sauce does the heavy lifting here, but make sure you’ve got that real butter ready for warming the wrap!
For the Secret Sauce
This sauce right here? This is the heart of the whole operation. It turns a simple burger into something you crave. Mix up a batch right now—you’ll want extra later for meal prep wraps throughout the week! It’s creamy, it’s tangy, and it’s the number one reason people ask for this recipe over and over again.
- 1/2 cup mayonnaise
- 2 tablespoons ketchup
- 1 tablespoon yellow mustard
- 1 teaspoon sweet pickle relish
- 1/2 teaspoon smoked paprika
For the beef itself, remember these essentials: 1 pound of that 80/20 ground beef, 1 teaspoon of salt, 1/2 teaspoon of black pepper, and 1/2 teaspoon of garlic powder. Oh, and don’t forget the chopped white onion and those four dill pickle chips to put inside the final wrap!
Assembling the Perfect Cheeseburger Filling: Preparation Steps
Before we even think about turning on the air fryer, we need to get our components lined up. This is where the planning comes in, and honestly, it’s the part that turns a fast quick ground beef dinner into something truly special. First thing first, make that Secret Sauce we just put together. You want that blended up nice and smooth, and then just set it aside in the fridge while you work on the meat. Letting it chill for a bit really lets those flavors marry.
Now, let’s talk ‘meat assembly’—this is key for great cheeseburger filling ideas. Divide your pound of 80/20 ground beef into four equal balls. Don’t overwork the meat! This is a lesson I got from Grandma Daisy when she was teaching me how to make her famous meatloaf. If you squeeze and mash the beef too much, you develop the proteins, and what you end up with is tough, dense little hockey pucks instead of juicy patties. Be gentle!
Flatten each portion into a thin, round patty, but make them just a touch wider than your tortillas will be. Remember the air fryer cooks them fast, so they will shrink up a bit. Once you have them all sized up, season both sides generously with the salt, pepper, and garlic powder we talked about. Lay them out on a plate, ready to go into the fryer. Doing this prep work first means that when the timer goes off, you can move straight into assembly, which is perfect for keeping things fast and delicious.
Cooking Your Cheeseburger Wrap Patties in the Air Fryer
Okay, time to turn up the heat! This is where the air fryer shines and really speeds up the process for our air fryer burger recipes. Seriously, this gadget keeps the patties juicy while giving them that barely-there crispness that feels just as good as a diner burger.
First, you absolutely must preheat your air fryer to 375 degrees Fahrenheit, or about 190 Celsius. You want that basket hot and ready when the meat hits it. Take your four seasoned patties—remember, handle them gently!—and arrange them in the basket. Do not, under any circumstances, let them overlap. They need their personal space in the hot air to cook evenly. Cook the first side for exactly 6 minutes.
When that timer sings, you move fast! Flip those burgers, and immediately lay one slice of cheddar right on top of each one. You want that cheese melting down the sides as the second side cooks. Pop them back in for just another 2 to 3 minutes. That’s all it takes for the cheese to get perfectly gooey and for the beef to decide on its final doneness. Once done, quickly remove those beauties and set them aside on a plate. If you have an extra patty waiting, keep it warm while you repeat the process for the second batch.
Now, if your air fryer is on a break or you just don’t have one—no drama! You can absolutely make these as regular patties. Just use a heavy skillet over medium-high heat. Cook them for about 4 minutes per side before adding the cheese. They won’t get that light crisp of the air fryer, but they’ll still be wonderfully juicy inside, making a fantastic homemade cheeseburger wrap.
Warming the Tortillas for Your Cheeseburger Wrap
You are so close to biting into this incredible cheeseburger wrap, but we have one small, vital step left before assembly that new cooks often skip: warming the tortilla. If you try to roll up a cold, stiff flour tortilla around hot, cheesy beef, trust me, it’s going to crack right down the middle. We want a perfect fold, not a sloppy pile of ingredients!
Warming these makes them incredibly pliable. It’s an essential step for any good tortilla wrap recipe, whether you’re making lunch or dinner. My method keeps it almost as fast as the beef cooked!
Take those four large flour tortillas and grab that melted butter you set aside. Using a pastry brush—or even just twisting up a paper towel if you’re feeling rustic, like Grandma Daisy sometimes did—lightly brush both sides of each tortilla with butter. Don’t soak them, just give them a nice sheen. This adds flavor and helps them crisp up just a hair.
Then, you load them into the air fryer! Since the patties are out, you can lay them right on the rack. They only need about 30 seconds per side to get warm, flexible, and ready to roll. If you’re cooking a huge batch of these dinner wraps and need to use the air fryer for the next thing, you can also do this step quickly in a dry skillet over medium heat. Just watch them closely; they go from perfect to burnt surprisingly fast!
Once they’re warm and soft, pull them out. They are now perfectly prepared vessels, ready to hold all that amazing cheeseburger power. Honestly, I sometimes just eat one warm and buttery straight out of the air fryer—don’t judge me!
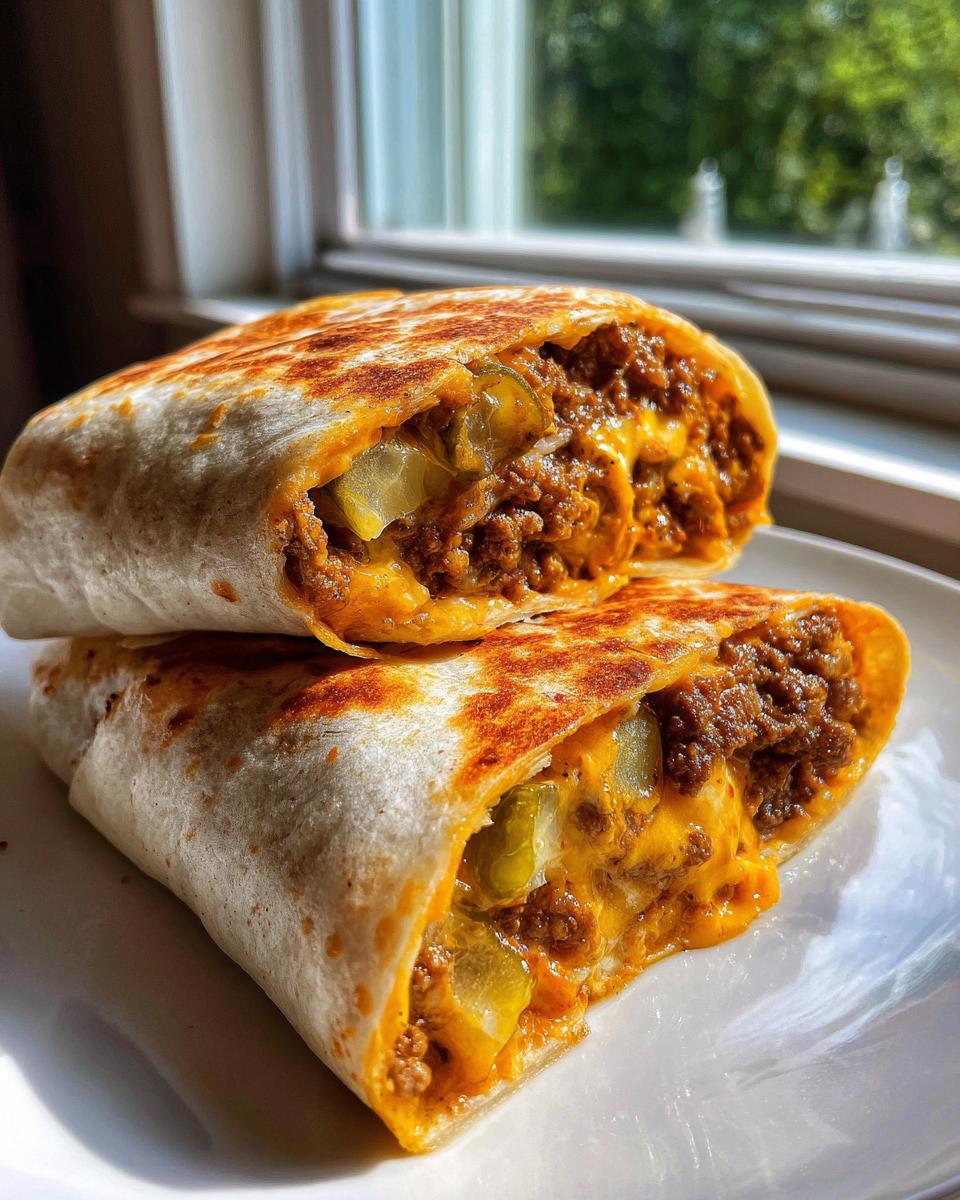
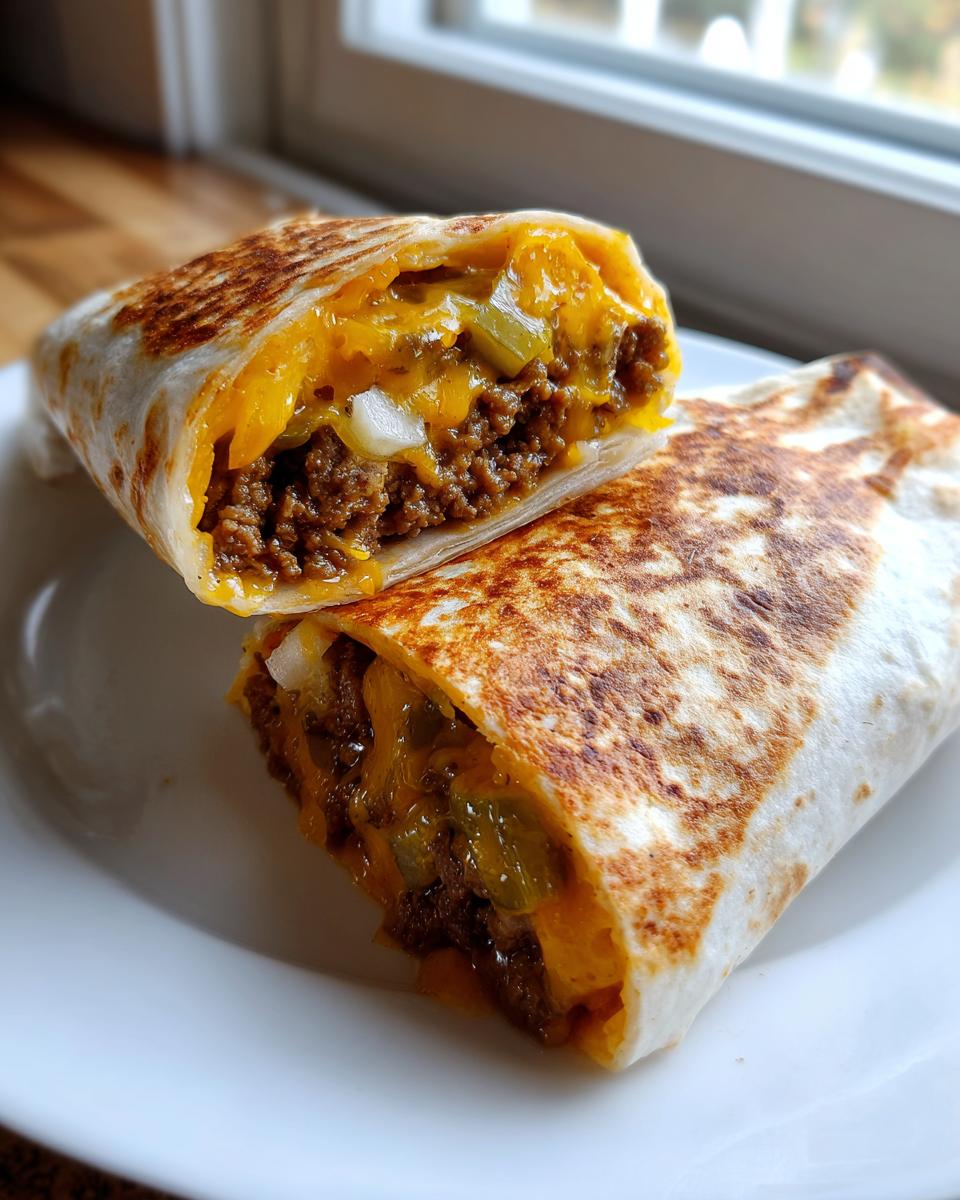
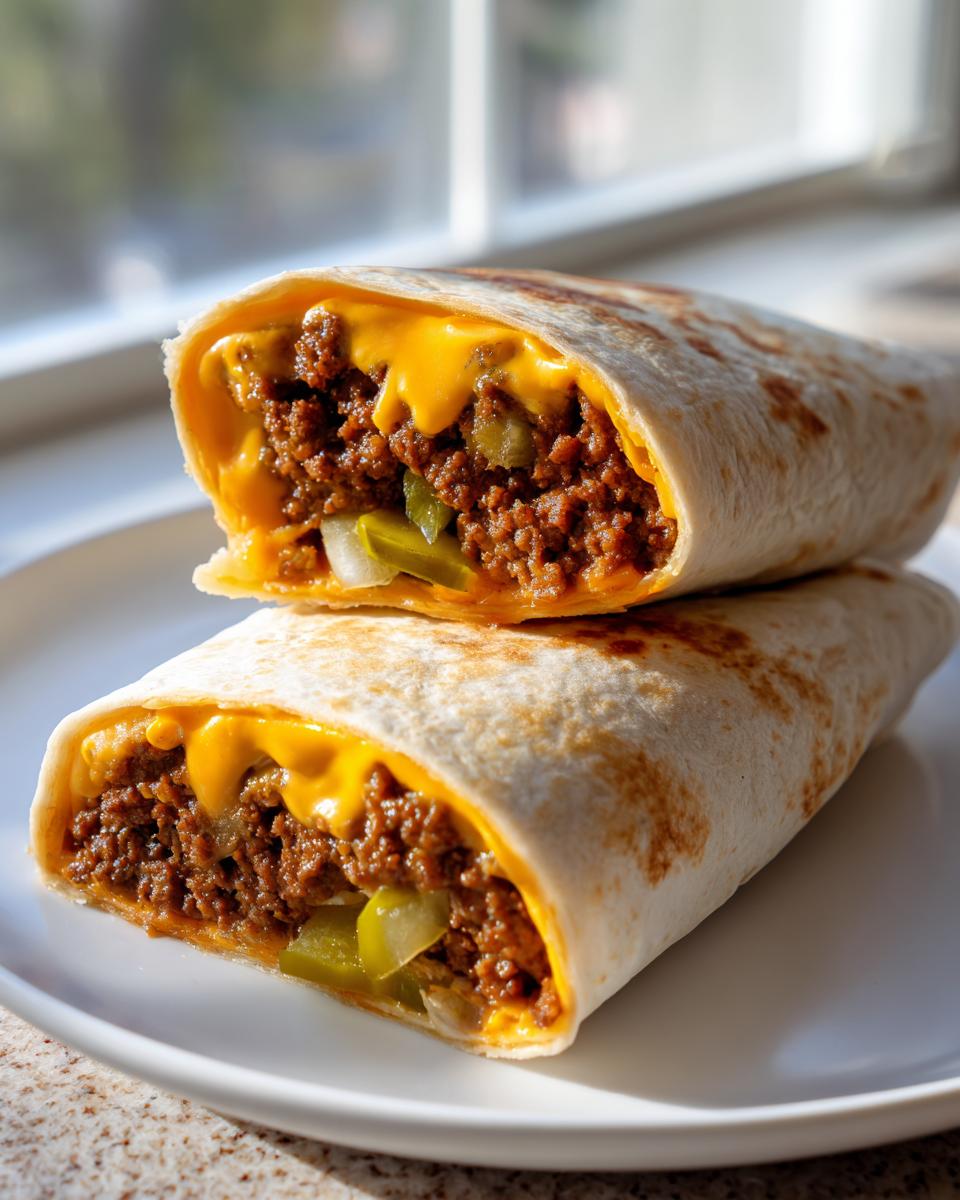
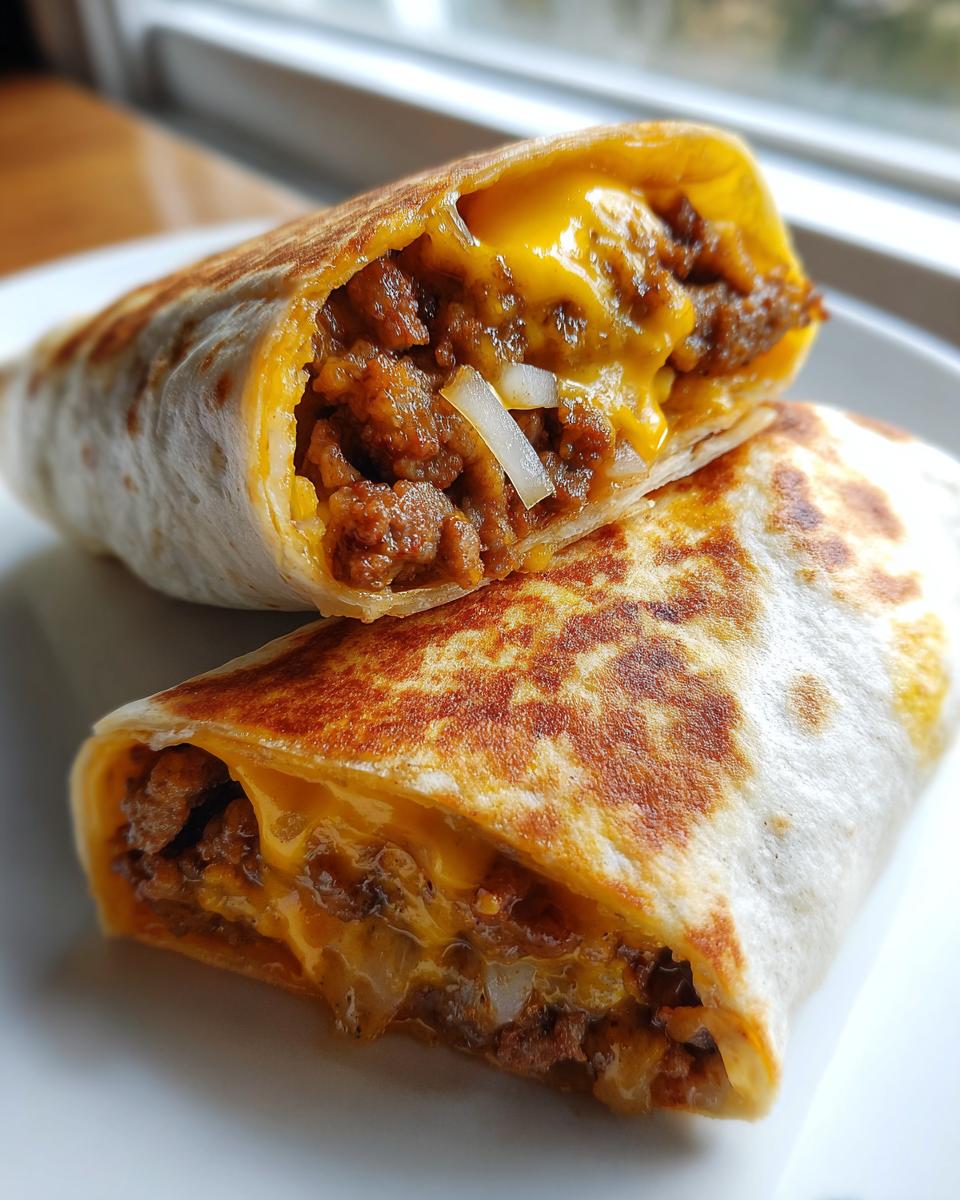
Step-by-Step Assembly of the Final Cheeseburger Wrap
We’ve made the sauce, we’ve cooked the seasoned, cheesy meat, and our tortillas are warm and supple. Now it’s time to finally bring it all together into the ultimate cheeseburger wrap! This is the final, glorious sprint toward handheld perfection. Follow this layering method exactly, and I promise you’ll achieve that sought-after, contained, and mess free burger experience that makes this recipe so great for family-friendly weeknight meals.
Lay one of those beautifully warmed, buttery tortillas out flat on your clean workstation—a cutting board works best for this, as it gives you something sturdy to press against during the final roll. We are building this from the inside out to ensure stability.
First, that sauce needs to go down. Take a generous spoonful of your Secret Sauce and spread it in a wide line down the center of the tortilla. Don’t go all the way to the edges; you want about a two-inch border on the top and bottom edges. Think of this sauce line as the base layer that helps keep everything else anchored.
Next comes the star of the show: place one perfectly cooked, cheese-covered beef patty right down the middle of that sauce stripe. Try to keep the patty condensed; it may have spread a little in the air fryer, but gently nudge it into a better shape now if needed.
Now for the crunch! Sprinkle a little bit of your finely chopped white onion right over the cheese. Remember, these are raw onions, so a little goes a long way unless you truly love that sharp bite. Follow that immediately with one dill pickle chip placed right over the center of the patty. If you want two pickles, cut them in half so they don’t create a bulky edge that will rip the tortilla when you roll.
Here’s the technique that ensures a tight seal. You need to create an envelope, not a burrito, for this kind of filling. First, take the two sides of the tortilla—the left and right edges—and fold them inward, overlapping slightly over the toppings. This keeps the patty width contained.
Once the sides are tucked in securely, you move to the bottom edge (the one closest to you). Fold that edge *up* and over the ingredients, tucking it tightly against the filling. Now, pull that bottom flap *back* towards you while simultaneously rolling the entire wrap forward. Keep the roll as tight as you possibly can without tearing the warmed tortilla. The butter you brushed on acts like glue, helping that final seam stay sealed.
If you want to get really fancy for serving, you can lightly toast the seam-side-down in the air fryer for another 60 seconds or in a dry skillet to seal it completely shut. Slice your finished cheeseburger wrap in half diagonally, and get ready to enjoy your ultimate quick lunch idea!
Tips for Making the Best Homemade Cheeseburger Wraps
Now that you’ve mastered the assembly, I want to share just a few little tricks I’ve picked up over the years turning this family favorite into a perfectly fast homemade cheeseburger wrap. These aren’t in the main instructions, but they take the recipe from good to absolute perfection. This is where we build that E-E-A-T, using lessons learned so you don’t have to fight with messy meals!
My number one piece of advice for flavor, which I mentioned briefly when talking ingredients, is to stick with the 80/20 ground beef if you can. Seriously, don’t try to sneak in extra-lean meat here. Burgers need fat to stay juicy, especially when they are getting a quick blast of dry heat in the air fryer. That extra fat renders out, basting the beef, which is what gives you that truly satisfying, traditional burger taste. It makes a huge difference in the final result of these ground beef wrap ideas.
Another thing that saves my sanity during the week is prepping components ahead of time. That Secret Sauce? Whip up a double batch! It keeps beautifully in the fridge—I mean, it practically begs you to make more bacon cheeseburger wraps later in the week. The sauce is a fantastic flavor boost for any spread, so don’t be shy about making extra for future meal prep wraps. You’ll thank yourself on Wednesday when you just need 10 minutes to assemble dinner.
Finally, we absolutely have to talk about handling the bun situation if you’re cutting back on carbs. If you or a family member needs a low carb burger alternative, ditch the flour tortilla entirely! You can achieve an amazing, crisp, yet fresh wrap by using large, sturdy lettuce leaves instead. I love Butter Lettuce or even Iceberg lettuce for this. Just make sure you use the big, outside leaves—you want them as intact as possible so they can cradle that hot filling without tearing. They provide that nice cold crunch right against the hot patty, which I actually prefer sometimes!
Also, when you assemble these, think about adding something crunchy inside beyond the onion. My kids love when I add a few crushed plain potato chips right on top of the cheese *before* they get the pickle. It adds a totally unexpected texture contrast that makes these beef wrap lunch inspiration wraps feel super special, almost like you’re eating actual fast food!
Storage and Reheating Instructions
So, you made a huge batch because they are just *that* good, or maybe you packed a couple extras for quick lunch ideas tomorrow. That’s smart planning! The key to keeping these homemade cheeseburger wraps fantastic is how you store them. Here is my hard-won wisdom on keeping leftovers fresh.
If you assembled the entire wrap—tortilla, sauce, beef, pickles, everything—and then you try to wrap it tightly in foil or plastic, I can almost guarantee you disaster by morning. The residual heat from the beef will make the tortilla go gummy and start to tear, destroying that perfect seal we worked so hard to create during assembly. It turns into mushy sad-burger territory, and nobody wants that!
For best results, treat this like you’re packing a packed lunch to eat later, meaning you store the components separately. If you have leftover cooked patties with that gorgeous melted cheese, wrap ONLY the patty (maybe with an extra sprinkle of onion if you like it raw) tightly in foil or parchment, and put that in the fridge. Keep the Secret Sauce in its little container, and the plain tortillas stored at room temperature.
When lunchtime rolls around, you’ll want to gently reheat the beef and cheese. The air fryer is your best friend here again, even for leftovers! Place the foil-wrapped patties back into the air fryer at about 325 degrees Fahrenheit for maybe 4 or 5 minutes. This gently warms the patty all the way through and remelts that cheese beautifully without drying out the edges too much. If you don’t have an air fryer, a quick 30 seconds in the microwave to warm the beef (it will soften the cheese, which is fine) and then a quick minute in a hot, dry skillet will do the trick!
Once the patty is hot, warm up a fresh tortilla using the same butter-brush method we used earlier. Then, assemble right then and there: sauce, hot patty, fresh toppings, and a tight roll. It takes less than three minutes total, and you get that glorious, fresh-made texture again. Storing the components separately ensures your wonderful quick ground beef dinner stays delicious across multiple meals!
Common Questions About This Cheeseburger Wrap Recipe
I know sometimes when you move a classic recipe like a burger into a new format, you end up with a million questions! That’s totally normal. I’ve done my best to answer the ones that pop up most often when readers try these cheeseburger wraps for the first time. If you try these, I hope you let me know what additions you come up with!
Can I use different cheese besides cheddar?
Absolutely! Cheddar is my go-to because it melts so perfectly and has that classic tang that pairs with the pickle and onion, but Grandma Daisy always said you shouldn’t be a slave to one ingredient. If you want something sharper, try Pepper Jack for a little kick. Provolone is great if you want a milder, stretchier cheese reminiscent of a deli sandwich. Monterey Jack melts like a dream, too. The key is just sticking to a good melting cheese so you don’t end up with slices that stay stiff after the air fryer time. This is your perfect opportunity to customize those family friendly weeknight meals!
What if I don’t have an air fryer for this ground beef wrap recipe?
Don’t you worry! The air fryer just makes the cleanup faster and adds a little crispness, but it doesn’t change the essential flavor of the quick ground beef dinner. As I mentioned before, you can easily use a skillet on the stovetop. Heat up a cast iron skillet or heavy-bottomed pan over medium-high heat. Add just a tiny drizzle of olive oil if your beef isn’t 80/20, and then cook those seasoned patties about 4 minutes per side. Add the cheese for the last minute of cooking on the second side. The assembly process is exactly the same, so you can still enjoy these wonderful tortilla wrap recipes!
How can I make this a keto friendly cheeseburger recipe?
This is a super common request, especially since we are already talking about wraps! For a truly keto friendly cheeseburger recipe, you skip the flour tortillas entirely. Instead, grab the biggest, sturdiest lettuce leaves you can find. Big pieces of Iceberg or soft Butter lettuce work wonderfully! You’ll use these as the wrap itself. You can also use low-carb tortillas if you find a brand you like, but the lettuce is my favorite low carb burger alternative because it adds that refreshing cold crunch.
What other toppings work well inside the wrap?
The beauty of this portable comfort food is how adaptable it is! While the classic pickle and onion combo is perfect, feel free to experiment. Caramelized onions are heavenly if you have the time to make them ahead—they add such a deep sweetness. If you like a little heat, a sprinkle of pickled jalapeños is fantastic. Some people even like to crumble up some bacon right over the melted cheese before folding! Just remember, the more you add, the more careful you need to be when rolling to keep everything contained in your homemade cheeseburger wraps.
PrintUltimate Air Fryer Cheeseburger Wraps with Secret Sauce

Make classic cheeseburger flavor portable and easy with these quick ground beef wraps cooked in the air fryer. This recipe offers a satisfying, mess-free burger night indoors.
- Prep Time: 10 min
- Cook Time: 15 min
- Total Time: 25 min
- Yield: 4 servings 1x
- Category: Dinner
- Method: Air Frying
- Cuisine: American
- Diet: Low Fat
Ingredients
- 1 pound ground beef (80/20 recommended)
- 1 teaspoon salt
- 1/2 teaspoon black pepper
- 1/2 teaspoon garlic powder
- 4 slices cheddar cheese
- 4 large flour tortillas (burrito size)
- 1/4 cup finely chopped white onion
- 4 dill pickle chips
- 1 tablespoon butter, melted
- For the Secret Sauce: 1/2 cup mayonnaise
- 2 tablespoons ketchup
- 1 tablespoon yellow mustard
- 1 teaspoon sweet pickle relish
- 1/2 teaspoon smoked paprika
Instructions
- Prepare the Secret Sauce: In a small bowl, mix the mayonnaise, ketchup, mustard, pickle relish, and smoked paprika until fully combined. Set aside.
- Form the Patties: Divide the ground beef into four equal portions. Gently flatten each portion into thin, round patties slightly larger than the tortillas. Season both sides of the patties with salt, pepper, and garlic powder.
- Cook in Air Fryer: Preheat your air fryer to 375 degrees Fahrenheit (190 degrees Celsius). Place two patties in the air fryer basket, ensuring they do not overlap. Cook for 6 minutes.
- Add Cheese: Flip the patties, immediately place one slice of cheddar cheese on each, and cook for another 2 to 3 minutes, or until the cheese is melted and the beef reaches your desired doneness. Remove and repeat with the remaining two patties.
- Warm Tortillas: Lightly brush both sides of the tortillas with melted butter. Place them directly on the air fryer rack (or in a separate pan if needed) for 30 seconds per side until warm and pliable.
- Assemble the Wraps: Lay a warm tortilla flat. Spread a generous amount of the secret sauce down the center. Layer with the cooked cheeseburger patty, top with chopped onion and a pickle chip.
- Wrap and Serve: Fold in the sides of the tortilla, then tightly roll from the bottom up to create a secure wrap. Slice in half if desired and serve immediately for a quick lunch idea or easy dinner recipe.
Notes
- For a low carb burger alternative, substitute the flour tortillas with large iceberg or butter lettuce leaves.
- If you do not have an air fryer, you can pan-fry the patties in a skillet over medium-high heat for about 4 minutes per side.
- Make a larger batch of the secret sauce for meal prep wraps throughout the week.
Nutrition
- Serving Size: 1 wrap
- Calories: 550
- Sugar: 5
- Sodium: 750
- Fat: 35
- Saturated Fat: 14
- Unsaturated Fat: 21
- Trans Fat: 1
- Carbohydrates: 35
- Fiber: 2
- Protein: 28
- Cholesterol: 90