
Ah, the sourdough discard! If you bake regularly, you know the feeling. You’ve got that jar of perfectly developed, slightly pungent starter resting, and then you have to pull a chunk out just to feed it again. It feels wasteful, right? After years of searching for a truly satisfying way to use up that lovely leftover, I finally landed on this recipe. This isn’t just a way to use up old starter; this method delivers a true, rustic **country loaf with sourdough discard** that rivals anything made with a dedicated levain. It’s a process my grandmother, Daisy, would have appreciated—taking something simple and making it magnificent. This **rustic sourdough discard bread** honors her way of never wasting a thing, giving us that beautiful crust and open structure we all chase. If you are new to the wild world of levain, you might want to check out my guide on how to make sourdough starter from scratch first, but for throwing that *remaining* starter straight into the mix, this is the one!
- Why This Country Loaf With Sourdough Discard Works So Well
- Gathering Ingredients for Your Sourdough Discard Country Loaf Recipe
- Essential Equipment for Your **Rustic Sourdough Discard Bread**
- Step-by-Step **Discard Sourdough Bread Instructions**
- Bulk Fermentation and Shaping for a No Fuss Country Sourdough Loaf
- Baking Your Perfect **Naturally Leavened Bread Using Sourdough Discard**
- Tips for Success with Easy Sourdough Discard Bread Baking
- Storage and Reheating for Your Country Loaf With Sourdough Discard
- Frequently Asked Questions About Using Sourdough Discard in Bread
Why This Country Loaf With Sourdough Discard Works So Well
You experienced bakers out there know that flavor isn’t just about time; it’s about acid, and that’s where using your discard shines. We don’t rely on a separately built levain here, which cuts down on kitchen stress. This method is perfect for getting that deep flavor profile without the extra feeding steps. It’s a real shortcut to amazing flavor!
Flavor Development from Leftover Starter
When that starter has been chilling in the fridge, it’s packed with lactic and acetic acids. Throwing the unfed discard straight into the autolyse acts almost like a built-in flavor enhancer. It cuts right through the process, giving you that characteristic **tangy sourdough country bread recipe** taste we love, but much faster. Trust me, you won’t miss the steps of building a dedicated preferment.
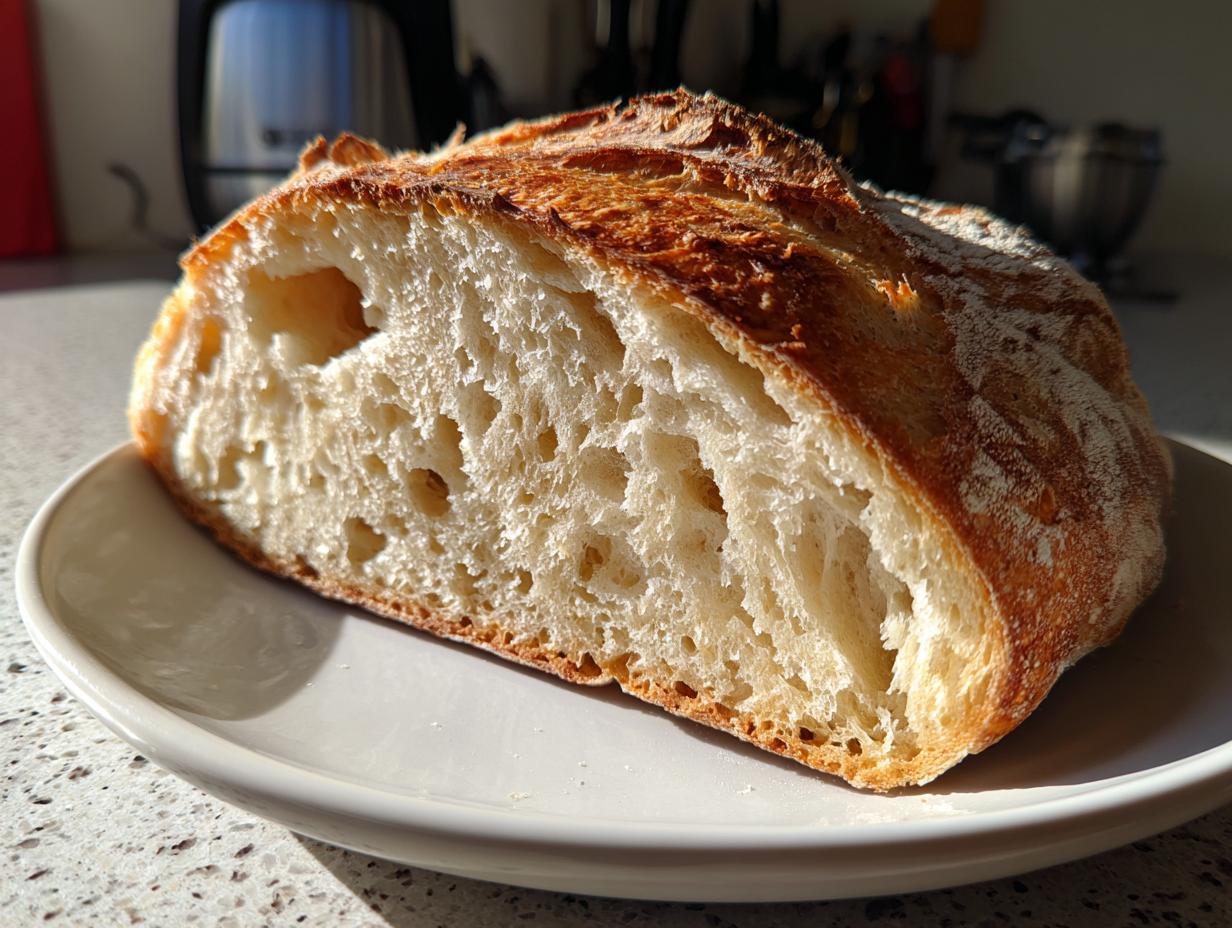
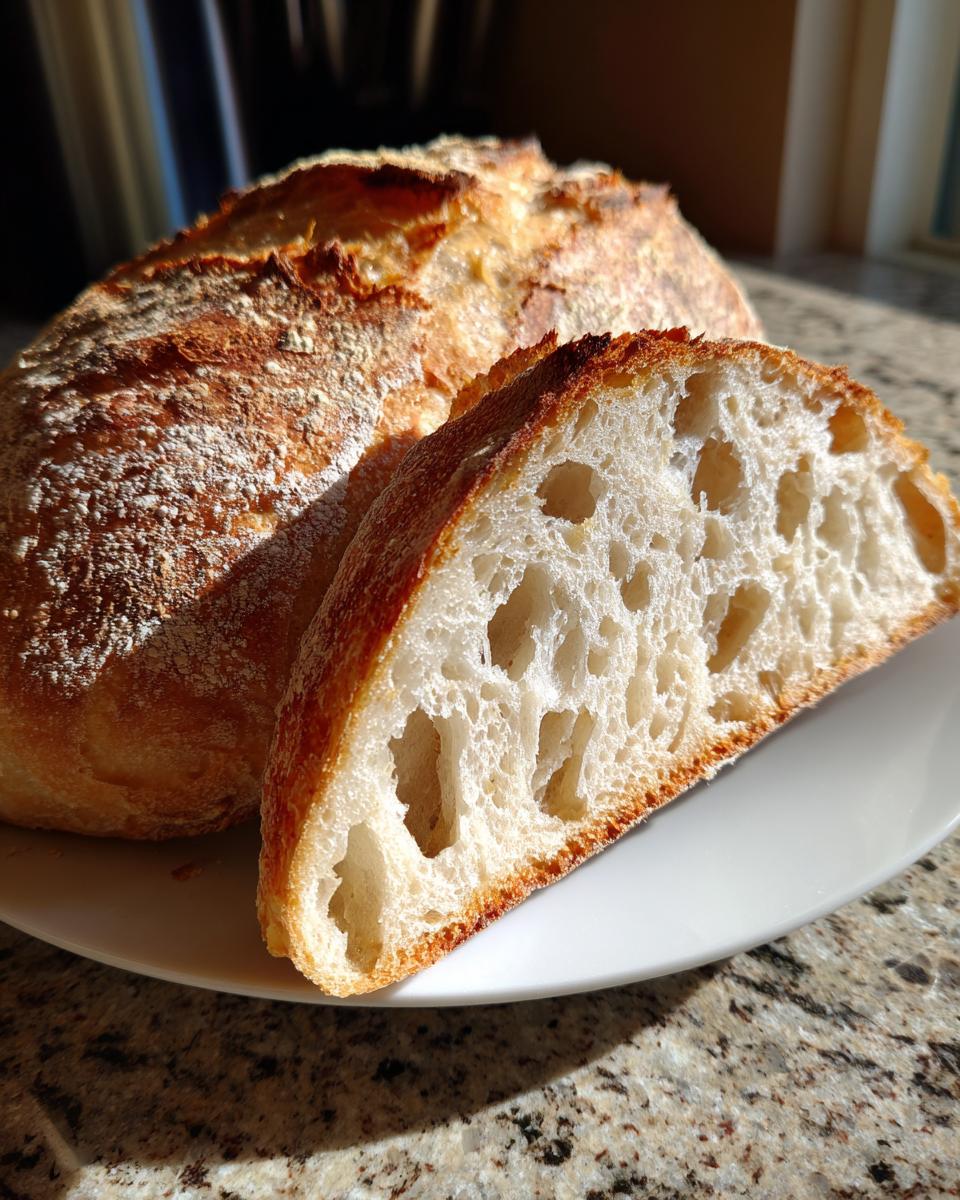
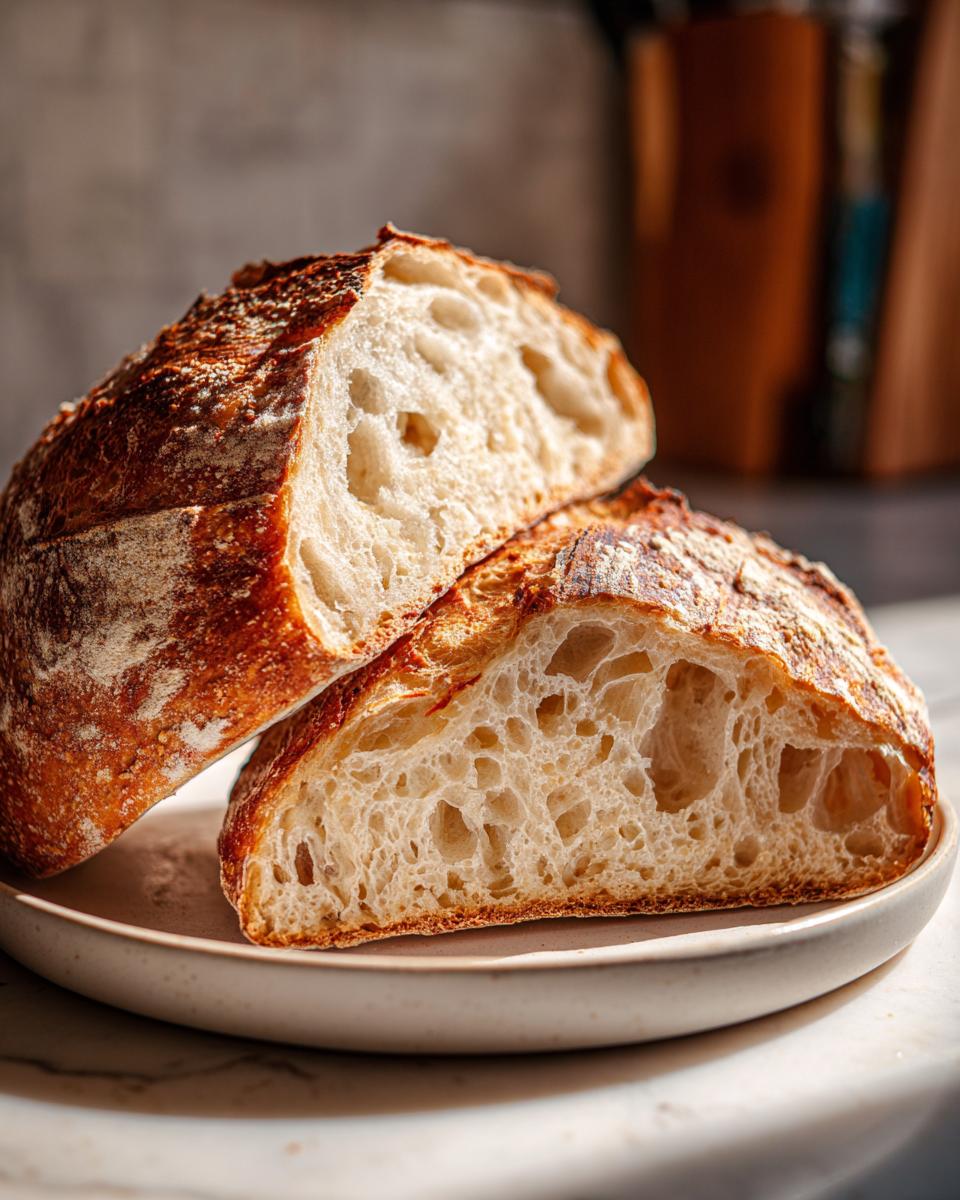
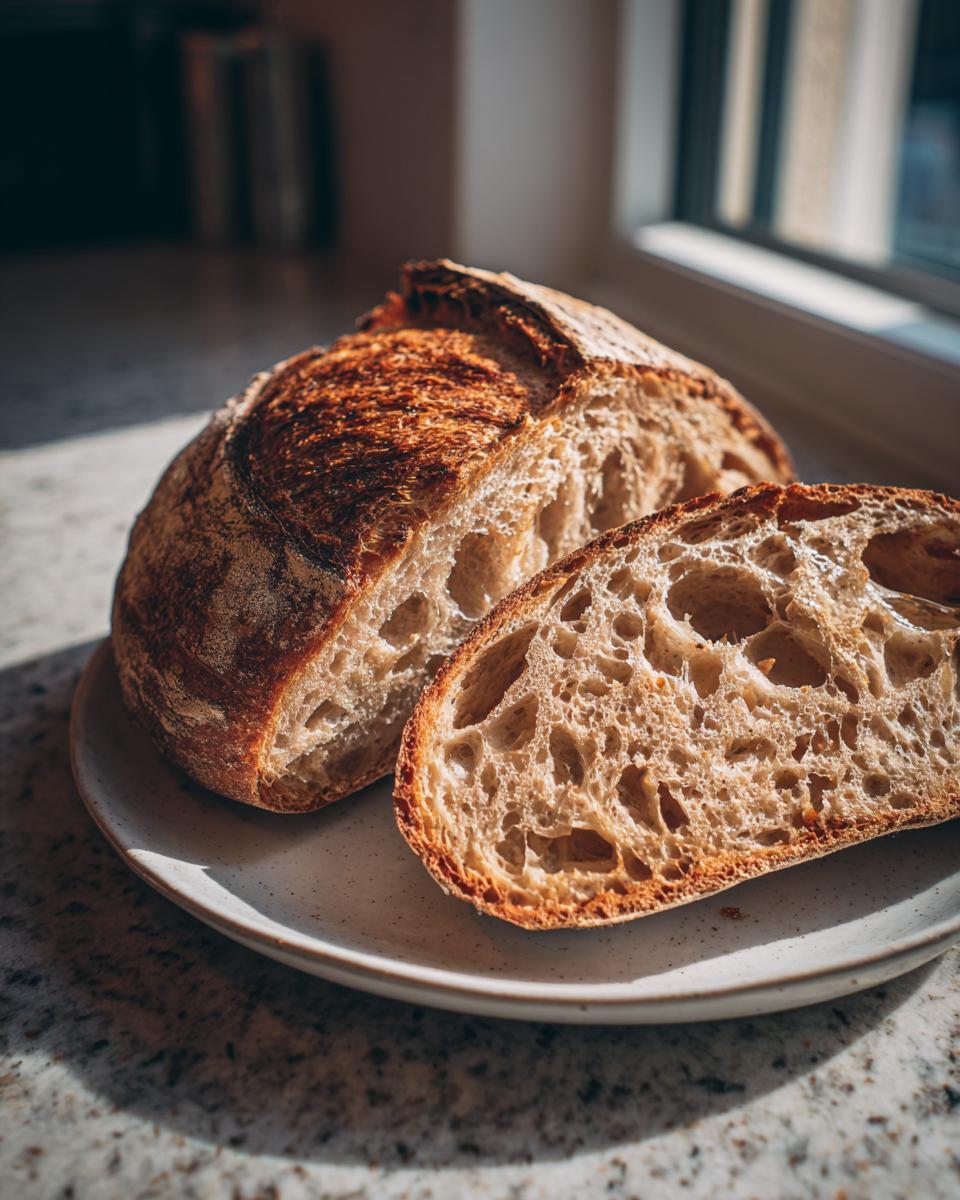
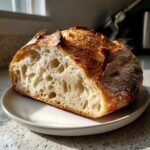
Achieving the Classic Country Loaf With Discard Texture
Because the discard already contains flour and water, we can bake using a higher overall hydration without making the dough too unruly. The combination of strong bread flour and a little whole wheat is just enough structure to trap all those lovely gases, giving you that open crumb you see in the fancy bakeries. We are aiming for that shatteringly crisp crust and a creamy interior!
Gathering Ingredients for Your Sourdough Discard Country Loaf Recipe
Okay, let’s get organized! Daisy always preached that a great bake starts before you even turn the oven on, and it starts with measuring everything right. This recipe keeps the flour blend simple yet effective, focusing on strength for that rustic lift. Keep your discard unfed and straight from the fridge—that’s the secret shortcut!
- 350g strong bread flour
- 150g nutritious whole wheat flour
- 350g water, just room temperature is fine
- 100g sourdough discard (make sure it’s unfed, right out of the cold fridge!)
- 10g fine sea salt
- 5g instant dry yeast (only if you want a little boost!)
If you’re looking for other ways to use up that extra starter without making more bread, I highly recommend my sourdough discard banana muffins. They are dangerously good!
Essential Equipment for Your **Rustic Sourdough Discard Bread**
You don’t need a professional bakery setup for this loaf, but a few key items really make the difference between an okay loaf and something truly special. These tools help manage the high hydration and ensure great spring in the oven. My equipment list is pretty straightforward, leaning heavily on things that provide great heat retention.
- A reliable kitchen scale: Forget volume measurements! Baking is chemistry, and this loaf needs precision when dealing with the discard.
- A large mixing bowl: Enough room for mixing, resting, and plenty of stretch and folds without making a huge mess.
- A Dutch oven or combo cooker: This is your secret weapon for creating steam indoors. The hot cast iron traps moisture around the loaf at the start, which is absolutely vital for a blistered, sturdy crust on this **artisan bread recipe for sourdough discard**.
- A banneton basket: Whether cane or synthetic, you need something to hold the shape of your loaf during that long, cold proof.
- A razor blade or sharp knife: For scoring! It’s where you sign your name on the bread, and it lets the loaf expand beautifully in the heat.
Step-by-Step **Discard Sourdough Bread Instructions**
This is where you need to put down your phone and focus, friend! Getting the first steps exactly right with this **country loaf with sourdough discard** is what separates a dense brick from a truly airy, rustic beauty. We’re using the autolyse phase here to let the flour sip up the water before we introduce the acids from the discard and the salt.
Mixing and Autolyse for the **Country Loaf With Sourdough Discard**
First things first: in your big bowl, gently mix your bread flour, whole wheat flour, water, and that gorgeous, cold sourdough discard. You’re not kneading—just mix it until there are no dry patches left. It’ll look shaggy and weird, I promise it’s supposed to! Cover that whole mess up with plastic wrap or a damp towel and walk away for exactly 30 minutes. That rest period, the autolyse, lets the flour fully hydrate, making the dough so much easier to work with later. It’s like giving the ingredients a little time to get acquainted before the hard work starts.
Developing Structure: Salt and Incorporation
When the time is up, if you’re using that optional yeast for an easier rise, sprinkle it right over the shaggy mass now. Then, add your salt. Now, this is the tricky part where we build strength fast. You need to mix that salt in thoroughly. I prefer using the Rubaud method, looping my hand through the dough and mixing it in place until the salt dissolves. Alternatively, just perform a handful of gentle stretch and folds right in the bowl—about five minutes of purposeful mixing should do it. You’ll feel the dough start to tighten up just a bit. Don’t worry about perfection yet; we build that strength over the next few hours. If you want to see my absolute favorite way to build strength without making a huge mess, check out this guide on sourdough banana bread moist easy recipe because the technique is similar!
Bulk Fermentation and Shaping for a No Fuss Country Sourdough Loaf
Now for the long, slow magic of bulk fermentation. Cover your dough again and let it sit at a warm room temperature—around 72°F is ideal for this **country loaf with sourdough discard**. We are looking for 3 to 5 hours of rising time. This is critical: you must perform a set of stretch and folds every 45 minutes for the first two hours. That repeated gentle handling is what builds the internal structure needed for a beautiful oven spring later on. The dough should look visibly fuller, maybe 30% to 50% larger, with some bubbles on the surface when you’re done.
Once bulk fermentation is done, gently coax the dough onto a lightly floured counter. Don’t punch it down! We want to be gentle. Give it a quick, loose pre-shape into a round mound and let it hang out, covered, for about 20 minutes—this is called the bench rest. This rest lets the gluten relax before the real work begins: the final shaping. When you shape it for the final time, really focus on creating tension on the outside skin of the dough; that taut surface is what holds everything together while it bakes. Pop the seam-side up into your floured banneton basket after that.
The Importance of Cold Proofing
Here’s where we cement the flavor and make handling easy. Immediately after shaping, get that basket into the refrigerator for a nice, long 12 to 18-hour cold proof. Honestly, this step is non-negotiable for me. The cold dramatically slows the yeast activity but lets those organic acids continue to develop, giving you that wonderful, deep tang and making the dough firm up beautifully. When the dough is cold, it holds its shape much better when you score it, which means you get less spread and more height in the oven!
Baking Your Perfect **Naturally Leavened Bread Using Sourdough Discard**
The moment of truth! Getting the oven right is just as important as the dough itself. For this **naturally leavened bread using sourdough discard**, we are using the tried-and-true Dutch oven method. Steam is the biggest secret to a bakery-quality crust, and that hot cast iron traps all the moisture the dough needs initially.
You absolutely must preheat your oven to a screaming hot 500°F (260°C) with that Dutch oven sitting inside for at least 45 minutes. I mean it—45 minutes! Don’t cheat this step; you need that metal ripping hot.
Once it’s screaming hot, carefully pull out your racks and place the Dutch oven on your baking surface. Take your cold, proofed **country loaf with sourdough discard** dough, which you gently transferred onto parchment paper, and score it quickly with your razor blade. This controlled slash tells the bread where it’s allowed to explode open when it hits the heat.
Now, grab the edges of the parchment paper and gently lower your dough right into that smoking hot pot. Pop the lid on immediately. Bake covered at 500°F (260°C) for exactly 20 minutes. This traps all the dough’s internal steam.
After those 20 minutes, it’s time to let the crust brown up nice and dark. Reduce the oven temperature down to 450°F (232°C) and carefully remove the lid. Continue baking for another 25 to 30 minutes. Don’t be shy about the color! A deep, mahogany crust means you’ve got incredible flavor. When you tap the bottom, it should sound wonderfully hollow.
The hardest part? Letting it cool! The internal structure is still setting up, so fight the urge to slice it right away. I know, it smells amazing, but cool it completely on a wire rack—at least two hours. If you want an amazing post-bake treat, you have to check out my recipe for sourdough French toast using slices that are a day old!
Tips for Success with Easy Sourdough Discard Bread Baking
Even with this fairly straightforward **sourdough discard country loaf recipe**, little tweaks can make all the difference between good and truly great. I learned this the hard way during one particularly cold winter when my kitchen was acting like a refrigerator! If your kitchen is cool, don’t just let it sit on the counter; find a spot that stays warm. Baking is an organism, and a cold environment makes for a very sleepy dough.
Remember those whole wheat adjustments I mentioned? If you want a slightly earthier flavor for your **rustic sourdough discard bread**, swap out 50g more of the bread flour for whole wheat, bringing it up to 200g total whole wheat. When I first tried that, my dough felt a little sticky, so my trick was adding just one extra, very gentle set of folds during the first hour of bulk.
Also, while I love using discard straight from the fridge, if you’re looking for a little lift and a slightly less intense sour flavor, you can always sprinkle in that optional yeast. It makes this a much more forgiving recipe for those days you didn’t plan ahead, resulting in an overall **no fuss country sourdough loaf** experience. If you’re interested in other quick breads, my easy 3-ingredient beer bread recipe is fantastic for busy days!
Storage and Reheating for Your Country Loaf With Sourdough Discard
Alright, you pulled that gorgeous loaf out of the oven, and you fought the urge to immediately slice into it. Good job! Now, the real test: how do you keep that beautiful, crisp crust the next day? Storing this **country loaf with sourdough discard** properly is key to enjoying that rustic texture for more than five minutes after it cools.
First rule: Do NOT store your bread in plastic bags. Seriously, it’s a sin against good crust! Plastic traps all the escaping moisture inside the bread, and that moisture immediately softens that lovely dark crackle you worked so hard to achieve. For the first day, if you have a simple paper bag, that’s your best bet. The paper allows a little breathability.
What about day two? If you’ve got half a loaf left, cut-side down on a clean wooden cutting board is my personal go-to. The open air keeps the crust from getting gummy. If your kitchen is super dry, you can wrap the cut end loosely in beeswax wrap—just make sure the crusty top is exposed.
If you know you won’t finish this amazing bread within three days, slicing it and freezing it is the way to go. It freezes beautifully! Just stack the slices with small squares of parchment paper between them so they don’t stick, wrap the whole stack tightly in foil, and pop it in the freezer. That keeps the freezer burn away!
When you want to eat a frozen slice, my favorite way to refresh it is simple: preheat your oven to 350°F (175°C). Place the frozen slice directly on the rack (no need to cover it) for about 5 to 7 minutes. It comes out almost exactly like it was fresh from the oven—warm, aromatic, and that crust is back! It’s the perfect way to keep your **country loaf with sourdough discard** tasting artisan-fresh all week long.
Frequently Asked Questions About Using Sourdough Discard in Bread
I always get so many questions when people try this recipe for the first time, especially if they are used to only baking with an active starter. It’s a different ballgame when you rely purely on the discard for a quick rise, but the results are so worth it! Don’t be shy about experimenting once you master the base recipe.
Can I skip the optional yeast in this sourdough discard country loaf recipe?
Oh yes, absolutely! If you skip the yeast, you are relying totally on the natural lift from the discard bacteria, which is what you want if you’re aiming for maximum tang. The trade-off is that your bulk fermentation time is going to shoot up—maybe closer to 6 or 7 hours instead of just 3 to 5. You’ll need to watch the dough, not the clock, to see when it’s ready to shape.
What if I don’t have a Dutch oven for this **no starter required country bread**?
Don’t panic if your cast iron pot is missing! You can still get a great loaf. You need steam! The best substitute is to use a sturdy baking stone or an inverted heavy baking sheet. About 15 minutes before you bake, put an empty, oven-safe pan (like an old metal broiler pan) on the bottom rack. When you load your bread onto the hot stone, quickly pour about a cup of very hot water into that bottom pan and immediately shut the door. That burst of steam will give you that fantastic crust development. It’s an excellent alternative for making your **rustic sourdough discard bread**!
How much discard should I use if I want a stronger tang?
If you are craving that intense, sharp flavor, you can carefully push the discard amount up to 120 grams instead of 100 grams. Since the discard is usually cooler and less active, adding a bit more actually increases the overall acidity in the dough, which amplifies that characteristic flavor. Just be gentle during your folds, because that extra moisture can sometimes make the dough feel a tad looser until it hits the cold proof. If you need more tips, I have a ton of other tips for handling the dough, which you can see here on my easy no-bake Oreo truffles recipe—yes, really, the science of moisture is universal!
PrintClassic Country Loaf Using Sourdough Discard
Bake a rustic, naturally leavened country loaf with a good crust and open crumb by incorporating your leftover sourdough discard.
- Prep Time: 20 min
- Cook Time: 50 min
- Total Time: 13 hours 10 min
- Yield: 1 loaf 1x
- Category: Baking
- Method: Baking
- Cuisine: American
- Diet: Vegetarian
Ingredients
- 350g bread flour
- 150g whole wheat flour
- 350g water (room temperature)
- 100g sourdough discard (unfed, straight from the fridge)
- 10g fine sea salt
- 5g instant dry yeast (optional, for a quicker rise)
Instructions
- In a large bowl, mix the bread flour, whole wheat flour, water, and sourdough discard until just combined into a shaggy mass. Let this mixture rest, covered, for 30 minutes (autolyse).
- If using yeast, sprinkle it over the dough. Add the salt. Use the Rubaud method or stretch and folds to fully incorporate the salt and develop initial gluten structure for about 5 minutes.
- Cover the bowl and let the dough bulk ferment at room temperature (around 72°F or 22°C) for 3 to 5 hours, performing a set of stretch and folds every 45 minutes for the first 2 hours. The dough should increase in volume by about 30-50% and show signs of life.
- Gently turn the dough out onto a lightly floured surface. Pre-shape the dough into a loose round. Let it rest, covered, for 20 minutes.
- Perform the final shaping, creating good surface tension. Place the shaped loaf, seam-side up, into a well-floured banneton basket.
- Cold proof the dough in the refrigerator for 12 to 18 hours. This develops the tangy flavor.
- Preheat your oven to 500°F (260°C) with a Dutch oven inside for at least 45 minutes.
- Carefully remove the hot Dutch oven. Gently turn the cold dough out onto parchment paper. Score the top of the loaf as desired.
- Carefully lower the dough (using the parchment paper) into the hot Dutch oven. Cover and bake for 20 minutes at 500°F (260°C).
- Reduce the oven temperature to 450°F (232°C), remove the lid, and continue baking for another 25 to 30 minutes until the crust is deep brown.
- Remove the loaf from the Dutch oven and cool completely on a wire rack before slicing.
Notes
- Using 100% discard instead of an active starter provides flavor without needing to feed a starter separately.
- For a more rustic texture, increase the whole wheat flour to 200g and reduce the bread flour to 250g.
- If your kitchen is cool, placing the dough in a turned-off oven with the light on can help maintain a consistent bulk fermentation temperature.
Nutrition
- Serving Size: 1 slice
- Calories: 280
- Sugar: 0.5
- Sodium: 450
- Fat: 1.2
- Saturated Fat: 0.2
- Unsaturated Fat: 1.0
- Trans Fat: 0.0
- Carbohydrates: 58
- Fiber: 3
- Protein: 10
- Cholesterol: 0