
There is nothing quite like that smell, is there? The minute cinnamon and baked apples hit the air, my whole world just slows down. In a life that rushes me constantly, returning to my Grandma Daisy’s cooking is my anchor. She always taught me that the best food doesn’t need fancy techniques, just good intention. That’s why this delicious dessert is so special to me. I finally perfected that apple cobbler recipe from scratch, and trust me, it’s the ultimate easy and buttery version you need for fall.
- Why This is the Best apple cobbler recipe You Will Make
- Gathering Ingredients for Your apple cobbler recipe
- Step-by-Step Instructions for this Homemade apple cobbler
- Tips for Success with your apple cobbler recipe
- Variations on this simple apple dessert
- Serving Suggestions for your warm apple dessert
- Storage and Reheating for this apple cobbler recipe
- Frequently Asked Questions about the apple cobbler recipe
- Estimated Nutritional Information
- Share Your Baking Moments
Why This is the Best apple cobbler recipe You Will Make
I’ve tried nearly every shortcut out there, but nothing beats the genuine warmth of an old fashioned apple cobbler made right. This recipe delivers that deep, comforting feeling without demanding you spend all afternoon wrestling with dough. It’s truly the *best apple cobbler recipe* because it masters that balance between being incredibly simple and tasting like it took hours! We’re going scratch, but keeping the process delightfully easy. To see how I handle similar fruit bakes, check out my old fashioned oat topping recipe.
- It’s lightning fast to pull together—a true quick apple cobbler for unexpected guests.
- That topping? It’s pure butter magic, baking up golden and tender every time.
- We’re going scratch, but keeping the process delightfully easy.
If you’re looking for that perfect fall apple recipes centerpiece, stop looking. This is it.
The Secret to a Buttery apple cobbler topping
Okay, let’s talk about that topping because it’s the star! We aren’t making a pie crust; we are making something better—a tender, biscuit-like mound that gets beautifully golden brown. The absolute key? Keeping that butter rock solid cold! When you cut in the cold butter, those little frozen chunks turn into steam pockets in the oven. That’s what creates those wonderful, flaky layers instead of just a dense cookie sheet on top. You want the texture to be shaggy, just barely held together.
Simple Apple Dessert Flavor Profile
The filling is classic comfort food perfection. We use just the right blend of sugars to make the apples tender without turning them into soup. Everything is coated in fragrant cinnamon and a hint of nutmeg, which makes your whole house smell like heaven. Since this is a true cobbler recipe from scratch, you get that incredible, natural sweetness from the fruit that you just can’t replicate with canned stuff. It’s honestly the most satisfying cinnamon apple dessert you’ll ever pull out of your oven.
Gathering Ingredients for Your apple cobbler recipe
You know how much I love knowing exactly what I’m working with before I even turn the oven on. A great apple cobbler recipe starts with quality components, and since this is a homemade apple cobbler, we’re keeping things straightforward. Don’t worry about running to the specialty store; these are all things I usually have on hand, except maybe for Granny Smiths if I’m out of them! If you’re looking for a great pairing for this dessert, you might love my quick honey butter recipe.
For the Cinnamon Apple Filling
This part is all about making sure those apples get perfectly tender and spiced up before they meet that glorious topping.
- 6 medium baking apples (Granny Smith or Honeycrisp are my favorites for holding their shape!), peeled, cored, and sliced about 1/4-inch thick
- 1/2 cup granulated sugar
- 1/4 cup packed light brown sugar – this adds depth!
- 1 tablespoon all-purpose flour (this thickens up the juices nicely)
- 1 teaspoon ground cinnamon
- 1/4 teaspoon ground nutmeg
- 1 tablespoon lemon juice
- 1/4 cup water
For the Buttery Biscuit Topping
This is where the magic happens! Remember, everything for the topping—especially the butter—needs to be cold. I mean it, *cold* cold.
- 1 1/2 cups all-purpose flour
- 2 teaspoons baking powder
- 1/2 teaspoon salt
- 1/2 cup (that’s one full stick!) unsalted butter, kept very cold and cut into small cubes
- 1/2 cup milk
- 1 large egg, lightly beaten (this is just for brushing the top)
- 1 tablespoon coarse sugar (for sprinkling—this gives you that amazing golden crunch!)
Step-by-Step Instructions for this Homemade apple cobbler
As promised, we’re making this apple cobbler recipe without any fuss! It really is intuitive, but following these small steps will guarantee you get that bubbly, perfect fruit base beneath that heavenly biscuit topping. I always preheat my oven now while I’m chopping, just to make sure everything is ready to go right when the batter is done. If you need a quick liquid base for other things, check out my orange juice cake recipe for inspiration!
Mixing the Apple Filling
First things first, let’s get those apples seasoned up. In a big bowl—the bigger the better so you don’t fling sugar everywhere—toss your sliced apples with both sugars, the tablespoon of flour, cinnamon, nutmeg, and that squeeze of lemon juice. You want every single apple slice coated lightly, like they’re ready for a spa day. Then, pour about 1/4 cup of water into the very bottom of your 9-inch pie plate or baking dish. Spread those perfectly seasoned apples right over that water layer. That little bit of water helps keep things steamy so the apples soften up nicely while they bake.
Creating the Buttery Topping and Assembly
Now for the topping. Whisk your flour, baking powder, and salt together in a completely separate bowl. Here’s the crucial part: add your cold, cubed butter. You need to cut that butter into the flour until it looks like coarse crumbs—stop when you see butter pieces about the size of little peas floating around. Dump in the milk and mix it quickly with a fork until it just comes together. It should look shaggy, almost messy! Just drop big spoonfuls of that dough right over the apples. Remember, you don’t have to cover every inch; those gaps let the apples bubble up beautifully.
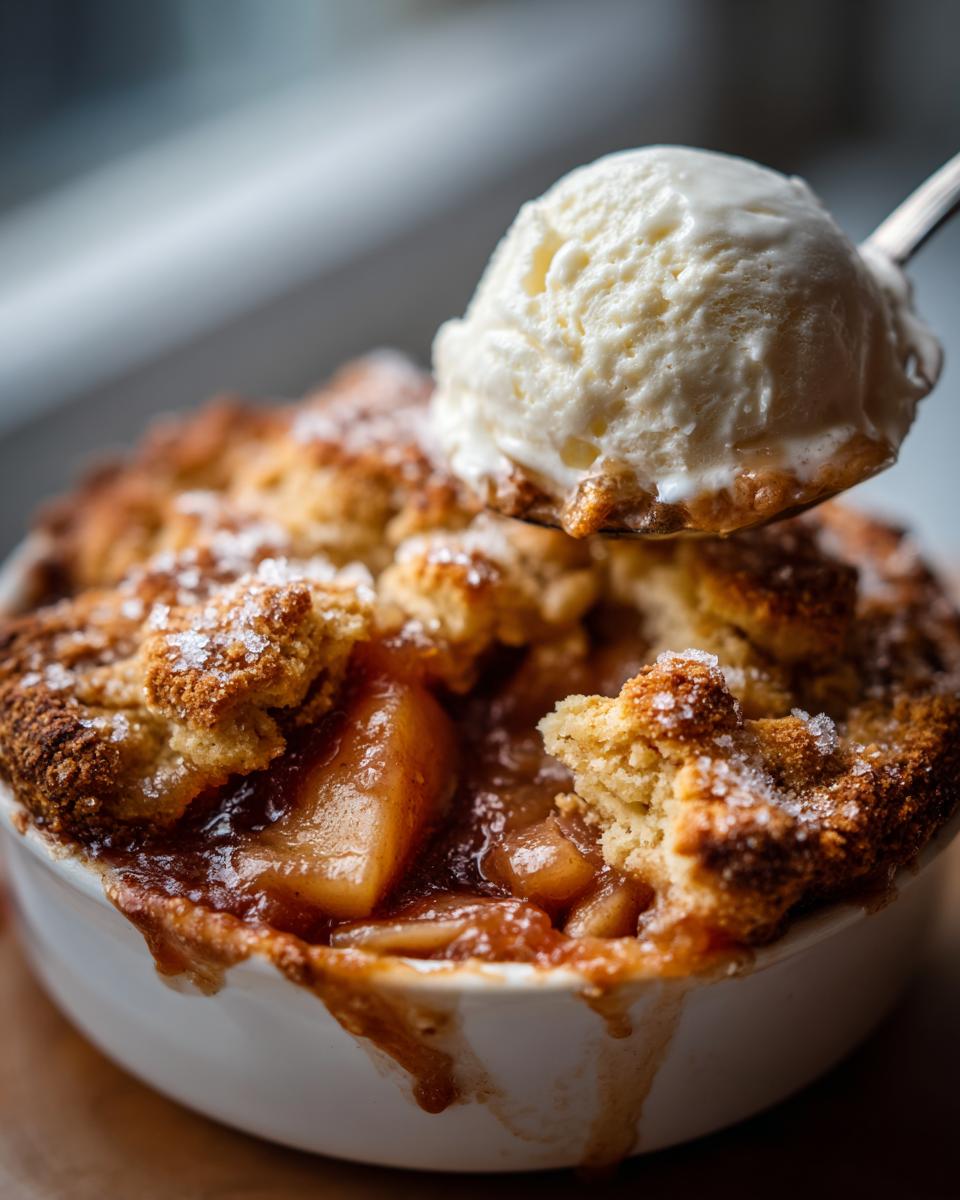
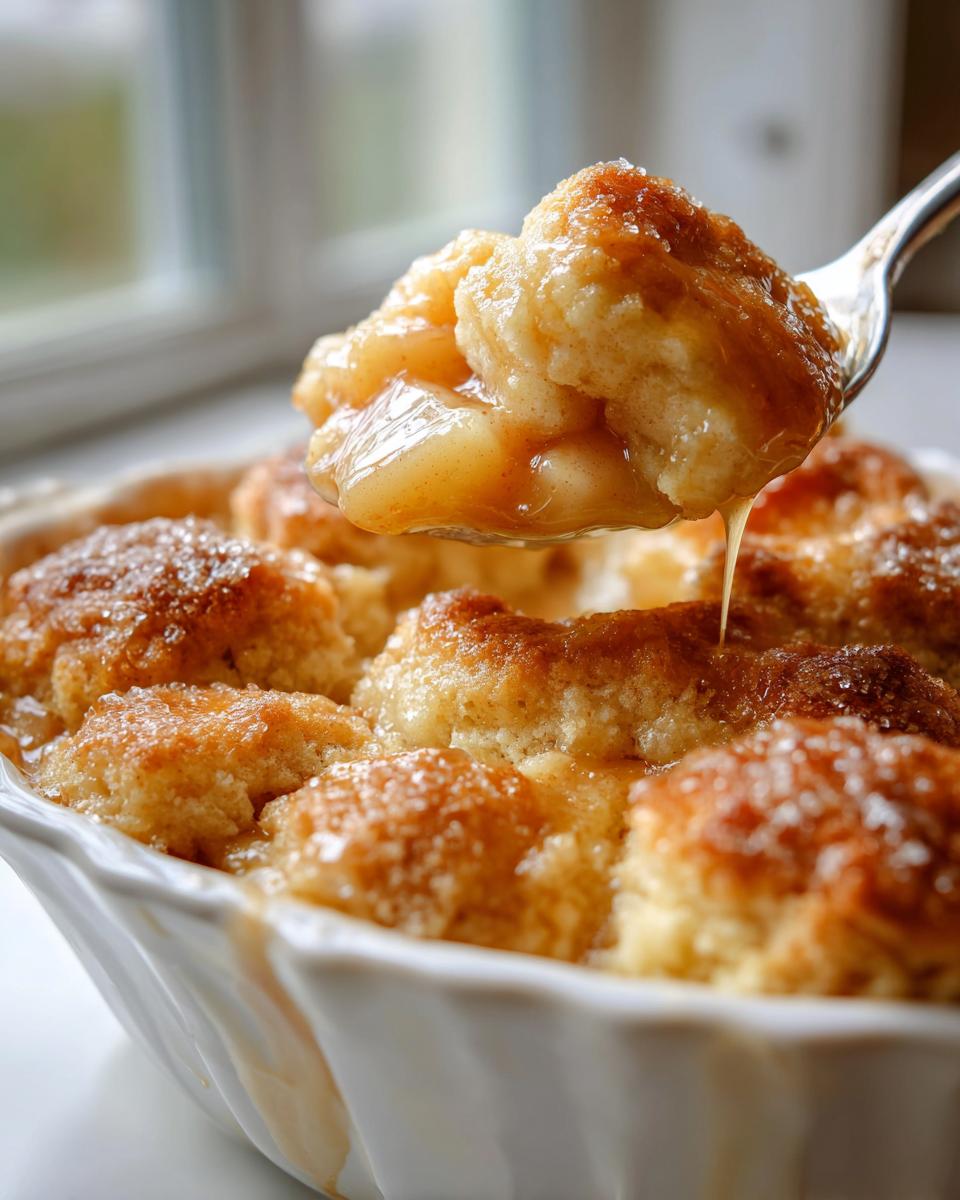
Baking and Resting the apple cobbler recipe
Once the topping is situated, take that lightly beaten egg and give the tops of your biscuit mounds a gentle brush. Sprinkle that coarse sugar on top for sparkle and crunch. Pop the whole thing into an oven that’s already hot—we need 375 degrees Fahrenheit! It needs about 40 to 45 minutes to bake. You’ll know it’s done when the topping is deep golden brown and you can see the fruit juices bubbling up thick around the edges. Don’t even think about digging in yet! You absolutely must let this warm apple dessert rest on a wire rack for at least 15 minutes for the filling to set up properly.
Tips for Success with your apple cobbler recipe
I want you to have the absolute best experience when you make this, because a disappointing cobbler is just a tragedy! Grandma Daisy always said baking wasn’t about following rules, but understanding ingredients. These little bits of knowledge, honed over years of trial and error, are what separate a good apple cobbler recipe from a truly great one. If you want another richly flavored, simple bake, you have to try my cream cheese banana bread!
Choosing the Right Apples
You simply cannot use soft, mealy apples here, or you’ll end up with sweet mush instead of a satisfying bite. The apples are the backbone of this dessert, and they need to stand up to the heat and all that cinnamon goodness. I always default to Granny Smiths because their tartness cuts through the richness of the buttery topping perfectly. Honeycrisp is a close second!
When you cut them, aim for about a 1/4-inch thickness, just like the recipe states. If they are too thin, they cook down too fast and disappear. If they are too thick, they stay hard in the center even when the topping is beautifully golden. It’s all about structure here!
Achieving the Perfect Biscuit Topping
We already talked about the cold butter, but I have to harp on it again because it’s the secret sauce for that incredible buttery apple cobbler topping. Once you mix in the milk, you need to stop mixing the instant it comes together. I mean it! If you work it too much, you develop gluten, and instead of that tender biscuit, you get a tough, bready lid. The dough should look totally unappealing—lumpy, shaggy, maybe even a little wet in spots. That’s when you know it’s perfect for dolloping onto those spiced apples.
Variations on this simple apple dessert
I love a recipe that trusts you to make it your own! While this apple cobbler recipe is fantastic exactly as written—pure, honest comfort—sometimes you just want to tweak things, especially when you’re baking all the time. That’s the fun of comfort food desserts, right? They are flexible! I’ve tested a few ways to give this classic a little twist without losing that essential buttery topping goodness. If you are exploring other fruit bakes, you might enjoy my rhubarb crisp recipe!
Adding Nuts or Oats for Texture
If you want a little extra crunch against that soft apple filling, try adding some texture right into the topping mixture. This moves it slightly towards an apple crisp vibe, but we keep the biscuit dollops, which I prefer. About 1/3 cup of chopped pecans or walnuts stirred right in with the flour and butter works wonders. They toast up beautifully during baking!
Alternatively, if you have some old-fashioned rolled oats lying around, throw in half a cup along with the flour and salt. It gives the edges of the biscuits an almost caramelized, chewy texture. Honestly, oat topping makes everything better, even if this isn’t technically a crisp!
Spice Level Adjustments for a Cinnamon apple dessert
We established that the cinnamon is key for that incredible aroma, but if you are making this during peak fall, you might want to deepen that spice flavor even more. This moves it firmly into the realm of the best fall apple recipes.
Try adding just a tiny pinch—and I mean *tiny*—of ground cloves or even a whisper of allspice when you mix your sugars and cinnamon for the apples. Those spices are powerful, so start small! A quarter teaspoon total of the added spice is usually plenty to make your cinnamon apple dessert taste richer without overpowering the apples themselves. See? So easy to customize!
Serving Suggestions for your warm apple dessert
Pulling this marvelous apple cobbler recipe out of the oven is just the first bit of the fun! Eating it is the reward, and honestly, how you serve it can elevate this simple comfort food dessert into something truly memorable. Since we are aiming for that ultimate cozy factor, presentation is key here. Make sure you let it rest that 15 minutes we talked about, though, or you’ll have a watery mess!
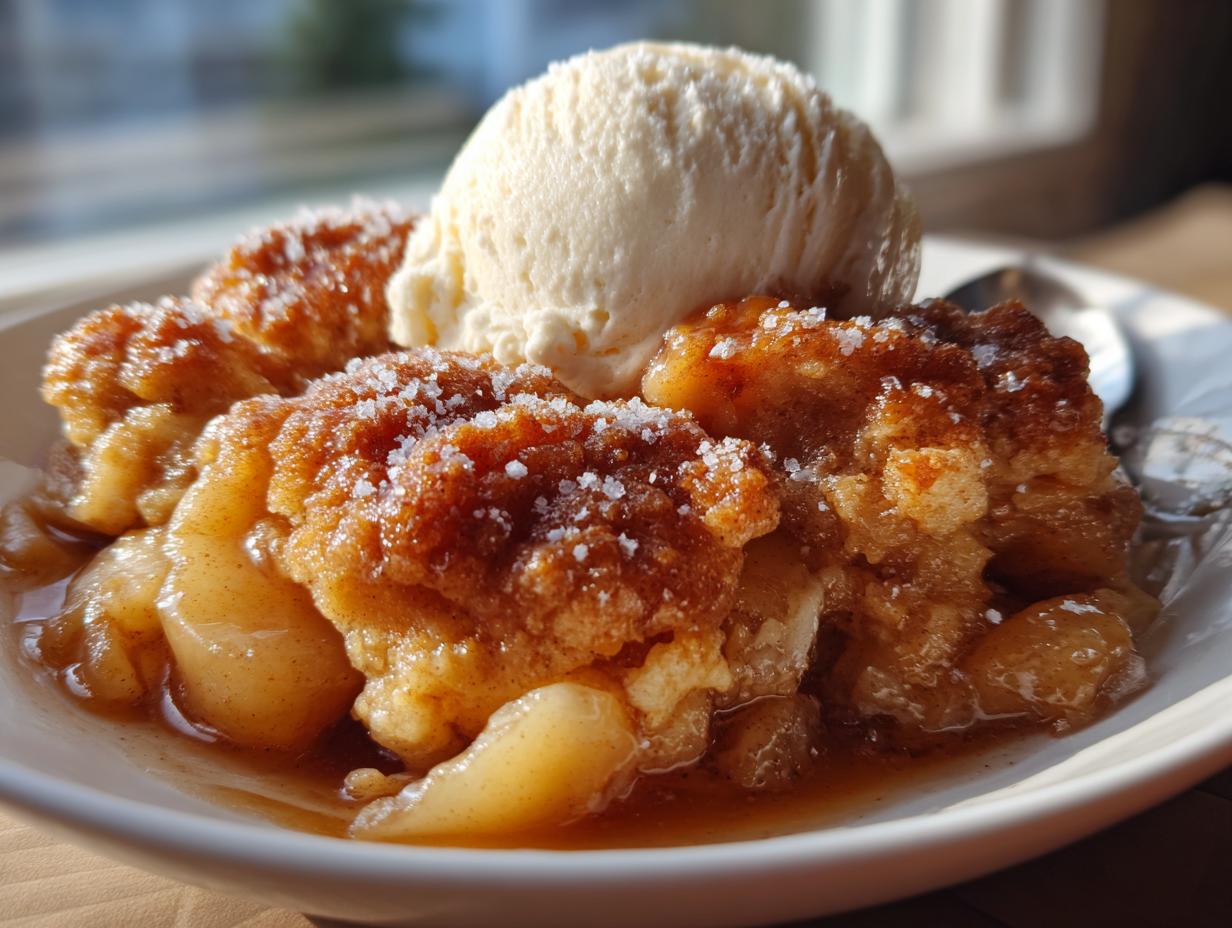
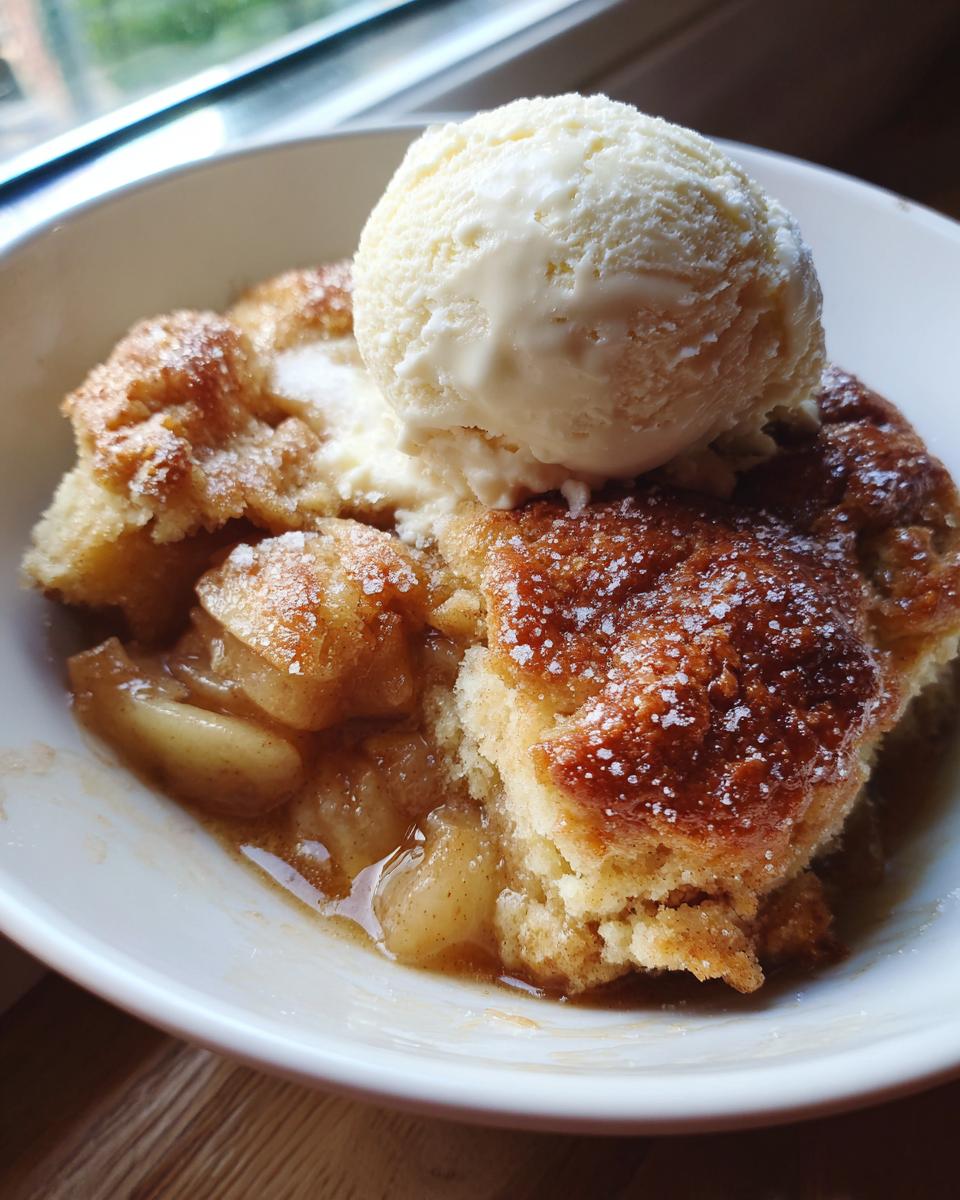
The Classic apple cobbler with ice cream Pairing
If you take away only one thing from this whole post, let it be this: apple cobbler with ice cream—always! The contrast between the piping hot, spiced apples and the cold, creamy vanilla is just heavenly. Seriously, my favorite way to eat this is when the topping is still slightly crisp and the ice cream starts melting right down into those bubbling cinnamon juices. It’s perfection, truly!
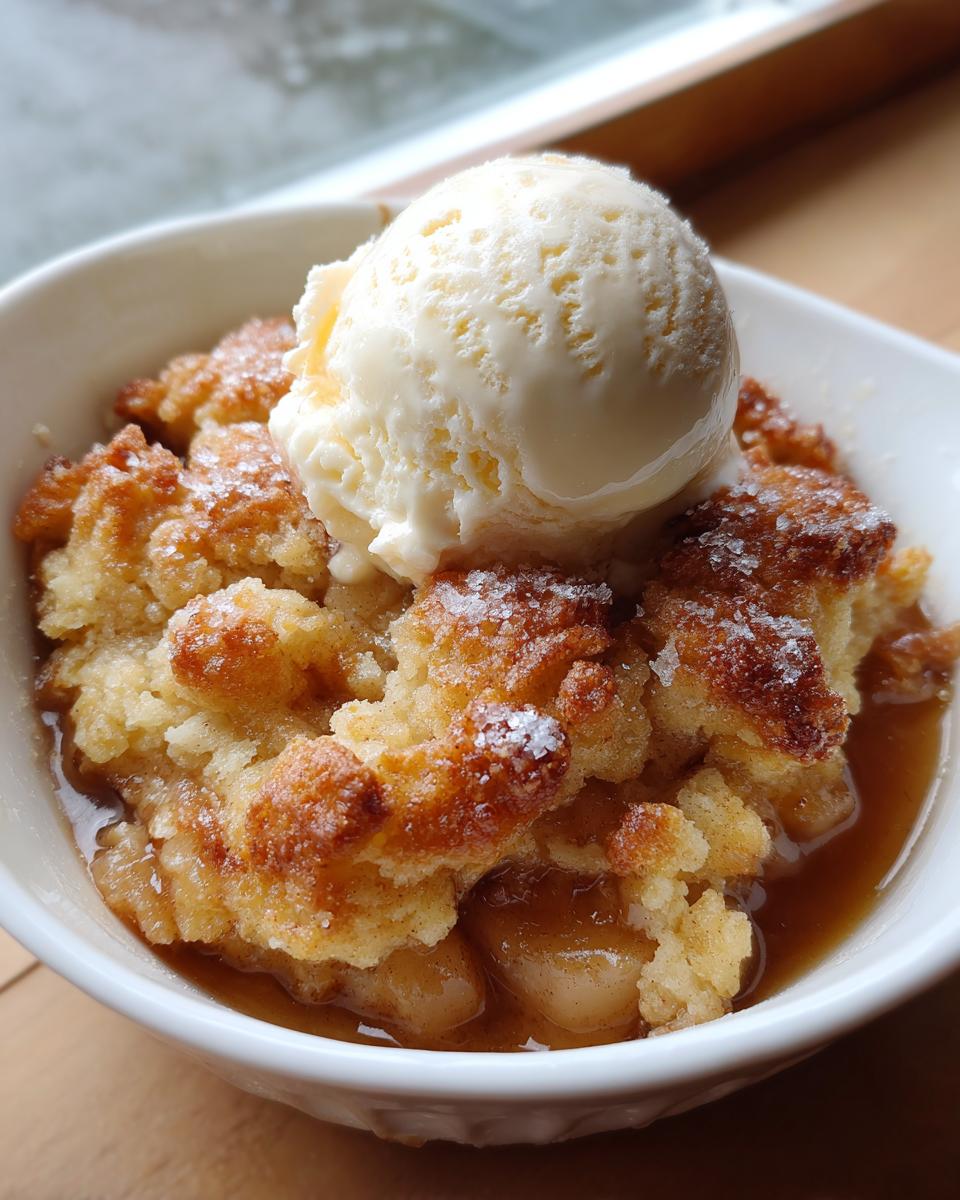
But look, I know we all have different preferences! If you aren’t a huge ice cream fan, a big dollop of freshly whipped cream works just as wonderfully. Give the whipped cream a little extra vanilla extract or even a tiny bit of almond extract for an extra depth of flavor. For a real showstopper when company comes over, whip up a quick drizzle of caramel sauce. You can find my recipe for a fantastic vanilla buttercream that you can turn into a quick glaze, but a simple caramel sauce poured right over the warm biscuit topping and melting ice cream? Now *that* is next level.
Storage and Reheating for this apple cobbler recipe
This apple cobbler recipe is one of those rare comfort food desserts that actually tastes better the next day—if you manage to have any leftovers! Because we use a buttery biscuit topping instead of a traditional pie crust, storage is slightly different, but keeping it fresh is super easy. If you’re looking for another great way to preserve a dessert, check out my guide on how to make an easy ice cream pie!
Here is my advice for keeping this homemade apple cobbler tasting fantastic for days.
Keeping it Fresh: Countertop vs. Fridge
You have two options here, depending on how long you plan to keep it. If you think you’ll eat the whole thing within 24 hours, keeping it covered on the counter is usually fine. Just make sure it’s wrapped tightly with foil or plastic wrap to keep the topping from getting stale. Room temperature works because of the high sugar content in the apples.
For anything longer than a day, I strongly suggest the fridge. Tightly cover the dish, making sure the wrap isn’t touching the topping too much, and pop it in. It stays perfectly good in the refrigerator for up to four days!
The Best Way to Reheat Your Cobbler
Never, ever try to reheat this in the microwave if you care about that topping! The microwave will steam up the biscuit part, making it soggy, and nobody wants a sad, damp cobbler. We want that crispy, buttery crust back!
The oven is your best friend here. Cover the dish lightly with foil—just enough to prevent the top from burning while it heats up. Place it back into a 350 degrees Fahrenheit oven for about 10 to 15 minutes. If you took it straight from the fridge, give it 20 minutes.
If you are just heating up a single slice, a toaster oven on a medium setting works like a charm! It reheats the apples without drying them out too much and crisps up the topping right on that little slice. Grab that vanilla ice cream, and enjoy your second round of this amazing apple cobbler recipe!
Frequently Asked Questions about the apple cobbler recipe
When you’re baking a classic like this, questions always pop up! I get so many messages from folks making this apple cobbler recipe for the first time, and that’s wonderful! I want you to feel totally confident walking into the kitchen. Here are a few things I hear most often about turning out a perfect homemade apple cobbler.
Can I make this easy apple cobbler ahead of time?
Yes, you absolutely can! This is such a great trick for when you have people coming over, or you just want a quick treat waiting after a long day. You can mix up the apple filling and the topping entirely. Assemble the whole thing in the baking dish, but here’s the trick: skip the egg wash and the coarse sugar sprinkle for now. Cover it up tightly and pop it in the fridge for up to 24 hours. When you’re ready to bake, pull it out, brush on that egg wash and sprinkle the sugar, and then bake it. You might need to add five extra minutes since it’s starting cold, but it works beautifully!
What is the best apple to use for this old fashioned apple cobbler?
If you want that perfect, slightly tart flavor that cuts through the richness of the buttery apple cobbler topping, you must use firm baking apples. My top two choices for this old fashioned apple cobbler are Granny Smith—they are robust and tart—or Honeycrisp, which stays beautifully crisp. Honestly, don’t use something soft like Red Delicious, because they just dissolve into sauce when baked for 45 minutes. We need texture in this easy apple cobbler!
Can I substitute the butter in the buttery apple cobbler topping?
Oh, I wish I could say yes, but for this specific topping, I really prefer you stick to the butter. The richness and the melting point of real butter are what give us that lovely, flaky crumb structure we are aiming for. If you absolutely must substitute, you could perhaps use a high-quality shortening instead for the *fat*, but you will lose some of that deep, unmistakable buttery flavor. If you only have salted butter on hand, go ahead and use it, but just pull back the initial 1/2 teaspoon of salt in the dry ingredients by just a little pinch. Just remember: butter equals the best texture for this biscuit topping!
Estimated Nutritional Information
I always like to keep the nutrition facts handy, even when baking something as purely comforting as this apple cobbler recipe. It helps keep things balanced, you know? Life is too short not to enjoy dessert, but it’s nice to have a general idea of where we land.
Please remember, this is just an estimate for one serving based on the ingredients listed in the recipe. If you eat a bigger piece—and who am I to judge when it’s this good?—the numbers will naturally go up! Also, if you douse it in extra butter or serve it with a massive scoop of ice cream, that counts too!
- Serving Size: 1 serving
- Calories: 380
- Fat: 18g
- Saturated Fat: 11g
- Carbohydrates: 55g
- Sugar: 35g
- Protein: 5g
It’s a rustic, homemade apple cobbler, so the sugar content is due to the fruit itself combined with the sugars needed for that perfect buttery apple cobbler topping texture. Worth every single calorie when it comes out warm!
Share Your Baking Moments
Phew! Now that you have the ultimate apple cobbler recipe soaking in your mind, the best part starts: baking it! Honestly, seeing your creations and hearing how this simple yet wonderful cinnamon apple dessert turned out for your family is what keeps me going in the kitchen.
When you try this easy apple cobbler, I really, truly want to hear about it. Did you use Granny Smiths or Honeycrisp? What did you top your warm slice with? Did the buttery apple cobbler topping come out flaky and golden? Don’t be shy—drop all your thoughts and tips in the comments below. Knowing what works for you helps our whole community bake with more confidence.
If you snap a picture of your bubbling, beautiful warm apple dessert, please tag me on social media! Seeing this classic comfort food dessert grace your tables brings me so much joy. It reconnects us all to that simple, honest comfort that Grandma Daisy intended. While you’re browsing for something sweet next, you might also want to try that super simple easy 3-ingredient chocolate fudge recipe—it’s just as fast!
Rate this recipe below, and let’s keep sharing the warmth!
PrintThe Ultimate Easy & Buttery Apple Cobbler (From Scratch)

Make this easy homemade apple cobbler for a comforting dessert. It features tender, cinnamon-spiced apples beneath a rich, buttery biscuit topping. This simple recipe delivers old-fashioned flavor without complicated steps.
- Prep Time: 20 min
- Cook Time: 45 min
- Total Time: 65 min
- Yield: 6 servings 1x
- Category: Dessert
- Method: Baking
- Cuisine: American
- Diet: Vegetarian
Ingredients
- 6 medium baking apples (like Granny Smith or Honeycrisp), peeled, cored, and sliced 1/4-inch thick
- 1/2 cup granulated sugar
- 1/4 cup packed light brown sugar
- 1 tablespoon all-purpose flour
- 1 teaspoon ground cinnamon
- 1/4 teaspoon ground nutmeg
- 1 tablespoon lemon juice
- 1/4 cup water
- 1 1/2 cups all-purpose flour
- 2 teaspoons baking powder
- 1/2 teaspoon salt
- 1/2 cup (1 stick) cold unsalted butter, cut into small cubes
- 1/2 cup milk
- 1 large egg, lightly beaten (for egg wash)
- 1 tablespoon coarse sugar (for sprinkling)
Instructions
- Prepare the apple filling: In a large bowl, combine the sliced apples, granulated sugar, brown sugar, 1 tablespoon flour, cinnamon, nutmeg, and lemon juice. Toss gently to coat the apples evenly.
- Pour the water into the bottom of a 9-inch deep-dish pie plate or an 8×8 inch baking dish. Spread the seasoned apples evenly over the water.
- Prepare the buttery topping: In a separate medium bowl, whisk together the 1 1/2 cups flour, baking powder, and salt.
- Cut in the cold butter using a pastry blender or your fingertips until the mixture resembles coarse crumbs with some pea-sized pieces of butter remaining.
- Stir in the milk until just combined; do not overmix. The dough will be shaggy.
- Drop spoonfuls of the biscuit topping over the apple filling, leaving small gaps between the mounds so the apples bubble up. You do not need to cover the entire surface.
- Brush the tops of the biscuit mounds lightly with the beaten egg and sprinkle with coarse sugar.
- Bake the cobbler in a preheated oven at 375 degrees Fahrenheit for 40 to 45 minutes, or until the topping is golden brown and the apple filling is thick and bubbling.
- Let the warm apple dessert cool on a wire rack for at least 15 minutes before serving. Serve warm with vanilla ice cream for the best experience.
Notes
- For the best texture, keep your butter very cold when making the topping.
- If you prefer a more rustic look, you can skip the egg wash and simply sprinkle the topping with a little extra cinnamon sugar.
- This cobbler pairs perfectly with vanilla ice cream or a dollop of fresh whipped cream.
Nutrition
- Serving Size: 1 serving
- Calories: 380
- Sugar: 35g
- Sodium: 250mg
- Fat: 18g
- Saturated Fat: 11g
- Unsaturated Fat: 7g
- Trans Fat: 0.5g
- Carbohydrates: 55g
- Fiber: 3g
- Protein: 5g
- Cholesterol: 55mg