
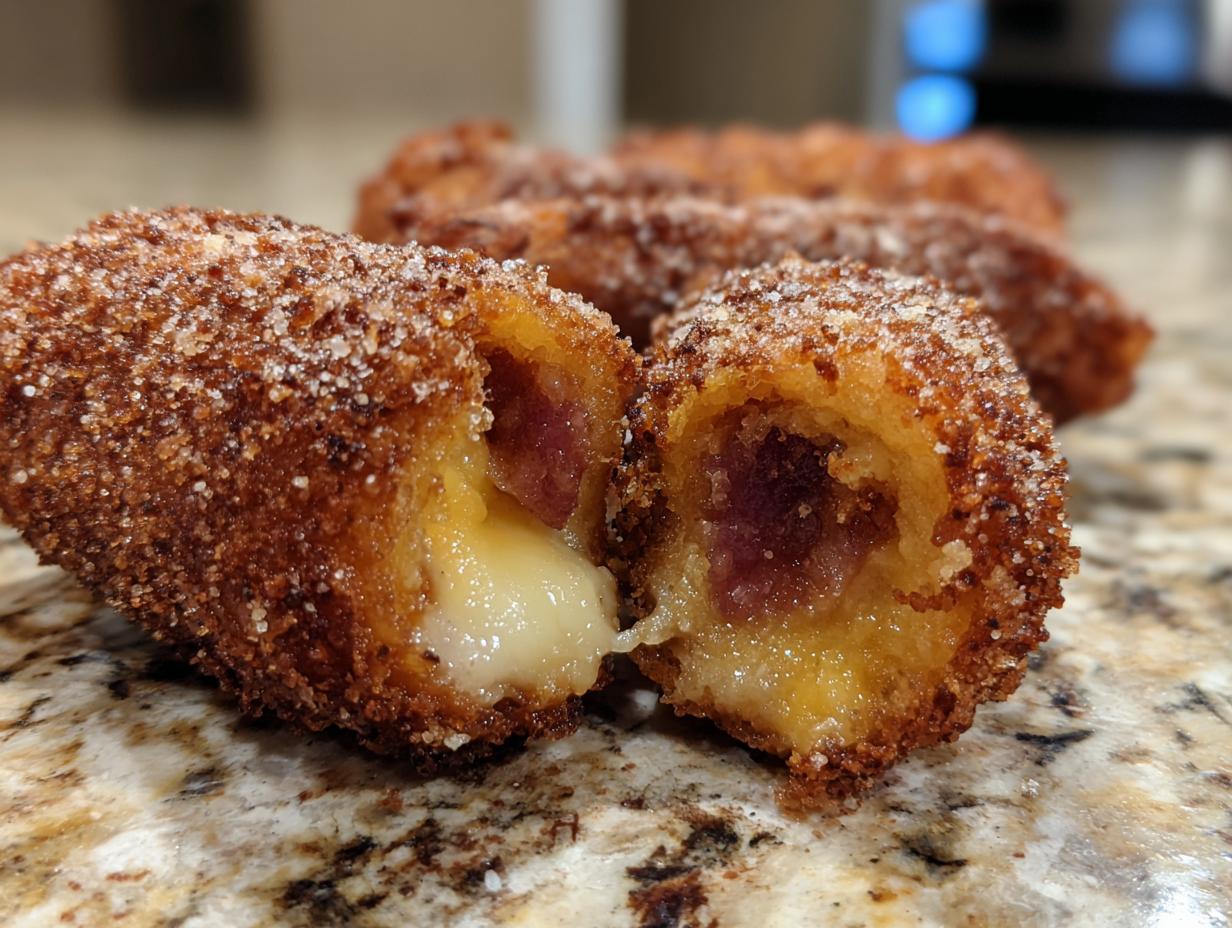
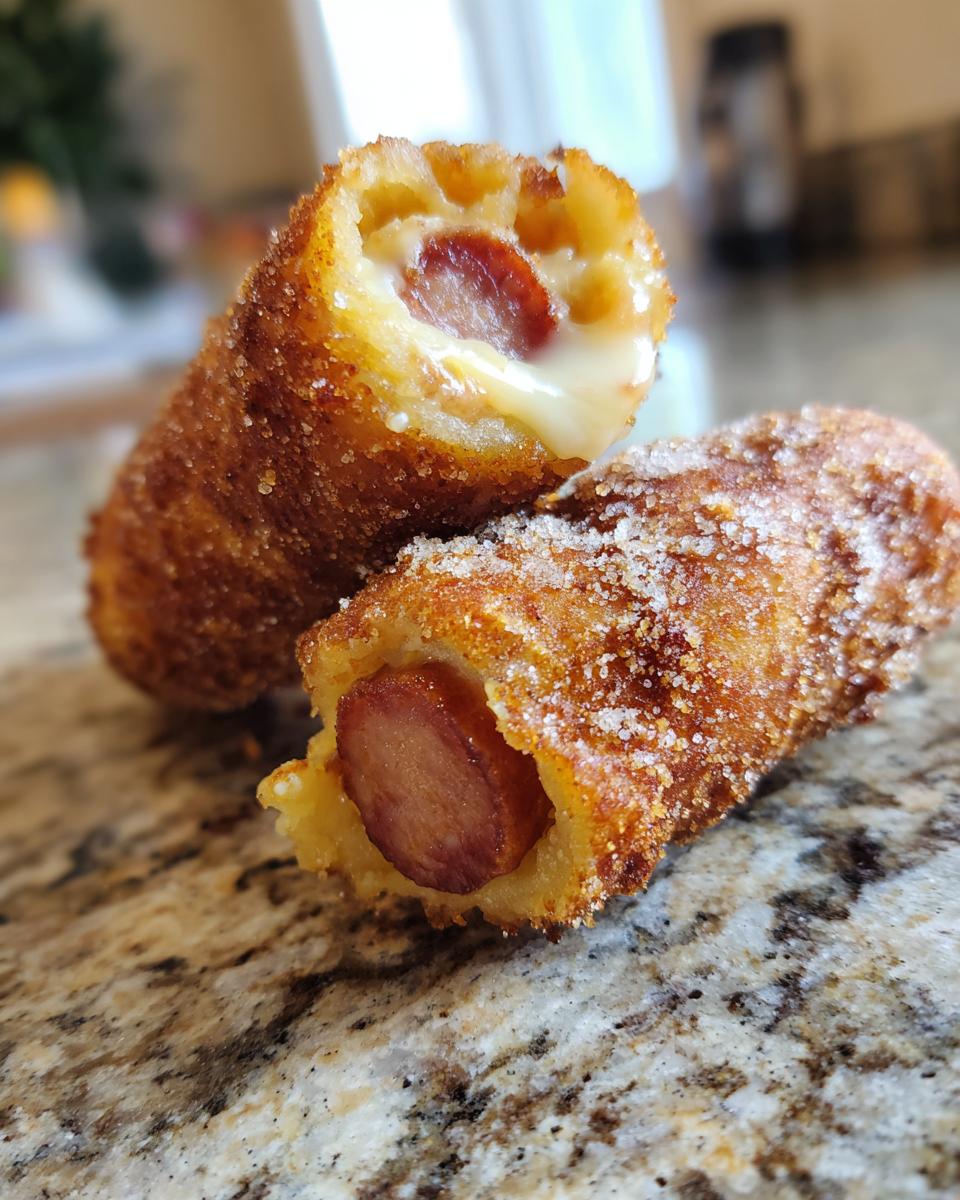
I swear, there is nothing more satisfying than biting into a perfectly crispy, golden **korean corn dog** fresh from the fryer, right? Those street food stands started a global obsession, and honestly, I get it! We can stop scrolling through videos and actually bring that authentic street food perfection right into our own kitchen. My goal here, channeling my Grandma Daisy’s spirit of honest cooking, is to nail that signature crunch—and we’re doing it with potatoes for that incredible crust. Plus, we’re making the famous half-and-half. Get ready for that lava flow of mozzarella mixed with savory hot dog that makes for the ultimate gooey cheese pull!
- Why You Will Love This Potato Crusted korean corn dog Recipe
- Essential Ingredients for the Crispiest korean corn dog
- Step-by-Step Instructions to Make Perfect korean corn dog
- Expert Tips for the Ultimate Gooey Cheese Pull korean corn dog
- Serving Suggestions for Your korean corn dog Street Food at Home
- Storage and Reheating Instructions for Crispy Fried Snacks
- Frequently Asked Questions About Making korean corn dog
- Estimated Nutritional Data for This Savory Sweet Snack
- Share Your korean corn dog Success
Why You Will Love This Potato Crusted korean corn dog Recipe
Honestly, turning on the fryer on a Saturday afternoon feels like an event, and these are definitely worth the effort. You don’t need to book a flight to Seoul to get the real deal anymore. Trust me, once you taste this crunch, you’ll be hooked!
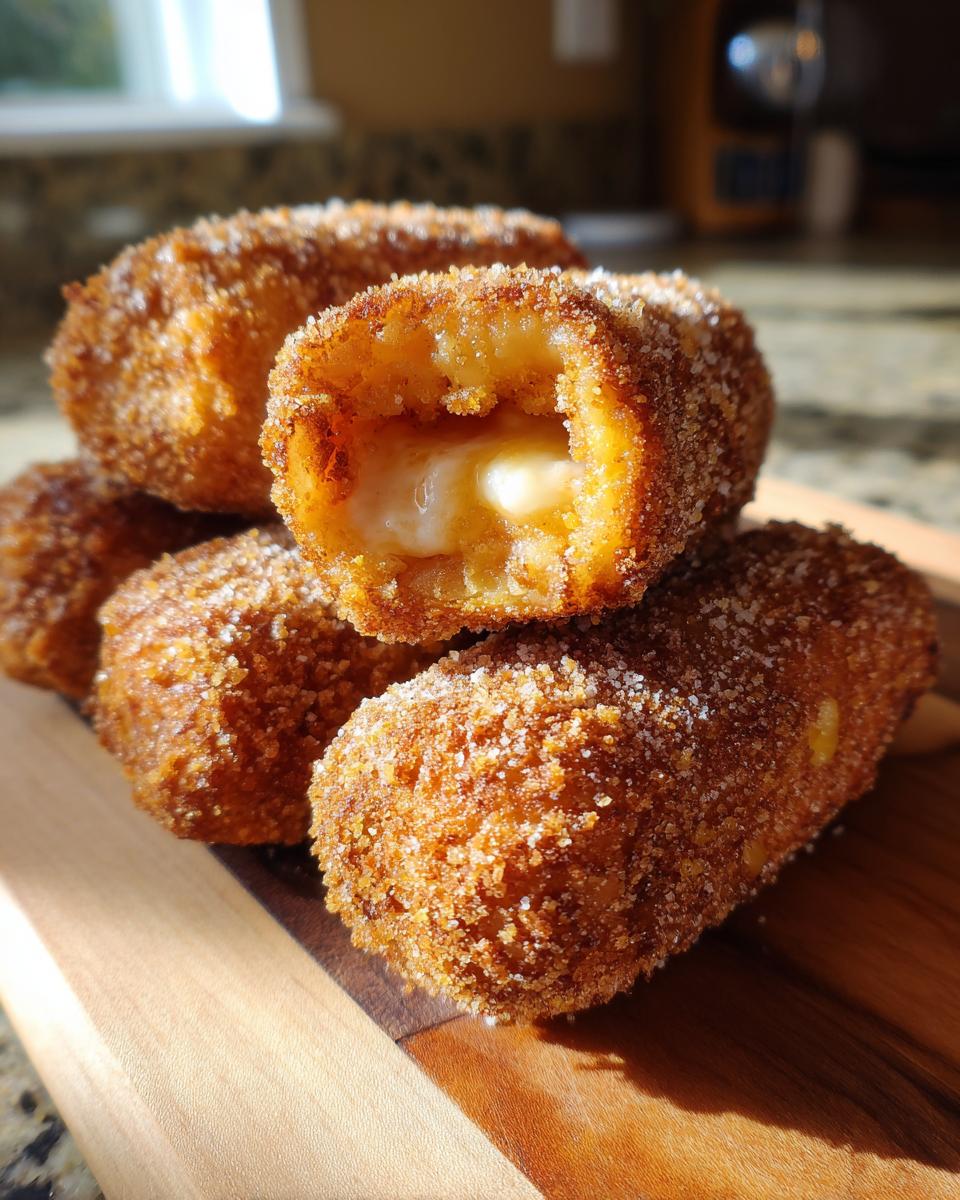
- That Signature Crunch Factor: We use diced or shredded potato mixed with panko, so the outside shattering when you bite it is exactly what you want. It’s next level crispiness!
- The Ultimate Gooey Cheese Pull: That perfect 50/50 split between hot dog and low-moisture mozzarella creates that Instagram-worthy stretch every single time. It’s pure satisfaction.
- Street Food at Home: This recipe perfectly captures the fun, slightly messy vibe of real Korean Street Food traditions. Perfect for game day or a fun Friday night activity.
- Simple Batter Magic: Don’t let the coating scare you! The batter is basic, comes together fast, and sticks beautifully to the fillings once they’re pre-chilled.
- Savory Meets Sweet Finish: That light dusting of sugar right after frying is non-negotiable. It balances the saltiness of the dog and the savory potato crust.
- Quick Cooking Time: Once your sticks are prepped, they fry up in minutes. You’re looking at a delicious snack ready to eat in under an hour total!
Essential Ingredients for the Crispiest korean corn dog
Okay, listen up, because the quality of your ingredients really makes or breaks that perfect crunch. You’ll need everything laid out before you start assembling, because once we dip, we move fast! We want eight perfect sticks of hot dog and mozzarella ready to go. Remember, we are making a classic; the star here is definitely that potato texture holding everything together.
- 1 cup all-purpose flour
- 1 teaspoon baking powder
- 1/2 teaspoon salt
- 1/4 cup granulated sugar, plus extra for dusting
- 1 large egg
- 3/4 cup cold water
- 1 cup panko breadcrumbs
- 1 cup finely diced frozen french fries or shredded potato (thawed and squeezed dry)
- 8 hot dogs (all-beef recommended)
- 8 mozzarella cheese sticks (low-moisture, cut to match hot dog length)
- Wooden skewers
- Vegetable oil, for deep frying
Ingredient Notes and Potato Crusting Secrets
A couple of quick pointers here to ensure you get that beautiful stretch. For the mozzarella, you absolutely must use low-moisture sticks; the fresh stuff is too wet and will just melt out instead of stretching beautifully. When it comes to the potato, I love sneaking in some frozen diced fries before they thaw completely—they are already a bit dry, which helps! If you shred them, squeeze every drop of water out; damp potato equals a soggy crust, and we cannot have that! And please, don’t skip the granulated sugar for dusting at the end; that salty/sweet combo is the secret sauce of the authentic Korean Street Food experience.
Step-by-Step Instructions to Make Perfect korean corn dog
Alright, this is where the fun starts, but you have to be quick and methodical! Remember what I always say: preparation is 90% of the battle when you’re dealing with frying. Get your assembly station ready before you even look at the flour. We need everything cold and ready to go into that hot oil, or things get messy fast. It’s really not that tricky, but it requires focus!
Assembling and Chilling the korean corn dog Sticks
First things first: we need structure! Take your hot dogs and mozzarella sticks and slice them so they are roughly the same length, giving you eight pairs of that glorious half-and-half filling. Carefully slide a wooden skewer right through one hot dog piece and the mozzarella piece stacked neatly on top. Do this for all eight. Pop these assembled sticks onto a plate and stick them in the fridge for at least 15 minutes. Seriously, don’t skip this chill time! Cold cheese and meat mean they hold their shape perfectly when they hit the hot batter.
Creating the Batter for Your Homemade Corn Dogs
While those are chilling, we make the glue. Whisk your flour, baking powder, salt, and the quarter cup of sugar together in a medium bowl. In a separate little cup, whisk your egg and that cold water until they’re friendly. Now, pour the wet into the dry. Here’s the big note for your Homemade Corn Dogs: don’t overmix! I just mean a few tiny lumps are totally fine; mixing too much develops gluten and makes your crust heavy instead of light and airy.
Achieving Maximum Crunch: Coating the korean corn dog
Time to set up the crunch station! Put your panko on one plate and your diced potato (thawed and squeegeed dry!) on the other plate. Grab a chilled stick, dip it completely into that batter—let the extra drip off for a second—and move it immediately to the panko. Press that panko on until it’s covered. Then, here’s the magic for the Potato Crusted Corn Dog look: roll it in the diced potato and press firmly! We want those little pieces stuck tight to the batter layer so they crisp up like fries!
Deep Frying Technique for Crispy Fried Snacks
Heat up your oil in a heavy pot to exactly 350°F (175°C). If your oil is too cool, these sticks eat up grease and get soggy, which is the opposite of what we want for Crispy Fried Snacks! For tips on keeping your oil temperature steady, check out my guide to Easy Deep Frying. Use tongs to gently lower no more than two or three coated dogs into the oil at a time. We want to maintain that heat! Fry them for about 3 to 4 minutes, turning them gently so they get that gorgeous, even golden color all over. When they look deep brown and sound super crisp when tapped, pull them out and set them on a wire rack to drain off that excess oil.
Expert Tips for the Ultimate Gooey Cheese Pull korean corn dog
So, you’ve got the golden crust—that’s half the battle won! But if you’re chasing that legendary, gravity-defying stretch, we need to talk about a few pro moves. This is where cooking becomes more than just following directions; it’s learning to listen to what the food needs. I learned these tricks the hard way, ending up with either a cheese explosion or a sad, solid block, but now? Now, we get the perfect pull every single time.
The absolute key to that dramatic moment when you pull the korean corn dog apart is the cheese and the oil temperature working together. If your oil is even a few degrees too low—say, under 340°F—the batter cooks too slowly, and the cheese melts right out the ends before the crust even sets up properly. You end up with a greasy exterior and a messy plate! Keep that thermometer glued to your pot!
Also, remember that note about the mozzarella? Low-moisture is crucial. Fresh mozzarella, while delicious in pasta, has too much water content. It turns steamy fast, fighting against developing that beautiful, stretchy body we want for the Gooey Cheese Pull. Stick to the low-moisture sticks cut to size.
Here’s a tiny thing I started doing that I think helps, especially for the sugar dusting: right after they come out of the oil and sit on the rack for maybe thirty seconds—just long enough for that initial heavy sizzle to stop—I transfer them to a paper towel for another thirty seconds *before* I roll them in the sugar. It lets any tiny trapped oil bubbles dissipate just a bit more, ensuring the sugar adheres perfectly to a surface that’s crispy, not oily. That little breather really firms up the crust before we add that final sweet layer!
Serving Suggestions for Your korean corn dog Street Food at Home
We’ve done the hard part—frying them to golden, crunchy perfection! But you can’t just pull a perfect korean corn dog out of the fryer and eat it plain. Well, you *could*, but to truly capture that vibrant, exciting aesthetic of the actual street food stalls, we need the toppings!
The finish is so important, and it’s an easy way to customize these for everyone at your party. Think of it like building your own experience; this is how we bring the whole Street Food at Home vibe to life.
First, that mandatory sweet hit: As soon as they are dry enough from the rack—still piping hot—give them a generous dusting of granulated sugar. Don’t be shy! This contrast between the hot, savory potato coating and the light sweetness is a crucial part of the flavor profile.
Next, let’s talk dips. If you want to stay purely traditional Korean style, you can’t go wrong with a drizzle of classic yellow mustard and basic ketchup, often applied in alternating zig-zags across the top. It looks amazing and tastes perfectly balanced!
But if we’re bringing them into my kitchen, I always offer a little something extra for dipping. I find that a simple spicy mayo—just mayo mixed with a little Sriracha—goes unbelievably well with the mozzarella cheese. For something a bit brighter, sometimes a sweet chili sauce works wonders too. You want a little tang or heat to cut through the richness of the fried batter and the sausage. Set out little dipping stations and let everyone customize their perfect bite!

Storage and Reheating Instructions for Crispy Fried Snacks
Look, these **korean corn dogs** are absolutely best eaten the second they leave the oil—that moment when the cheese is molten and the potato crust is aggressively crunchy. But let’s be real, leftovers happen, right? Or maybe you made a huge batch for a party and need to know how to keep them perfect for tomorrow.
First rule of anything deep-fried: if you want that crispiness back, you absolutely *cannot* use the microwave. The microwave just turns that beautiful potato crust back into a sad, soggy sponge? No thanks! We spent too much time getting everything perfectly adhered to risk that fate. We need dry, circulating heat to bring back the crunch we worked so hard for when making these **Homemade Corn Dogs**.
If you are storing them, let them cool completely first. Then, place them in a single layer in an airtight container for the fridge. They will stay decent for about two days, but honestly, they start losing life quickly after the first day.
Reheating for Maximum Crispiness
When it’s time to reheat, you have two amazing options that bring that exterior right back to life. I find the air fryer gives you the fastest, surprisingly effective results. Set your air fryer to about 375°F (190°C). If you don’t have an air fryer, the conventional oven works great too—just make sure you preheat it properly!
For the air fryer, pop your cold corn dogs in the basket, making sure they aren’t touching much, and cook for about 6 to 8 minutes. Give them a shake halfway through. You’ll hear that beautiful crunch coming back!
If you are using a standard oven, set it to 400°F (200°C) and lay them out on a wire rack set over a baking sheet. The rack is key here! It lets the heat circulate underneath so the bottom doesn’t get soggy while the top crisps. Bake them for about 10 to 12 minutes. You’re looking for them to be heated through and audibly crisp before you dust them with fresh sugar and dive back into that incredible texture.
Frequently Asked Questions About Making korean corn dog
I know you might have a few lingering worries—frying can feel intimidating sometimes! But honestly, once you get the rhythm down, making these amazing snacks is just like riding a bike. That’s why I gathered up the questions I get asked most often about mastering the perfect **Korean Street Food** at home. It’s all about these little procedural tweaks!
Can I use rice flour instead of all-purpose flour in the korean corn dog batter?
Oh, that’s a great question for anyone looking to amp up the crunch! Yes, you absolutely can, and many authentic recipes do this! If you substitute some or all of your all-purpose flour with glutinous rice flour, you will get a slightly chewier, thinner final crust that tends to shatter even more dramatically than the standard batter. It’s a fantastic technique, especially popular in some Asian Snack Recipes, so feel free to experiment with swapping maybe a quarter cup of the flour for rice flour next time!
What is the best oil temperature for deep frying these Mozzarella Hot Dog Sticks?
This is probably the most important single factor in preventing greasy results! For these **Mozzarella Hot Dog Sticks**, you absolutely need your oil settled right at 350°F (175°C). If the temperature drops below 340°F—which happens fast if you crowd the pot—the batter soaks up that oil instead of crisping up quickly, and you end up with heavy, oily **Homemade Corn Dogs**. I always recommend keeping a close eye on your thermometer and only frying two or three corn dogs at a time to keep that temperature stable. Stability equals a dry, crispy crust!
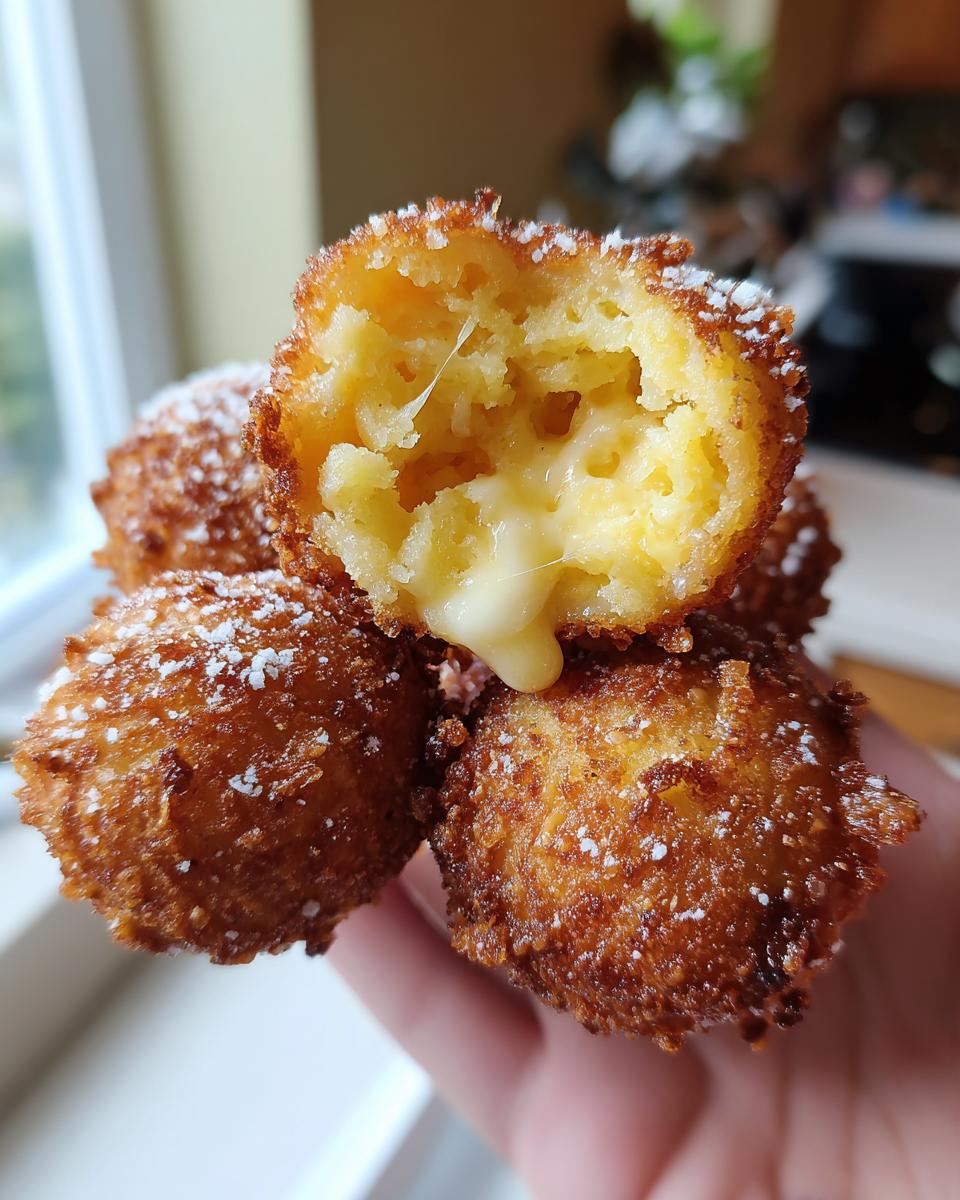
How do I make the pure potato crusted version (Gamja Hotdog)?
You are asking about my second favorite style! If you want that intense, rugged, fry-covered look—the true Gamja Hotdog style—it’s actually easier than the double coating we chose for this recipe. Remember the coating process where we rolled it first in panko and then in potato? For the pure potato version, you simply skip the panko step entirely. Once the stick is dipped in the batter, roll it immediately and firmly into your diced potato layer, pressing those chunks in until the entire surface is covered. That way, you get nothing but that glorious, textured Potato Crusted Corn Dog shell!
Estimated Nutritional Data for This Savory Sweet Snack
Now, I never want anyone to worry too much about counting every little calorie when we are making something this fun—honestly, these are special occasion **Savory Sweet Snack** items that bring joy! But because I believe in being thorough—Grandma always said knowledge is power—I put together the estimated nutritional breakdown for one of these amazing sticks based on the ingredients list we used. Remember, this data is based on what was needed for eight servings, so treat it as a guideline rather than a strict measurement.
If you are keeping track for health goals, you can see where the energy comes from! It’s definitely richer than your average snack, but that’s the nature of a fantastic, crispy, deep-fried item. For everyday eating, I always suggest checking out my guide to healthy breakfast ideas, but for this treat? Enjoy it!
Here is the breakdown per serving (one corn dog):
- Calories: 380
- Fat: 22g (with 8g being saturated fat)
- Carbohydrates: 35g
- Sugar: 12g (That’s mostly from the batter and the final dusting!)
- Protein: 13g
- Sodium: 650mg
Share Your korean corn dog Success
Whew! Now you have the power to recreate the most craveable **Viral Food Trends** right in your own kitchen. Seeing those golden, potato-crusted beauties emerge from the oil and watching that first cheese pull? That’s the real payoff, isn’t it? I really, really hope you give this recipe a go. It’s fun, it brings the whole family into the kitchen, and honestly, it’s so much more rewarding than waiting in line at the food truck!
When you nail that perfect crispy exterior and get that awesome sweet-and-savory hit, I want to know about it! Please snap a picture of your finished **korean corn dog** spread—especially if you’ve gone all out with the dipping sauces! Tag me on social media. I love seeing how everyone makes it their own. Your feedback means the world to me, and it helps the next home cook feel brave enough to fire up the oil!
If you run into any snags, or if you just want to tell me how much you loved the sugar dusting, don’t hesitate to reach out through the contact page. I read every single message!
And finally, which dipping sauce combination won the night for you? Was it the classic ketchup and mustard combo, or did you try something wild? I’m always looking for new ideas, and I might even feature your genius sauce recipe in the next update. Share your favorites!
If you want to check out some other great voices on this dish, feel free to peek at what others are saying, like this great overview from Honest Food Talks recipe guide! Now go on, get frying!
PrintCrispy Potato Crusted Korean Corn Dogs

Make street-style Korean corn dogs at home featuring a half-and-half hot dog and mozzarella filling. This recipe gives you the signature crunch using a potato coating for an irresistible, gooey cheese pull snack.
- Prep Time: 25 min
- Cook Time: 15 min
- Total Time: 40 min
- Yield: 8 servings 1x
- Category: Snack
- Method: Deep Frying
- Cuisine: Korean
- Diet: Vegetarian
Ingredients
- 1 cup all-purpose flour
- 1 teaspoon baking powder
- 1/2 teaspoon salt
- 1/4 cup granulated sugar, plus extra for dusting
- 1 large egg
- 3/4 cup cold water
- 1 cup panko breadcrumbs
- 1 cup finely diced frozen french fries or shredded potato (thawed and squeezed dry)
- 8 hot dogs (all-beef recommended)
- 8 mozzarella cheese sticks (low-moisture, cut to match hot dog length)
- Wooden skewers
- Vegetable oil, for deep frying
Instructions
- Prepare the fillings: Cut the hot dogs and mozzarella sticks in half lengthwise to create eight pairs of half-and-half pieces. Insert a wooden skewer through one piece of hot dog and one piece of mozzarella, stacking them together. Repeat for all sticks. Chill the assembled sticks for 15 minutes.
- Make the batter: In a medium bowl, whisk together the flour, baking powder, salt, and 1/4 cup of sugar. In a separate small bowl, whisk the egg and cold water. Pour the wet ingredients into the dry ingredients and mix until just combined; do not overmix. A few lumps are fine.
- Prepare the coatings: Spread the panko breadcrumbs on one shallow plate and the diced/shredded potato on another shallow plate.
- Coat the sticks: Working with one stick at a time, dip the chilled hot dog/cheese combination completely into the batter, letting excess drip off.
- Roll in coating: Immediately roll the battered stick in the panko, pressing gently to adhere. Then, roll it again in the diced potato, pressing firmly so the potato pieces stick all over the surface.
- Fry the corn dogs: Heat about 2-3 inches of vegetable oil in a deep, heavy-bottomed pot or Dutch oven to 350°F (175°C).
- Carefully lower 2-3 corn dogs into the hot oil, ensuring you do not overcrowd the pot. Fry for 3 to 4 minutes, turning occasionally, until the crust is deep golden brown and crispy.
- Remove the cooked corn dogs with tongs and place them on a wire rack set over a paper towel-lined baking sheet to drain excess oil.
- Serve immediately: While still hot, lightly dust the corn dogs with granulated sugar. Serve with ketchup and mustard for dipping.
Notes
- For the best cheese pull, ensure your mozzarella sticks are fully thawed before assembly, but keep them cold until they go into the batter.
- If you prefer a pure potato crust (Gamja Hotdog style), skip the panko and only use the diced potato coating.
- Maintain your oil temperature carefully; if it is too cool, the crust will absorb too much oil and become greasy.
Nutrition
- Serving Size: 1 corn dog
- Calories: 380
- Sugar: 12
- Sodium: 650
- Fat: 22
- Saturated Fat: 8
- Unsaturated Fat: 14
- Trans Fat: 0
- Carbohydrates: 35
- Fiber: 2
- Protein: 13
- Cholesterol: 55