The Ultimate Guide to Perfectly Caramelized Onions
Learn the patient technique to transform sharp raw onions into sweet, golden, jammy caramelized onions. This guide covers the slow method for deep flavor and a quicker option for weeknight meals.
- Prep Time: 10 min
- Cook Time: 75 min
- Total Time: 85 min
- Yield: About 1.5 cups 1x
- Category: Side Dish
- Method: Slow Sautéing
- Cuisine: American
- Diet: Vegetarian
Ingredients
Scale
- 3 large yellow onions, thinly sliced
- 2 tablespoons unsalted butter
- 1 tablespoon olive oil
- 1 teaspoon salt
- 1 teaspoon granulated sugar (optional, for faster browning)
Instructions
- Slice the onions thinly and uniformly. Uniformity helps them cook evenly.
- Place a large, heavy-bottomed skillet over medium-low heat. Add the butter and olive oil. Allow the butter to melt completely.
- Add all the sliced onions and the salt to the skillet. Stir well to coat the onions evenly with the fat.
- Cook the onions uncovered for 15 minutes, stirring every few minutes. The onions will soften and release moisture.
- Reduce the heat to low. Continue cooking, stirring every 5 to 8 minutes. This slow process draws out the natural sugars. If you are using sugar, add it now.
- After 30 to 40 minutes, the onions will start to turn light golden brown. Scrape up any brown bits stuck to the bottom of the pan; these add flavor.
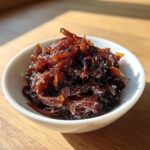
- Continue cooking, stirring more frequently as they darken, for another 20 to 30 minutes, until they reach a deep, rich, mahogany brown color and have a jammy texture. Total cooking time is usually 60 to 75 minutes for the deepest flavor.
- Remove from heat. Use these rich savory onion flavors immediately or store them for later use.
Notes
- For a quicker method, use medium heat and add 1 tablespoon of water every 10 minutes to prevent sticking and encourage steaming, which speeds up softening. This will take about 30 minutes total but results in less deep caramelization.
- These onions are a fantastic weeknight flavor booster for burgers or grilled cheese sandwiches.
- You can make a batch ahead of time and store them in the refrigerator for up to one week.
Nutrition
- Serving Size: 1/4 cup
- Calories: 95
- Sugar: 10
- Sodium: 390
- Fat: 5
- Saturated Fat: 3
- Unsaturated Fat: 2
- Trans Fat: 0
- Carbohydrates: 12
- Fiber: 2
- Protein: 1
- Cholesterol: 10
Find it online: https://daisyrecipe.com/caramelized-onions-ultimate-guide/