
You know how sometimes you just crave that perfect, effortless outdoor entertaining vibe? I’m talking about spreading out a checkered blanket and having everything feel beautiful without breaking a sweat. That’s why I developed this Simple Layered Picnic Cake. It’s the showstopper you need when planning that perfect cake picnic this spring. It delivers huge visual impact for almost zero stress!
My grandmother, Daisy, always taught me that the best food is honest food, made simply. She wasn’t a fancy baker; she was a practical one. I took that philosophy—that idea of simple, honest baking—and adapted it into something vibrant and transportable for today. This cake is designed for connection, ensuring you spend less time fussing with frosting outdoors and more time laughing with your friends at the social gathering.
- Why This Layered Cake is Perfect for Your Next Cake Picnic
- Essential Ingredients for a Simple Cake Picnic Layer Cake
- Step-by-Step Instructions for Your Cake Picnic
- Expert Tips for a Flawless Cake Picnic Experience
- Making Your Cake Picnic Ahead of Time
- Serving Suggestions to Complement Your Cake Picnic
- Frequently Asked Questions About the Cake Picnic
- Understanding the Nutrition of This Cake Picnic Dessert
- Share Your Simple Layered Cake Picnic
Why This Layered Cake is Perfect for Your Next Cake Picnic
Forget those heavy, complicated layer cakes that fall apart the second you hit the breeze! This design is specifically made for outdoor entertaining. The simplicity of the light whipped cream means it’s not sliding everywhere, and the three distinct, soft colors just scream ‘weekend fun.’ Honestly, these are the kind of shareable desserts that make people stop and take photos before they even dig in. If you want to know more about the philosophy behind keeping things simple and real in the kitchen, hop over to our story here!
Achieving Spring Aesthetics with Color
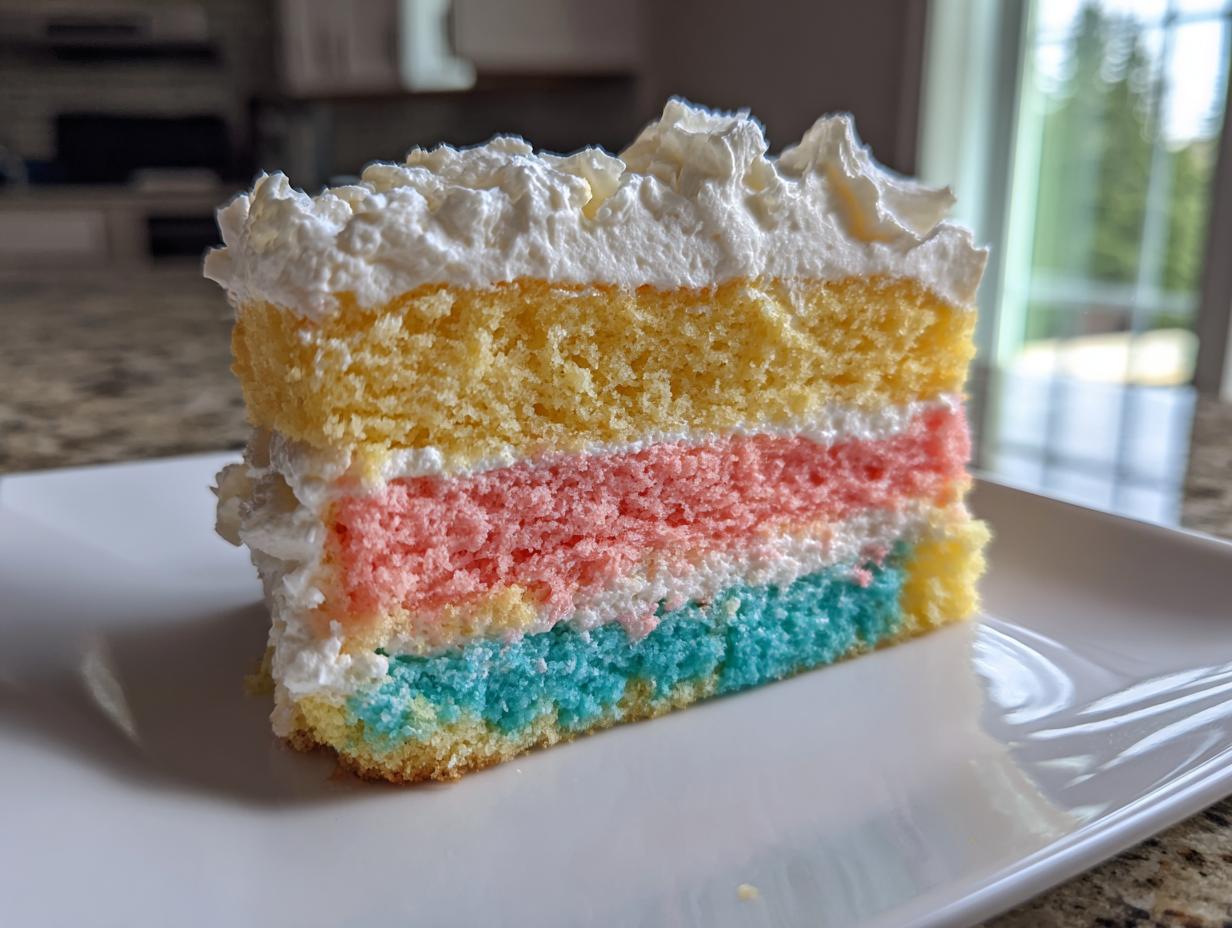
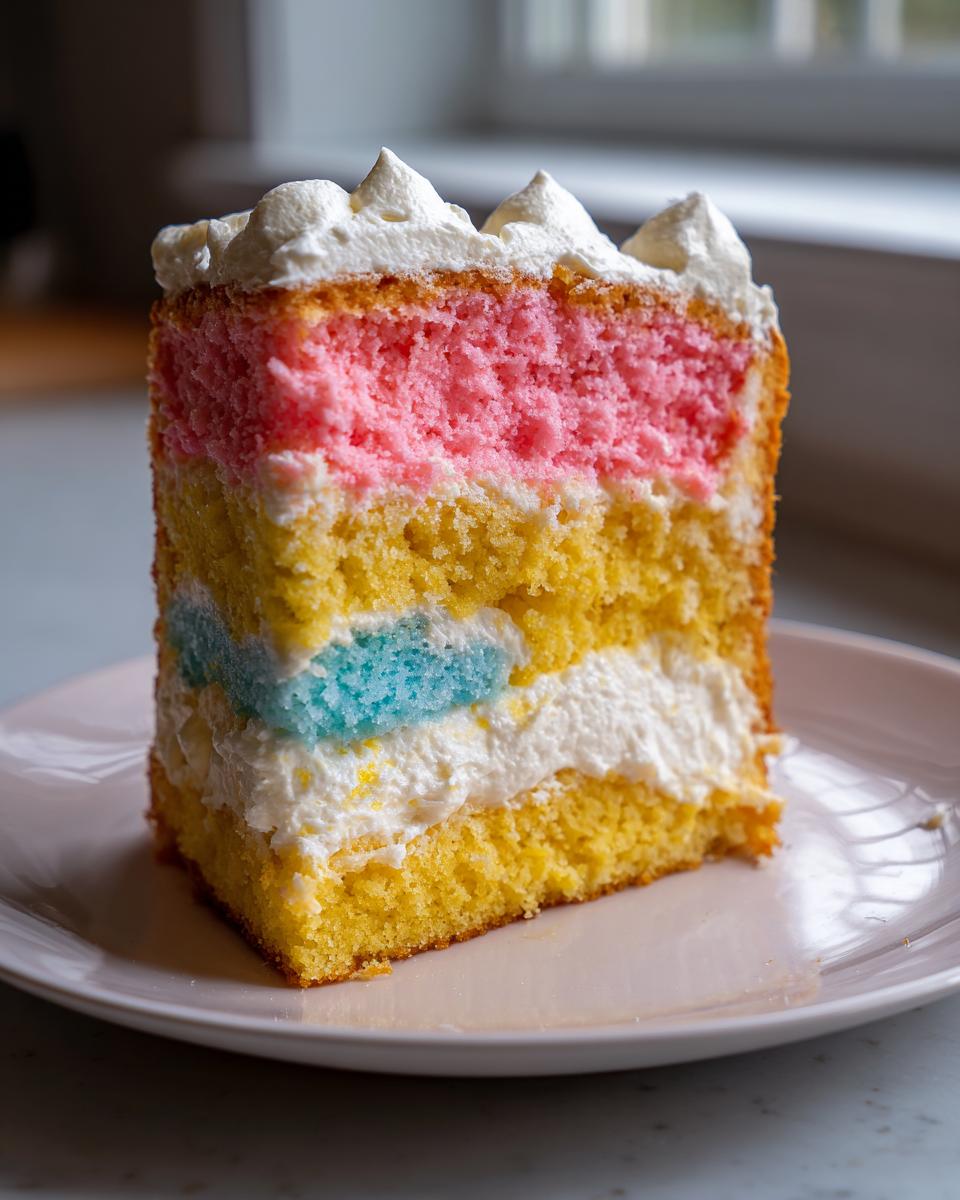
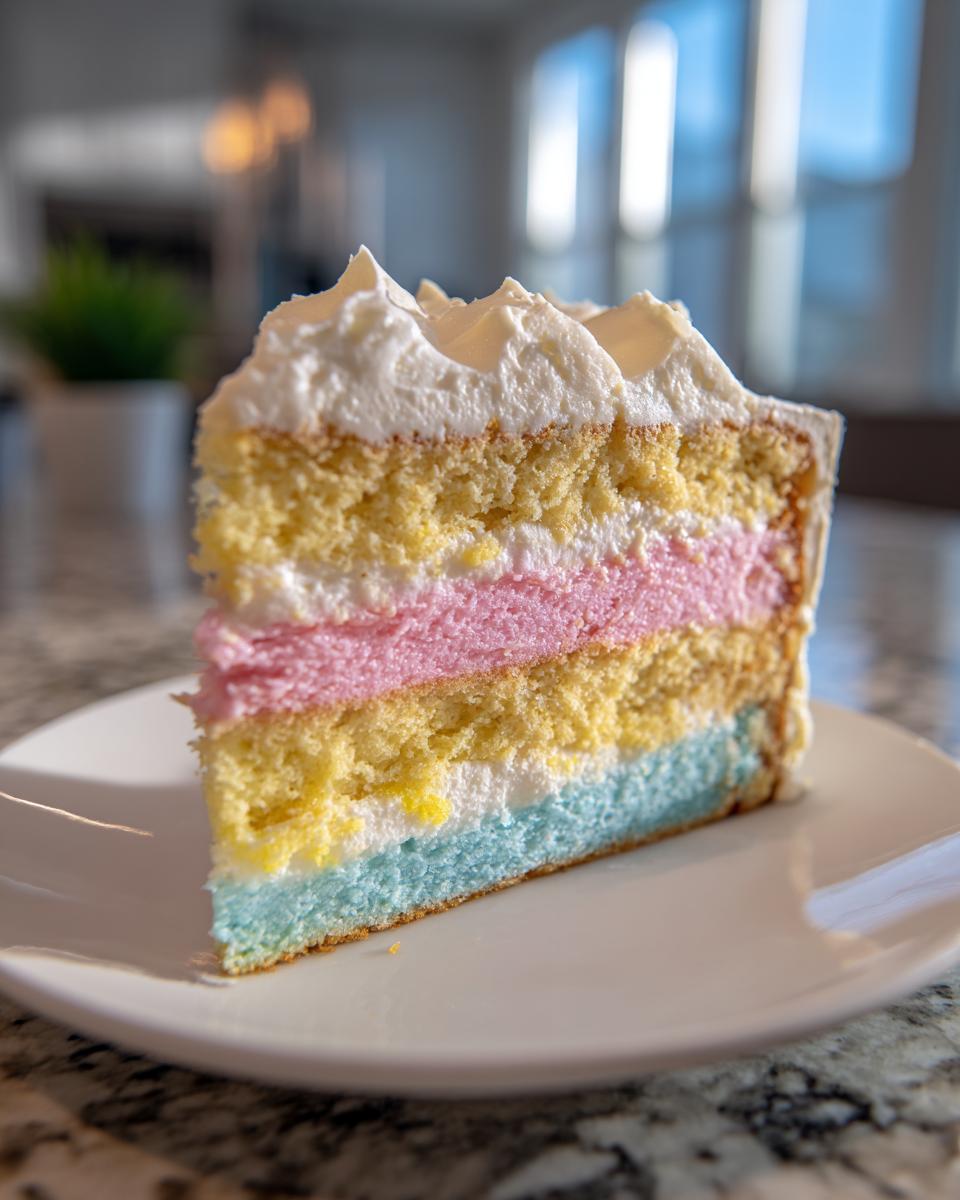
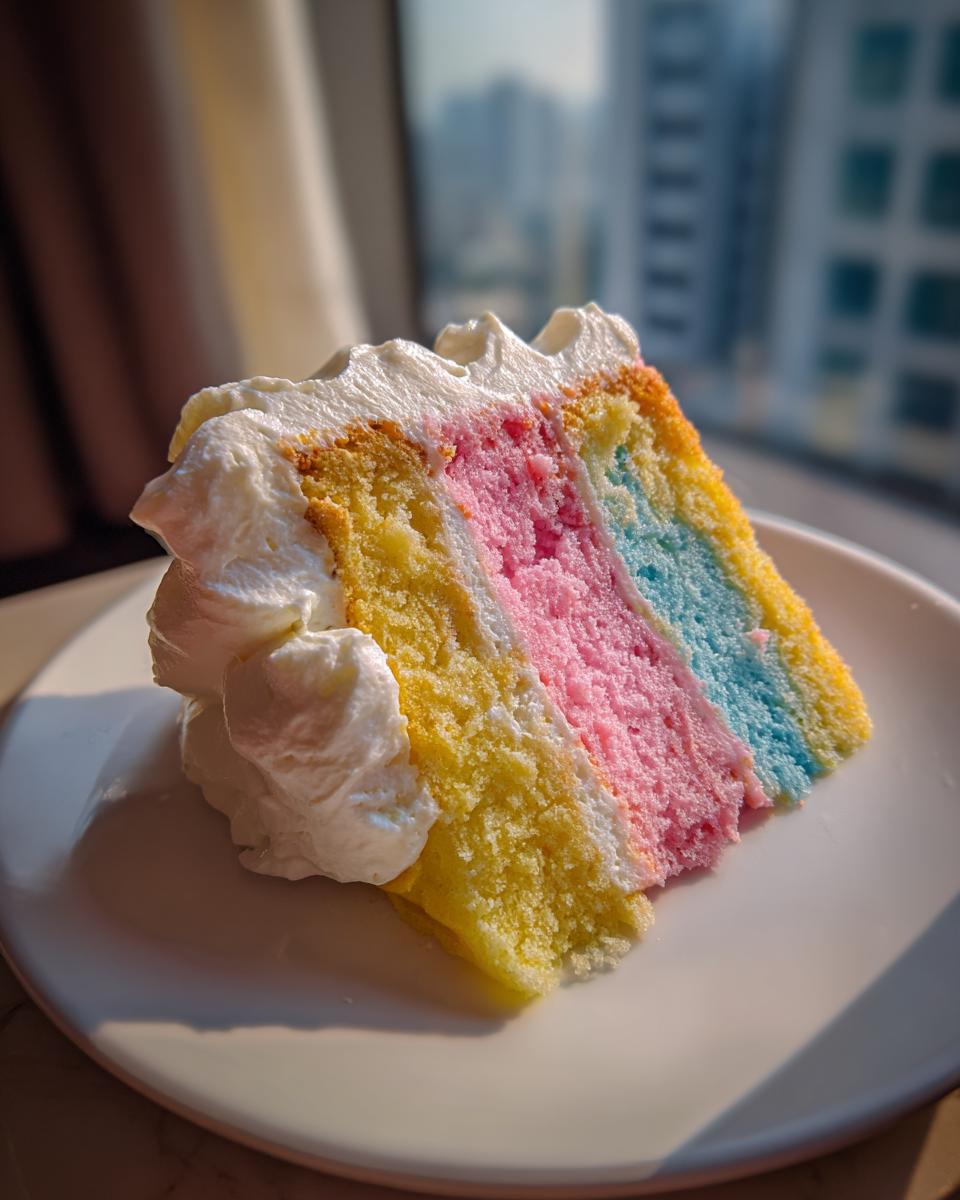
This is where the magic happens for those beautiful spring aesthetics pictures! We use just three subtle colors—a little pink, blue, and yellow—layered inside a simple white hug of whipped cream. It’s cheerful without being juvenile. When you slice into it under the dappled sunlight, you get that gorgeous, unexpected pop of color that just brightens up the whole picnic spread.
Low-Stress Transport for Your Cake Picnic
I know the fear: driving down a bumpy road with your dessert rattling in the back seat. Trust me, I’ve fixed that issue! By keeping the frosting light and using only two 6-inch layers, we minimize the surface area that can get bumped or smeared during transport. This cake is sturdy enough for the journey, making it the ultimate cake picnic companion.
Essential Ingredients for a Simple Cake Picnic Layer Cake
Daisy always said you shine brightest when you start with good quality basics. For this cake, we aren’t messing around with fancy fillings—it’s all about the quality of the simple batter and the fresh cream. You’ll want to have your butter fully softened; this is crucial for that light texture we need!
- 1 1/2 cups all-purpose flour
- 1 1/2 teaspoons baking powder
- 1/2 teaspoon salt
- 1/2 cup unsalted butter, softened
- 1 cup granulated sugar
- 2 large eggs
- 1 teaspoon vanilla extract
- 1/2 cup milk
- Food coloring (pink, yellow, blue—use gel colors if you can!)
- 1 cup heavy whipping cream
- 2 tablespoons powdered sugar
- 1 teaspoon lemon zest
Step-by-Step Instructions for Your Cake Picnic
Baking is all about rhythm, and while Daisy used elbow grease, I rely on my mixer. But the core principle stays the same: don’t rush the mixing stages, especially when creating these colorful layers! Get your workspace ready before you even turn on the oven.
Preparing the Colorful Cake Layers
First thing: Get your oven humming at 350 degrees F and make sure those two 6-inch pans are greased and floured—you don’t want anything sticking later! Whisk your dry stuff (flour, baking powder, salt) and set that bowl aside. Now for the wet. Beat that softened butter and sugar until it’s fluffy—really fluffy! Then, lovingly incorporate your eggs one by one, followed by the vanilla. When you finally add the dry and the milk, switch your mixer to low. Add them in alternating splashes; just mix until you see the streaks disappear. Overmixing is the enemy here, trust me!
Once combined, divide that beautiful vanilla batter evenly into three small bowls. Drop a few drops of your chosen food coloring into each until you get that perfect pastel look. Pour one color into each pan and slide them into the oven for about 20 to 25 minutes. Once done, let them cool for just 10 minutes in the pan before flipping them out onto a rack to cool completely. You can check out some of my easier weekday recipes right here if you’re planning ahead!
Whipping the Lemon Zest Frosting
While the cakes cool down completely—and I mean *completely*—it’s time for the frosting. We are keeping this light and bright! Throw the heavy whipping cream, powdered sugar, and that lovely lemon zest into a clean bowl. Whip it up! You want stiff peaks—that means when you lift the whisk out, the tip stands straight up, like a little mountain. This stability is absolutely necessary for outdoor entertaining.
Assembling and Preparing the Cake Picnic for Travel
Time to stack! Place your first cooled layer down. Spread a thin layer of that lemon cream over the top. Repeat with layer two, then layer three. Now, this is key for travel: give the whole thing a very thin coat—what bakers call a crumb coat—on the top and sides. This seals in the crumbs and makes the final layer look sharp later. Once that’s set for a minute, you’re ready to carefully load up your beautiful, colorful cake picnic dessert and head out the door!

Expert Tips for a Flawless Cake Picnic Experience
I learned early on that planning for outdoor entertaining means planning for tiny mishaps! My grandmother always insisted on using a sturdy base, so I always bake my layers directly onto a thick cake board—it makes moving the whole thing so much easier than trying to transfer it later. Remember that crumb coat we talked about? That’s your insurance policy against things shifting on the drive.
If you are heading to a social gathering on a hot day, here is my little secret: Use an insulated cooler bag—the kind you take to the beach—to transport the cake, even if it doesn’t have ice packs inside. The insulation keeps the ambient heat off our delicate whipped cream frosting. If you’re interested in trying a frosting that travels even better in a heatwave, I have a fantastic stabilized buttercream recipe over here, though I think the fresh lemon zest in this whipped cream is worth the cooling strategy!
Making Your Cake Picnic Ahead of Time
Because we’re using a lighter whipped cream frosting, we have to be smart about timing—this isn’t a sturdy five-day buttercream we’re dealing with! My rule for any successful cake picnic is to do as much prep work as possible the day before, but leave the final assembly for the last minute.
You can absolutely bake those three colorful layers a day in advance. Once they are completely cool, wrap each layer snugly in plastic wrap and keep them right there on the counter, or pop them in the fridge if your kitchen is super warm. They stay wonderfully moist overnight.
The same goes for the lemon zest whipped cream frosting. Whip it up the morning of your event, but *do not* frost the cake yet. Keep the frosting bowl covered tightly in the fridge.
This is the trick for transport success for any social gathering: Transport the three cooled, unfrosted layers on their cake boards, along with the container of frosting. Assemble the cake right when you arrive at the lawn or park. It only takes five minutes to stack it and place that final layer of frosting on top. If you like skipping baking altogether sometimes, you should really check out my tips for no-bake treats!
Serving Suggestions to Complement Your Cake Picnic
A beautiful layered cake is the star, right? But a great picnic food spread needs a few easy friends alongside it! Because this cake is colorful, I like to keep the sides simple and refreshing so the cake gets all the attention. Think about adding some fresh berries—strawberries or raspberries look incredible next to the pastel layers.
I always pair this dessert with something bubbly to cut through the richness. A light, non-alcoholic cucumber mint water is wonderful, or if you need a bubbly kick for your outdoor entertaining, I’ve got a fantastic simple punch recipe that travels well in a thermos. Keep it chilled, and you’ve got a perfect, stress-free pairing!
Frequently Asked Questions About the Cake Picnic
When I first started taking Daisy’s recipes out of the kitchen and into the real world, I had a dozen questions myself! Transporting something this pretty requires a little foresight, but it’s totally doable once you know the tricks. It’s all about making sure your social gathering dessert looks as good when you slice it as it did when you left home. If you ever have questions about any of my recipes, feel free to reach out to me via my contact page!
Can I use a different frosting for my cake picnic?
Absolutely! That’s the beauty of building on a simple base recipe. Our lemon zest whipped cream is lovely and light for those perfect spring aesthetics, but it does need shade. If you’re worried about heat or need a thicker coating, you can totally swap it out for an American or Swiss Meringue Buttercream. Just know that buttercream is denser and heavier, so the transport might feel a little riskier. For a true, effortless cake picnic, though, I stick to the light cream and focus on keeping it cool!
How do I keep this picnic cake cool outdoors?
This is the million-dollar question when dealing with whipped cream! The best way is always full insulation. Don’t just throw the cake in a box; put it in a well-insulated cooler bag. If you don’t have a spare ice pack, toss a bag of frozen peas or a couple of frozen water bottles on the bottom, and place the cake box on top of that. Shade is your second best friend—never leave the cake sitting in direct sun, even for a minute. As long as it’s shaded and insulated, it should be fine for serving time at your outdoor entertaining event.
I don’t have 6-inch pans, can I still make this?
Oh, I know how it is when your pantry doesn’t match the recipe! If you only have standard 8-inch pans, you can use them, but you’ll only get two thinner layers, not three dramatic ones. You’ll need to extend the baking time a bit, maybe closer to 28 or 30 minutes. If you want those beautiful, tall layers for your shareable desserts, sometimes it’s worth grabbing a cheap set of 6-inch pans; they are perfect for these smaller, cute desserts we love to make.
Why did you use lemon zest in the sweet frosting?
Daisy was all about balancing sweetness, and even though she didn’t start using my whipped cream, she always added citrus to her lighter fillings! The little bit of lemon zest cuts through the richness of the cake and the sweetness of the powdered sugar. It just brightens everything up so it tastes fresh, which is exactly what you want when you are serving picnic food outside. It makes the whole thing taste like sunshine!
Understanding the Nutrition of This Cake Picnic Dessert
Now, I know some of you amazing bakers out there like to keep track of all the numbers, and I totally respect that! When Daisy was baking, the focus was purely on nourishment and love—nobody was pulling out a spreadsheet, ha! But since we are living in a slightly different world today, I wanted to give you a heads-up about the nutritional details associated with this dessert for your outdoor entertaining.
Please know that the figures I provide are just an estimate based on the standard products I keep stocked in my pantry here. Every brand of flour, every stick of butter, and how much you decide to dress up your final frosting layer will change those numbers slightly. This recipe is all about enjoying the moment and the connection with your friends, so please treat any stated values as a general guideline rather than iron-clad fact for your perfect social gathering!
Share Your Simple Layered Cake Picnic
Baking should always feel like an invitation, and now that you’ve mastered this simple, colorful cake, I really want to see what you’ve created! This whole recipe is dedicated to those bright, joyful moments, and I truly believe that sharing our culinary successes—and even the little oopsies!—helps us all get better.
When you take this beauty out for your next outdoor entertaining scene, snap a picture! Show off those gorgeous colored layers you worked so hard to bake. Tag me when you post because I absolutely live to see all our efforts come together; it connects us all in this little baking community we’ve built here.
If you loved how stress-free this dessert was for your social gathering, please leave a rating below. A quick comment or rating is the best way to tell me if this recipe is a keeper, and it really helps others find these simple, honest recipes. We’ve got tons of other bright desserts too—if you’re looking for fruity colors next, you should see what I did with this amazing cherry cake recipe!
PrintSimple Layered Picnic Cake for Outdoor Entertaining

A straightforward, colorful layer cake perfect for transporting and serving at your next social gathering or spring aesthetics picnic.
- Prep Time: 25 min
- Cook Time: 25 min
- Total Time: 50 min
- Yield: 6 servings 1x
- Category: Dessert
- Method: Baking
- Cuisine: American
- Diet: Vegetarian
Ingredients
- 1 1/2 cups all-purpose flour
- 1 1/2 teaspoons baking powder
- 1/2 teaspoon salt
- 1/2 cup unsalted butter, softened
- 1 cup granulated sugar
- 2 large eggs
- 1 teaspoon vanilla extract
- 1/2 cup milk
- Food coloring (pink, yellow, blue)
- 1 cup heavy whipping cream
- 2 tablespoons powdered sugar
- 1 teaspoon lemon zest
Instructions
- Preheat your oven to 350 degrees F. Grease and flour two 6-inch round cake pans.
- In a medium bowl, whisk together the flour, baking powder, and salt. Set aside.
- In a large bowl, beat the softened butter and granulated sugar with an electric mixer until light and fluffy. Beat in the eggs one at a time, then mix in the vanilla extract.
- Gradually add the dry ingredients to the wet ingredients, alternating with the milk, mixing until just combined. Do not overmix.
- Divide the batter evenly into three small bowls. Add a few drops of a different food coloring to each bowl to create your desired colors.
- Pour each colored batter into a prepared cake pan, one color per pan.
- Bake for 20 to 25 minutes, or until a toothpick inserted into the center comes out clean. Let the cakes cool in the pans for 10 minutes before inverting them onto a wire rack to cool completely.
- While the cakes cool, prepare the frosting. Beat the heavy whipping cream, powdered sugar, and lemon zest until stiff peaks form.
- Place the first cake layer on your serving plate. Spread a thin layer of whipped cream frosting over the top. Repeat with the second and third layers. Frost the top and sides of the entire cake lightly.
- Transport the cake carefully to your picnic location. Keep cool until serving time for the best results.
Notes
- For easier transport, frost the cake lightly (a crumb coat) before leaving home, then apply the final frosting layer once you arrive at your outdoor entertaining spot.
- Use sturdy cake boards for the base of the cake to make moving it simple.
- This cake is best served the same day it is made for optimal freshness.
Nutrition
- Serving Size: 1 slice
- Calories: 350
- Sugar: 30
- Sodium: 180
- Fat: 18
- Saturated Fat: 10
- Unsaturated Fat: 8
- Trans Fat: 0
- Carbohydrates: 45
- Fiber: 1
- Protein: 5
- Cholesterol: 75