
Oh, the aroma of a pie baking on a warm afternoon! There is simply nothing that screams summer comfort quite like a perfectly made blackberry pie. For me, baking is revisiting those quiet, cherished moments in my Grandmother Daisy’s midwestern kitchen. She never fussed with complicated gadgets; she just used honest ingredients and a lot of love. That’s exactly what this recipe is about. We aren’t aiming for fancy here; we are aiming for the quintessential, old fashioned berry pie—rich, sweet-tart, and bursting with juice, all held together by that beautiful, delicate lattice crust pie. Trust me, mastering this classic American dessert is easier than you think, and it’s the best way I know to keep Daisy’s simple, beautiful baking legacy alive right here on my counter.
- Why This Classic Homemade Blackberry Pie Recipe Stands Out
- Ingredients for the Perfect Blackberry Pie
- Mastering the Flaky Pie Crust for Your Blackberry Pie
- Preparing the Juicy Blackberry Filling for this Old Fashioned Berry Pie
- Assembling Your Lattice Crust Pie
- Crucial Steps: How to Prevent Soggy Bottom Pie
- Baking and Cooling Your Perfect Blackberry Pie
- Tips for Using Fresh vs. Frozen Blackberries
- Variations: From Crumble Topping to Pie Bars
- Frequently Asked Questions About Fruit Pies
- Serving Suggestions and Storage for Leftover Pie
- Share Your Daisy's Recipe Creation
Why This Classic Homemade Blackberry Pie Recipe Stands Out
When I talk about the best fruit pie filling, I’m not just talking about flavor—though this berry filling is perfectly sweet and tart! I’m talking about achieving that perfect sliceable texture, which is what separates a good pie from an amazing one. Daisy always taught me that a spectacular homemade blackberry pie recipe is about honoring the ingredients and nailing the foundation.
- It delivers that truly rustic fruit pie aesthetic everyone loves.
- We use a high-fat, all-butter method which gives incredible flavor to the crust.
- It stays structurally sound, letting you serve gorgeous slices without a mess. This is why I know you’ll love this version on my dessert recipes board!
The Secret to a Truly Flaky Pie Crust
It all comes down to temperature. For an unbeatable buttery pie crust, you must keep your butter brutally cold—I mean, ice cold. Those little chunks of butter melt in the oven, creating steam pockets that literally push the layers apart. That’s pure flakiness right there!
Achieving a Juicy Blackberry Filling Without Excess Liquid
Nobody wants soup pooling at the bottom of their pie plate! Our secret weapon here is simple cornstarch, which gently thickens the juices as they heat up, giving you that lush, juicy blackberry filling that holds its shape beautifully. And guess what? You don’t even need to thaw frozen berries; just toss them in straight from the freezer!
Ingredients for the Perfect Blackberry Pie
Pulling together the components for this beautiful pie is the easiest part, honestly! Just make sure you have everything ready to go before you start mixing. For the crust, I can’t stress enough: use top-quality, cold, unsalted butter. That richness is what makes the crust sing. Here is exactly what you’ll need for one show-stopping, 9-inch blackberry pie.
- 2 1/2 cups all-purpose flour
- 1 teaspoon salt
- 1 cup (2 sticks) cold unsalted butter, cut into small cubes
- 1/2 cup ice water, plus more if needed for the dough
- 6 cups fresh or frozen blackberries (if frozen, keep them frozen!)
- 1 1/2 cups granulated sugar (taste your berries before adding all of this!)
- 1/4 cup cornstarch
- 1 tablespoon lemon juice
- 1/2 teaspoon ground cinnamon
- 1 large egg, beaten with 1 tablespoon milk (for brushing on top)
- 1 tablespoon coarse sugar (for sprinkling)
Mastering the Flaky Pie Crust for Your Blackberry Pie
Alright, let’s talk about the foundation of any amazing pie—the crust! This is where Grandmother Daisy’s wisdom truly shines because we are leaning into an all-butter crust, and you can taste the difference. Remember, we want flaky, not tough! My city apartment kitchen learned this the hard way before I went back to basics. You’re going to whisk together your flour and salt first, just to get everything incorporated evenly.
Next up is the butter. It absolutely must be cold—and I mean rocks cold. Cut your cold unsalted butter into little cubes. Now, this is the moment that defines your flaky pie crust. You need to work that butter into the flour with your hands or a pastry blender until the mixture looks like coarse crumbs. My favorite visual cue is seeing some butter chunks about the size of peas still floating around in there. If everything blends into fine sand, your butter got too warm, and you’ve lost that crucial separation for flakiness!
Now, take your ice water and add it slowly, just a tablespoon at a time. You’re mixing until the dough *just* starts to grab hold of itself. Seriously, stop mixing the second it looks like it will hold together if you squeeze it. We are creating structure, not mixing bread dough. Once it’s barely together, divide it straight away into two disks, wrap them tight, and get them into the fridge.
Chilling the Dough: Why Waiting Matters
I know you’re excited about that juicy blackberry filling, but you simply cannot skip this step! We chill the dough for at least an hour, minimum. Why? Two big reasons. First, it lets the gluten—that network you developed while mixing—relax. If you roll it out now, it will fight you and snap back every time. Second, and more importantly, this chill time lets that beautiful butter firm right back up. When that super-cold butter hits the hot oven, it releases steam and creates all those lovely, tender layers that make this blackberry pie truly special. Patience here definitely pays off.
Preparing the Juicy Blackberry Filling for this Old Fashioned Berry Pie
While those pie disks are chilling out, we turn our attention to the star of the show: the berries themselves! This filling is what brings that quintessential summer feeling to your table—that perfect balance between tart and sweet that you expect from a great old fashioned berry pie. It’s surprisingly straightforward, but the thickening agent is key to keeping everything together neatly.
In a separate bowl—make sure it’s roomy because those 6 cups of berries take up space!—we gently introduce the dry goods to the fruit. You are going to combine your blackberries (fresh or frozen right out of the bag, no thawing required!) with the sugar, cornstarch, lemon juice, and just a tiny dash of cinnamon. Don’t mash up your berries when you mix, please! A gentle toss with a spatula is all you need to coat everything evenly.
Now, let’s talk about that crucial thickening agent, the cornstarch. This is what keeps your finished slice from ending up like a soupy mess. Cornstarch is magical because it hydrates and swells when heated, turning the natural berry liquids into a thick, glossy sauce that sets up perfectly as it cools. We use just enough so that when you finally pierce that golden crust, all you see inside is lush, set fruit, not a runny disaster. Because berry sugar content varies wildly, always taste your mixture before you put it into the crust; if your berries are a bit tart, add an extra tablespoon of sugar. You want vibrant flavor, not puckering faces!
Once it’s all coated and smelling heavenly, set that lovely mixture aside. We’ll pour it into our bottom crust soon, but for now, letting it sit allows the sugar to start drawing out a little bit of moisture, which the cornstarch will handle perfectly when it bakes. If you ever want to see how others handle this staple, check out this great inspiration for fresh blackberry pie!
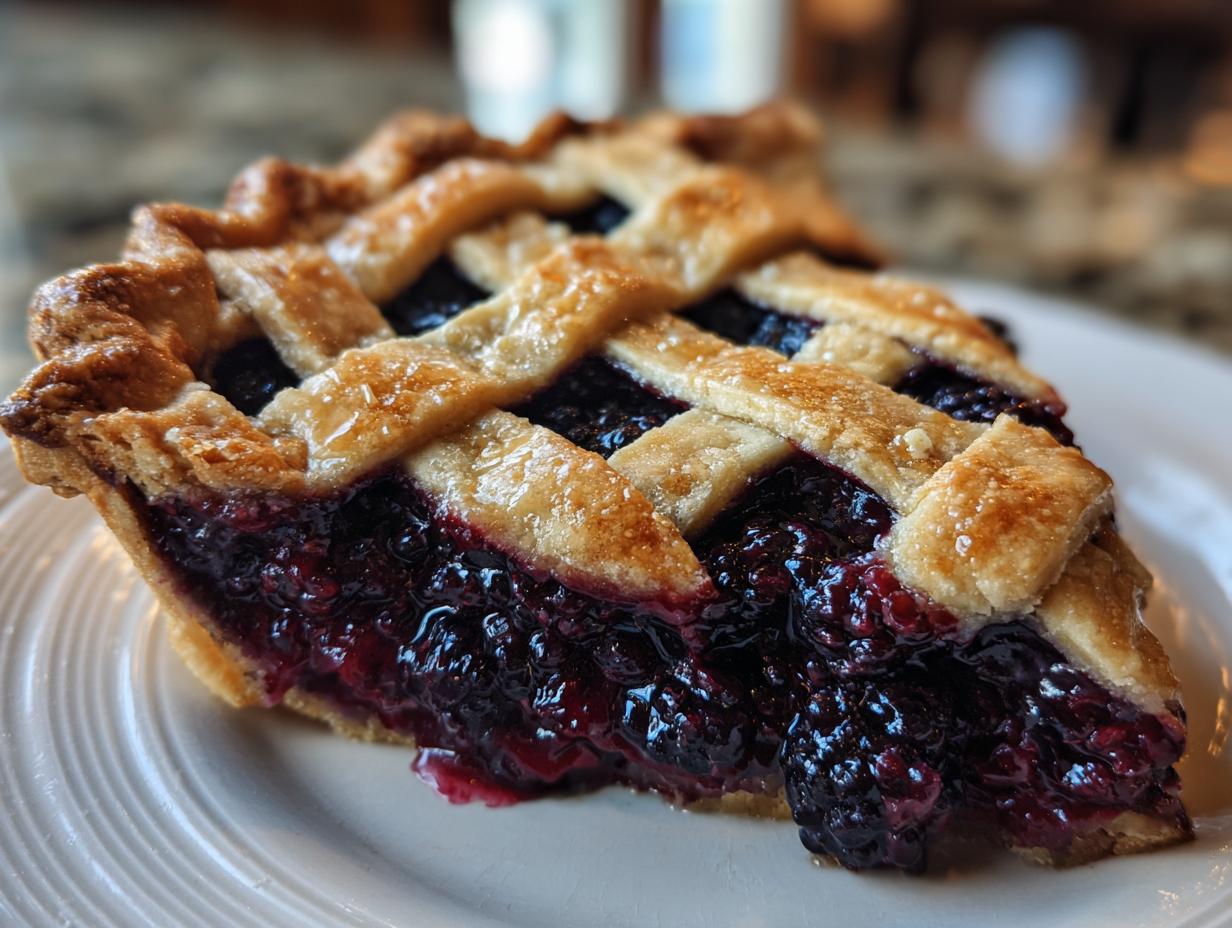
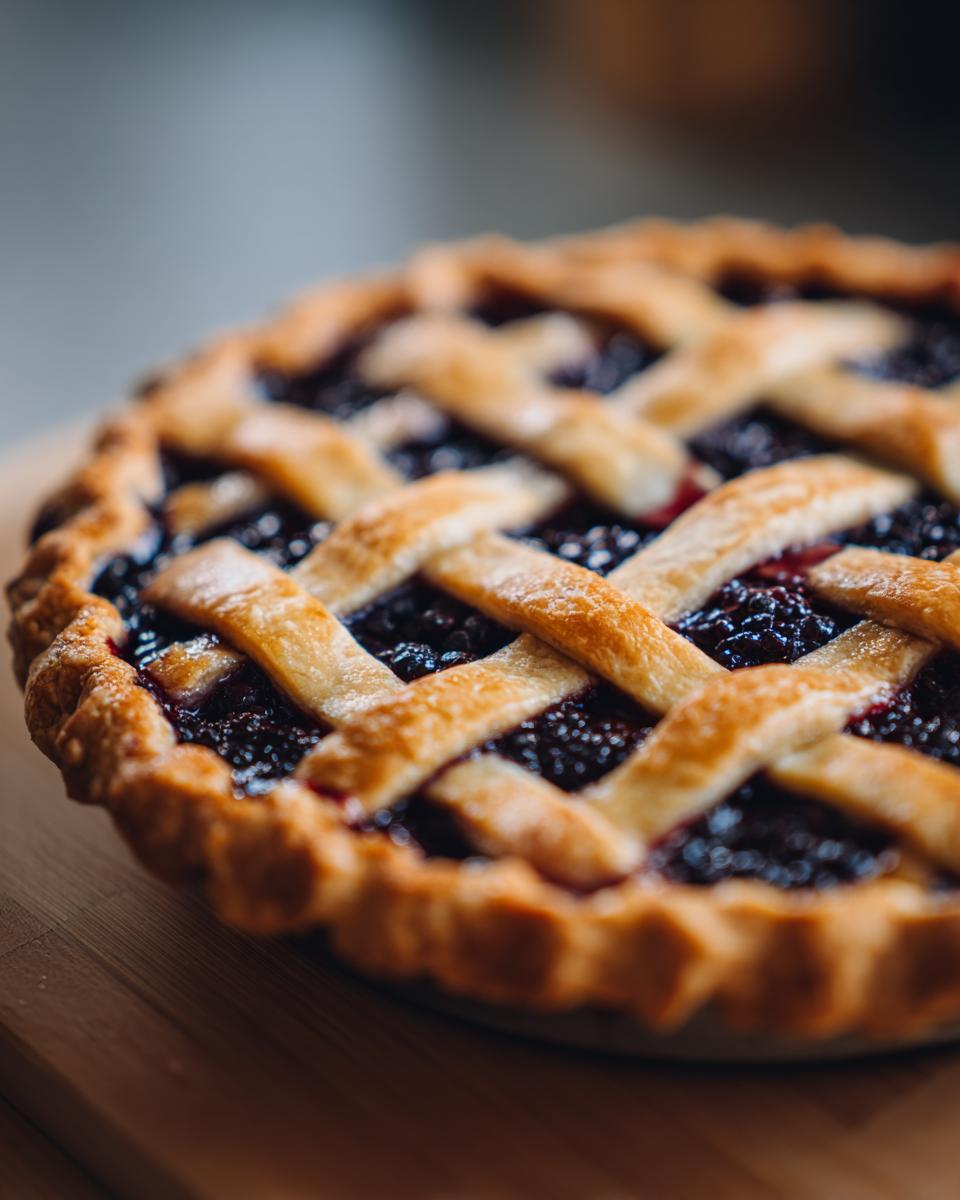
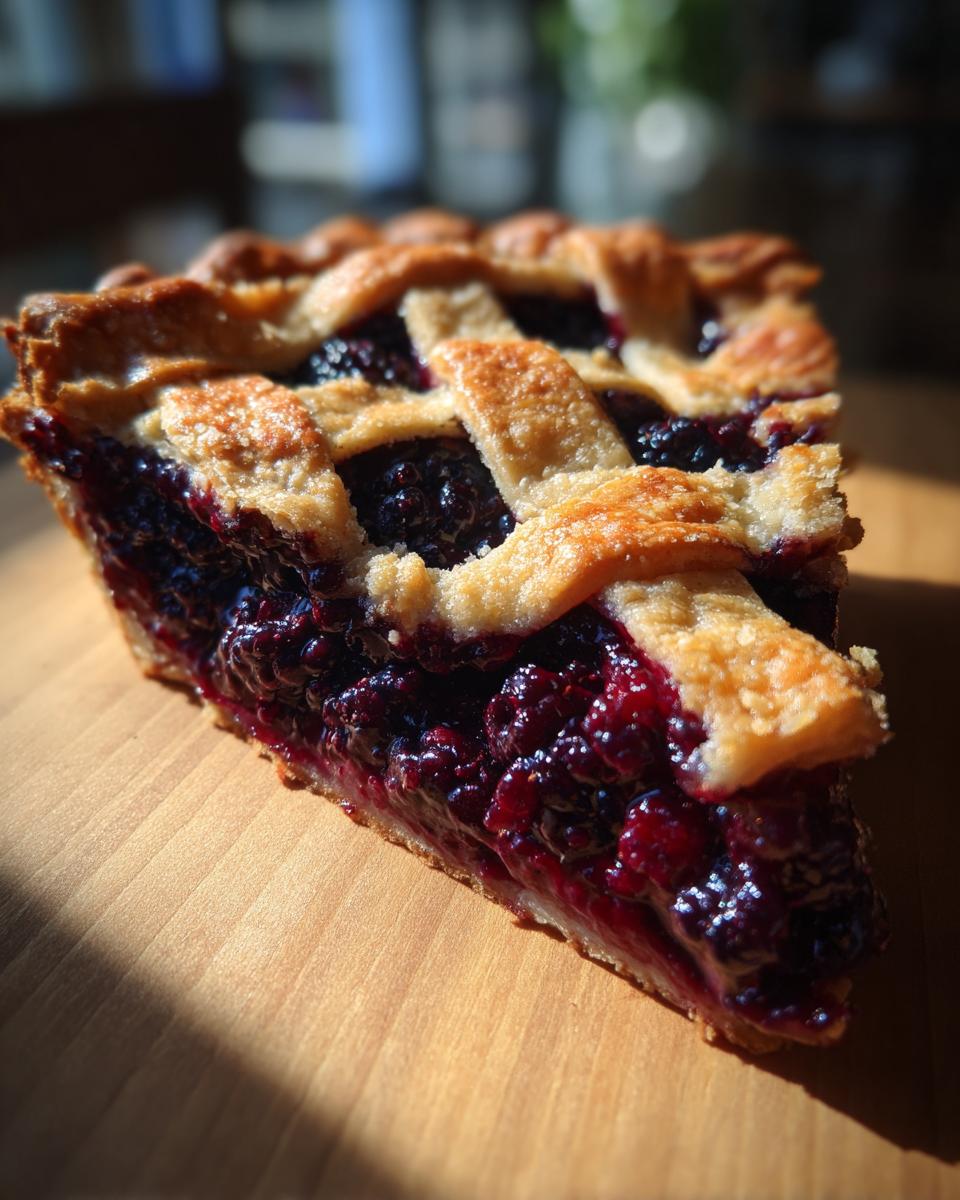
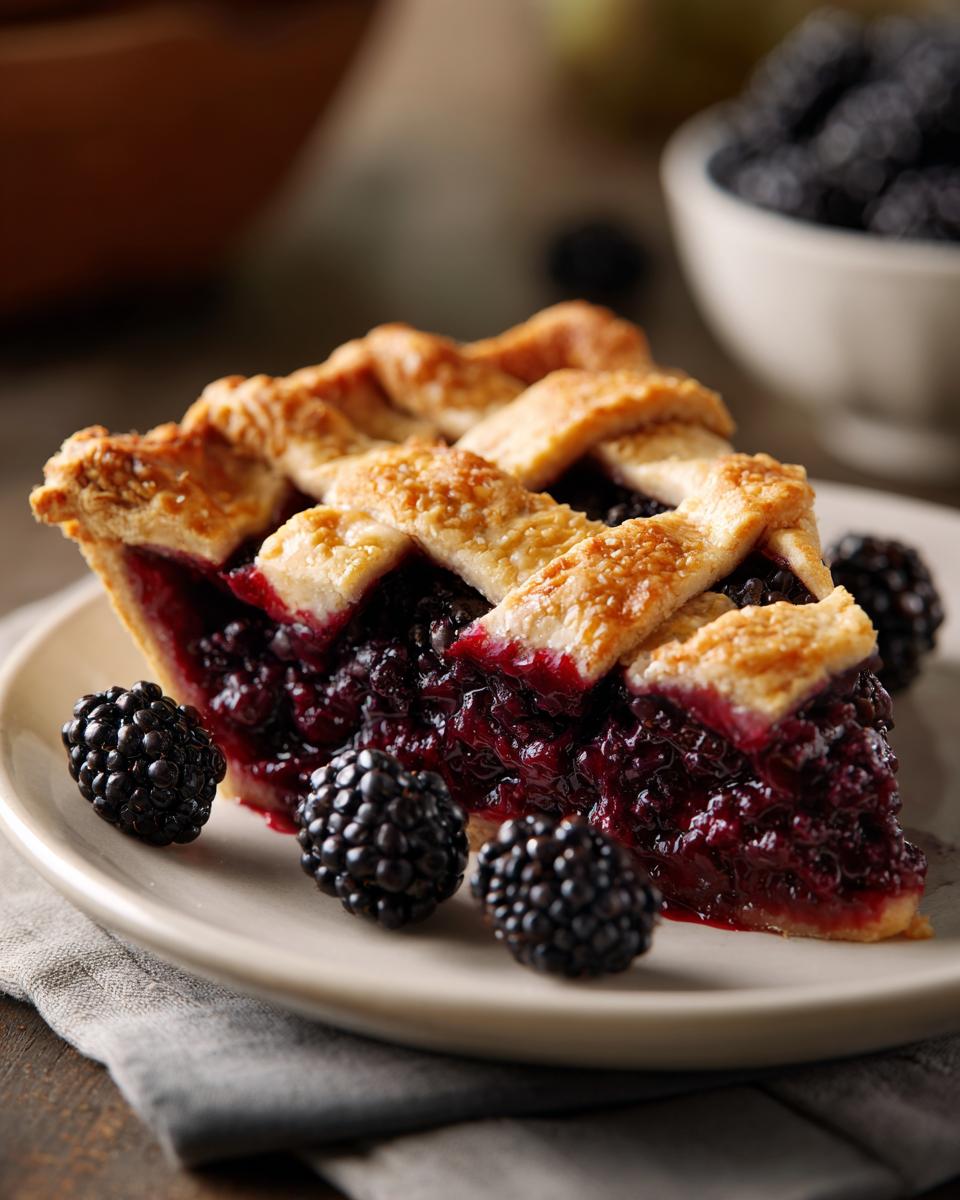
Assembling Your Lattice Crust Pie
Now we put the pieces together! This is where the pie starts looking like a real showstopper, that classic, beautiful lattice crust pie my grandmother always made. You should have your chilled bottom dough disc waiting patiently. Dust your counter lightly with flour—just a touch—and start rolling out that first disk into a circle that’s about 12 inches across. It needs to be big enough to drape generously over the edges of your standard 9-inch pie plate.
Gently fold that dough in half, then in half again like a little taco, just to make it easier to lift. Carefully place it into your pie plate. Don’t pull or stretch it! Let it settle into the bottom and sides naturally. Once it’s nestled in, trim the edges so you have about an inch of overhang past the rim. Go ahead and pop that filled bottom shell back into the fridge while we finish the top. Keeping everything cold is still the number one rule, even during assembly!
Time for the fun part: the lattice top! Take your second chilled dough disk and roll it out into another 12-inch circle. Don’t panic if it cracks a little; we can patch those later. Now, grab a sharp knife—or a pizza cutter works wonders here—and start slicing strips that are about 3/4 inch wide. Consistency is key for a tidy weave, so try to keep them all the same width.

To weave the lattice, lay about five or six strips parallel across the top of your filling going in one direction—say, north to south. Leave small gaps between them. Now, fold back every *other* strip halfway, exposing the dough underneath. Take a strip running the opposite direction (east to west) and lay it down across the center. Unfold the first set of strips back over that center strip. Next, fold back the strips you *didn’t* fold back the first time, lay down your second perpendicular strip, and unfold. Keep alternating this weaving pattern until you have a beautiful, woven top!
Once your weaving is done, trim the lattice strips so they match the overhang of the bottom crust. Now you pinch them together! Crimp the top and bottom edges tightly all the way around to seal those edges completely. This seal locks the steam in and keeps that gorgeous filling snug inside your blackberry pie.
Crucial Steps: How to Prevent Soggy Bottom Pie
This is it—the moment every baker fears: the dreaded soupy center! I’ve ruined more pies than I care to admit before I learned the secrets to a truly crisp bottom crust, especially when dealing with juicy fruit like blackberries. Grandmother Daisy always insisted that a soggy bottom wasn’t just a texture failure; it was a structural failure! We’ve got two major defenses built into this recipe to guarantee you get that beautifully golden, crisp base, saving your glorious blackberry pie from disaster.
First, after you’ve meticulously woven that gorgeous lattice top and crimped all those edges, you need another chill. That cold dough hits the heat too fast, and you risk residual warmth from your hands or the ambient air turning that bottom butter into slick grease before it can create steam pockets. So, brush the top with your egg wash, sprinkle on that coarse sugar just like the recipe says, and pop the whole assembled pie back into the refrigerator for a solid 15 minutes. Think of it as a final, bracing cold shower before the oven marathon!
Second, we tackle the heat gradient. Most ovens really blast the heat from the bottom element, which is exactly what we want to avoid when baking pastry. My technique here is borrowed straight from Daisy: we start hot and then drop the temperature significantly. Preheat your oven nice and high to 400°F (200°C). When you slide that pie in—make sure it’s sitting on a preheated baking sheet on the lowest rack, a little trick from my friends over at flaky crust recipes—we give it that initial blast for 20 minutes. This initial high heat sets the crust quickly.
After those 20 minutes, you must drop the temperature down to 375°F (190°C) for the remainder of the baking time. This lower, slower bake allows the heat to penetrate deeply, cooking the syrupy blackberry filling through and gently setting the bottom crust without burning the edges or letting that butter liquefy before it can steam. Keep an eye on the edges, though! If those pretty crimped borders start getting too dark before the filling is bubbling thickly in the middle, just grab a ring of aluminum foil and shield the edges loosely. That’s how we achieve the perfect result for how to prevent soggy bottom pie!
Baking and Cooling Your Perfect Blackberry Pie
We’ve prepped, we’ve chilled, and we’ve battled the dreaded soggy bottom—now it’s time for the magic to happen! Baking your blackberry pie involves those gentle temperature dips we talked about, but you’ll know when it’s truly done in two important ways. First, look for that deep, gorgeous golden brown color on your lattice work. It should look rich, not pale. Second, and this is the indicator that the filling is ready, you must see the filling actively bubbling up through the slits in the top crust. And I don’t mean a little simmer; I mean thick, slow, heavy bubbles. That’s the cornstarch doing its job and thickening up all those lovely blackberry juices!
As the instructions lay out, we blast it at 400°F for 20 minutes so that bottom crust sets hard. Then, we gently drop the oven down to 375°F for another 35 to 45 minutes. If you see those edges getting too dark too soon, just wrap them gently in foil; they’re sensitive! Once it looks done—beautifully colored and vigorously bubbling—carefully pull that rustic fruit pie out of the oven.
Now, this next part is the hardest thing you’ll have to do all day, but you absolutely cannot skip it. You must let the pie cool completely on a wire rack. I mean it—we’re talking at least four full hours, though overnight is truly best. I know that warm pie is calling your name, especially when topped with vanilla ice cream, but slicing into it too soon is the number one way to ruin all our hard work! The filling needs that extended cooling time to fully set, turning from hot liquid to that perfect, sliceable, sweet tart berry dessert consistency we worked so hard for. If you cut it early, everything runs out, and all that texture we fought for disappears. Be patient; that final cooling stage locks in its perfection.
Tips for Using Fresh vs. Frozen Blackberries
One of the best things about making this blackberry pie is that it doesn’t really care whether you picked the berries yesterday or pulled them from the deep freeze! This makes it the perfect comfort food pie year-round, not just when the black raspberries are in season. But since the berry preparation is slightly different, I want to make sure you know exactly what to do depending on what you have on hand. This flexibility keeps this recipe an easy summer baking idea, even when the season is long gone!
Starting with the crust, remember what I said about keeping the butter for the buttery pie crust secrets—that applies no matter what. The berries themselves are where we adjust things slightly. If you are lucky enough to have a huge haul of fresh, ripe berries, that’s wonderful! Just make sure you wash them *very* gently and pat them completely dry before tossing them with the sugar and cornstarch. Excess surface water is really the enemy of a good filling texture.
Now, if you’re using frozen blackberries—and please, don’t even think about thawing them first!—you get a huge advantage. In my notes for the recipe, I mentioned that frozen berries help maintain structure. When you use them straight from the freezer, they stay colder longer during assembly, helping keep your dough colder too! Plus, they tend to release their liquid a bit slower during the initial bake compared to room-temperature fresh berries. The cornstarch definitely handles the moisture from both sources, but throwing them in frozen ensures you don’t accidentally end up with too much liquid for your blackberry pie filling.
Whether you use them fresh or frozen, the ratio of the other ingredients—the sugar, the lemon juice, the cinnamon—stays exactly the same. The goal remains the same: a vibrant, delicious, no fail pie recipe that tastes just like Grandmother Daisy intended. It shows you how resourceful a good baker has to be!
Variations: From Crumble Topping to Pie Bars
Listen, while this recipe is designed to be the ultimate classic American dessert—that perfect double-crust, woven lattice dream—I know sometimes you just don’t feel like wrestling with pie dough, or maybe the mood strikes for something baked in a square pan! That’s perfectly fine in Daisy’s book; she always said a good baker knows how to pivot based on the day’s energy. Don’t let tradition stop you from enjoying these berries!
If you adore the flavor but aren’t feeling up to the lattice work today, you can easily convert this into a beautiful, rustic fruit pie scenario by switching out the top crust for a quick streusel. You just toss out step 4 entirely. Instead of weaving strips, you make a simple blackberry crumble topping. It usually involves just combining flour, some brown sugar, and cold butter until you have coarse, buttery crumbs. Sprinkle that generous layer right over your filling, brush it with a little egg wash if you want it extra golden, and bake it exactly as directed. It gives you a fantastic textural contrast—crunchy topping meeting that soft, juicy center.
And what about those times you need something easy to pack for a picnic or cut into squares for a potluck? We can pivot that filling right over into blackberry pie bars! This is where you’ll want to use a 9×13 inch pan instead of a pie plate. For the bars, you typically press about two-thirds of your chilled crust dough into the bottom of the pan as your base layer. Then, you pour right over that gorgeous, thickened blackberry filling we already perfected. You’ll use the remaining dough either cut into strips for a quick lattice top for the bars, or you can crumble it right over the top to make a sort of hybrid between a crumble and a bar!
The best part? Since the filling base—the sugar, cornstarch, and berries—is already balanced for set-up, it works perfectly whether it’s cradled in a round crust or baked flat in a pan. You’ll find those instructions covered in more detail over on my delicious dessert recipes hub if you decide to go the bar route next time. It’s all about getting those amazing summer berries into your belly in the easiest, most delicious way possible!
Frequently Asked Questions About Fruit Pies
I get so many questions about pies now that people are trying out this homemade blackberry pie recipe! It’s completely understandable; pies can seem intimidating, but once you understand a few simple rules—especially about temperature—you’re golden. Here are a few things I hear all the time when folks are tackling baking these delicious summer berry desserts.
Can I make this blackberry pie ahead of time?
Yes, you absolutely can, and it’s a great strategy for big gatherings! I find that this blackberry pie is actually better the next day because the filling has fully set up. If you bake it the day before serving, just store it loosely covered at room temperature for up to 24 hours. If you need to store it longer than that, definitely move it into the fridge, but let it sit out on the counter for about an hour before serving so the crust softens up just a touch. You want that buttery crust to still hold its own against that thick filling!
What is the best sugar substitute for this berry filling?
This is tricky because sugar doesn’t just provide sweetness in a pie; it helps the juices thicken correctly! If you use a zero-calorie sweetener, you will almost certainly need to increase the cornstarch because those substitutes don’t hold moisture the way actual sugar does. If you want a substitute, I recommend using half the sugar called for and using coconut sugar or maple syrup, but you’ll need to add an extra tablespoon of cornstarch to compensate for the extra moisture and ensure you don’t end up with a runny mess. For the best results in this classic American dessert, stick to the granulated sugar if you can.
My crust edges burned; what should I do next time?
Oh, that happens to the best of us! If you find your pretty crimped edges are browning way faster than the rest of the pie—usually around the 30-minute mark—it means your oven is directing too much heat to the exposed crust surface. Next time, when you assemble the pie, take a long strip of aluminum foil, fold it over so it’s about an inch wide, and gently wrap it around the entire circumference of the pie plate only. It shields the delicate edges from that direct heat while allowing the center of the filling to finish cooking. It’s a simple trick that keeps those beautiful edges from turning charcoal, which is important when you’re aiming for that perfect flaky pie crust!
Serving Suggestions and Storage for Leftover Pie
Whenever I pull my blackberry pie out of the oven, I swear the whole house smells like a summer picnic, even if it’s the middle of winter! Now that you’ve waited those agonizing four hours for it to set—which, I hope you did!—it’s time to serve it up. There’s no wrong way to enjoy this classic, but I always have a couple of favorite ways I like to serve it that just elevate the whole experience.
The absolute classic way, the one Daisy always served it, is warmed slightly with a big, glorious scoop of high-quality vanilla bean ice cream melting right down the sides. The cold creaminess contrasts perfectly with that sweet-tart filling. If you aren’t into ice cream, a dollop of freshly whipped heavy cream—maybe sweetened just a tiny bit with vanilla extract—is just as wonderful. If you were feeling extra fancy for a holiday gathering, a thin drizzle of caramel sauce over the top of the lattice can be divine. It pairs beautifully with the molasses notes from the bottom crust.
Now, let’s talk about leftovers, because sometimes, miraculously, there are slices left over! As I mentioned in the FAQs, this pie is actually better on day two because that filling is fully settled. If you have leftovers, store them loosely covered at room temperature for up to 24 hours. Because the filling is thickened with cornstarch, it tends to hold up just fine sitting out on the counter, and the crust stays softer that way.
If you need to keep it longer than a day, or if your kitchen is just too warm and humid, put it in the refrigerator. Make sure you cover it well—I use a cake dome or just tent it loosely with foil so it doesn’t dry out. When you pull a refrigerated slice out, never cut it cold! Let it sit on the counter for about an hour before you plan to eat it. That little bit of time lets the crust soften back up from that chilly fridge air. If you *must* have it warm, zap a single slice in the microwave for about 10 to 15 seconds—just enough to warm the filling slightly without overheating the butter in the crust. Enjoy every last bite of that beautiful homemade blackberry pie recipe!
Share Your Daisy’s Recipe Creation
It warms my heart so much when I hear from you all after you’ve tried one of these treasured recipes. Making this blackberry pie isn’t just about following steps; it’s about recreating that feeling of home and tradition that Daisy poured into everything she baked. When you pull that perfectly golden, woven crust out of the oven, I want to see it!
So please, once you’ve let your pie cool—and I know that part is tough!—come right back here and leave me a rating. Five stars if it tasted like Grandma’s kitchen, but honestly, any feedback helps me adjust the notes for the next cook!
Did the lattice weave give you trouble? Did you try the crumble topping instead? Are you sharing it at a summer cookout? Drop all those details in the comments section below. Knowing how you adapted this classic American dessert for your own family celebrations is the best gift you can give back to Daisy’s legacy. If you snap a picture of your beautiful slice, tag me on social media! I absolutely love seeing your creations come to life. And if you have specific questions that weren’t answered here, feel free to reach out to me directly via my contact page, and we can troubleshoot together. Happy baking, everyone!
PrintClassic Homemade Blackberry Pie with Flaky Lattice Crust

This recipe guides you through making an old-fashioned blackberry pie featuring a juicy, sweet-tart filling and an all-butter, flaky crust. We include a method to prevent a soggy bottom, making this a showstopper dessert.
- Prep Time: 45 min
- Cook Time: 55 min
- Total Time: 100 min
- Yield: 8 servings 1x
- Category: Dessert
- Method: Baking
- Cuisine: American
- Diet: Vegetarian
Ingredients
- 2 1/2 cups all-purpose flour
- 1 teaspoon salt
- 1 cup (2 sticks) cold unsalted butter, cut into small cubes
- 1/2 cup ice water, plus more if needed
- 6 cups fresh or frozen blackberries (do not thaw if frozen)
- 1 1/2 cups granulated sugar (adjust based on berry sweetness)
- 1/4 cup cornstarch (for thickening)
- 1 tablespoon lemon juice
- 1/2 teaspoon ground cinnamon
- 1 large egg, beaten with 1 tablespoon milk (for egg wash)
- 1 tablespoon coarse sugar (for sprinkling)
Instructions
- Prepare the Pie Crust: In a large bowl, whisk together the flour and salt. Cut in the cold butter using a pastry blender or your fingers until the mixture resembles coarse crumbs with some pea-sized pieces of butter remaining. Gradually add the ice water, one tablespoon at a time, mixing until the dough just comes together. Do not overmix. Divide the dough in half, flatten each half into a disk, wrap in plastic, and chill for at least 1 hour.
- Prepare the Filling: In a separate bowl, gently combine the blackberries, granulated sugar, cornstarch, lemon juice, and cinnamon. Toss lightly until the berries are evenly coated. The cornstarch is your secret to a perfectly set, juicy blackberry filling.
- Assemble the Bottom Crust: On a lightly floured surface, roll out one disk of dough into a 12-inch circle. Carefully transfer the dough to a 9-inch pie plate. Trim the edges, leaving a 1-inch overhang. Place the pie plate in the refrigerator while you prepare the top crust.
- Create the Lattice Top: Roll out the second disk of dough. Cut the dough into even strips, about 3/4 inch wide. Weave the strips over the filling in a lattice pattern. Trim the overhang and crimp the top and bottom crust edges together to seal.
- Prevent a Soggy Bottom: Place the assembled pie on a baking sheet (to catch drips). Brush the entire lattice top with the egg wash and sprinkle with coarse sugar. Chill the pie for 15 minutes before baking.
- Bake the Pie: Preheat your oven to 400°F (200°C). Place the baking sheet with the pie on the lowest rack of the oven. Bake for 20 minutes at 400°F. Then, reduce the oven temperature to 375°F (190°C) and continue baking for another 35 to 45 minutes, or until the crust is deep golden brown and the filling is bubbling thickly. If the edges brown too quickly, cover them loosely with foil.
- Cool Completely: Remove the pie from the oven and place it on a wire rack. You must let the pie cool for at least 4 hours, or until the filling is completely set, before slicing. This step is crucial for a non-runny filling.
Notes
- For an all-butter, flaky pie crust, keep all ingredients very cold. The visible pieces of butter create steam pockets, resulting in flakiness.
- If you prefer a crumble topping over a lattice crust, skip step 4 and prepare a simple streusel topping using flour, brown sugar, and cold butter.
- If using frozen berries, do not thaw them first. This helps maintain the structure of the fruit and prevents excess liquid from making your filling watery.
Nutrition
- Serving Size: 1 slice
- Calories: 420
- Sugar: 35g
- Sodium: 250mg
- Fat: 24g
- Saturated Fat: 15g
- Unsaturated Fat: 9g
- Trans Fat: 0g
- Carbohydrates: 52g
- Fiber: 4g
- Protein: 5g
- Cholesterol: 60mg